Dipping My Big Toe Into Cross-Tenant Synchronization Part I
Part I - I have a very big Big Toe!!!
So, I am very interested in What cross-tenant synchronization is and what it could do for me and maybe for customers? Since I have a number of tenants I thought it would be good to at least try this preview feature and blog about my experience.
Also, this blog originally started out as a single blog but as I started to write it it grew and grew and grew. I wanted to refocus myself and break it up into smaller parts. The first part will focus on a single source to a single target topology. That is all explained below.
So let me dive into my experience, good or bad?
Topics Covered in this blog:
- What is Cross-Tenant Synchronization?
- What are the prerequisites
- Topology Planning
- My Environment
- Deployment
- Defining User Scope for Provisioning
What is Cross-Tenant Synchronization?
According to the Microsoft Learn documentation:
Cross-tenant synchronization automates creating, updating, and deleting Azure AD B2B collaboration users across tenants in an organization. It enables users to access applications and collaborate across tenants, while still allowing the organization to evolve.
Here are the primary goals of cross-tenant synchronization:
- Seamless collaboration for a multi-tenant organization
- Automate lifecycle management of B2B collaboration users in a multi-tenant organization
- Automatically remove B2B accounts when a user leaves the organization
Prerequisites
So I found that there are of course some perquisites required. The biggest one is that all tenants will been to be licensed for Azure AD Premium P1 or P2. So on a few of my tenants I had to enable the trial of Azure AD Premium P2.
The following roles will be needed for the Source tenant:
- Security Administrator Role
- Hybrid Identity Administrator Role
- Cloud Application Administrator or Application Administrator Role
The following roles will be needed for the Target tenant:
- Security Administrator Role* Security Administrator Role
There is of course some planning that is needed. However, I like to jump in and drive first, when it comes to learning new technologies.
- I need to define our topology/structure of our tenants.
- The Microsoft documentation says I need to learn how provisioning service works. I think I will do that as I keep moving forward and then go back and read about it?
- I will need to determine which of my users will be in scope for provisioning.
- Then I need to figure out what data I need to map between tenants.
All this is available to read more about on the Microsoft Learn Documentation for Planning Your Provisioning Deployment.
Topologies Planning
Topology
My environment for testing will consist of a few tenants. So I have a few choices on how I can configure the my topology. For example:
- Single Source with a single target
- Single Source with multiple targets
- Multiple sources with a single target
- Mesh peer-to-peer
For testing I wanted to see what I could do. Single source with a single target seemed easier but I was curious. I also needed to educate myself for future customer engagements so I wanted to try a more advanced topology.
The Mesh peer-to-peer really had my attention. This topology would work great for organizations that need to have users flow across all tenants and enable people to access applications and resources in both directions.

The other three are pretty much one way synchronization. Which means users in Tenant A will have access to resource in Tenant B but not the other way around.
So Single source with a single target would be great for customers who want to have or manage all their users in Tenant A but have access to resources in Tenant B.

The same with single source with multiple targets. An organization may have multiple tenants but they just want to manage identities from Tenant A and have users sync to Tenant B, Tenant C, and Tenant D, etc. so they would have the same access to services in those tenants.

The last, multiple sources with a single target would work the opposite in some sense. An example here would be that users in tenants B, Tenant C, and Tenant D would need access to the parent Tenant A.

Now, at least up until this point this is what my understanding of all these topologies are. As I document this and actually configure this solution I may learn that my assumptions are wrong.
So, I will try and deploy a Mesh peer-to-peer topology however, I have decided to split up my blogs into various parts. So Part I will be about configuring two tenants as a single source and single target. From there I will continue to grow this experiment and convert that single source and single target into a mini Mesh deployment. I will also try and blog about using the Portal and also using Graph API to accomplish all this.
My Environment
I happen to have 4 tenants that I can use:
- Sheep and Cows (this is a good story. Ask me about it.)
- Country Cloud Boy (May explain a little bit about Sheep and Cows?)
- Living On The Edge
- This Is My Demo
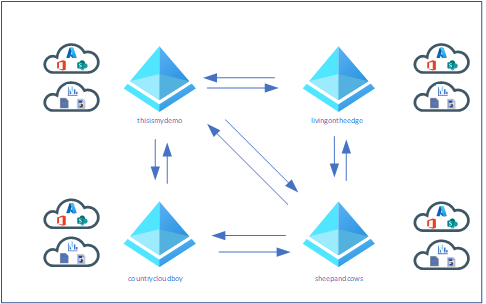
Below is what my topology should look like when I am done.
For Part I the topology will look like this:

The Deployment
So I am going to jump in and start driving… I am hoping things go well? After all, this is a learning experience so I won’t make stupid mistakes later.
So we start in the target tenant. I am going to start with one of my tenants I really don’t use a lot and move forward with the rest later in other parts of this blog.
There are two ways that we can configure cross-tenant synchronization. Either from the Azure portal or from Graph API. I am planning to do the first target and source with the portal then maybe doing the rest or at least one tenant source and target using Graph API.
Sheep and Cows / Country Cloud Boy Tenants using the Portal
As mentioned before, I will be doing this first set of tenants using the portal. My target will be my sheepandcows.onmicrosoft.com tenant and my source tenant will be my countrcloudboy.onmicrosoft.com tenant.
Target Tenant Configuration - User Synchronization Enablement
To enable user synchronization on my target tenant, sheepandcows.onmicrosoft.com, I did the following:
- From the portal, I logged in as an account that meets all the prerequisites mentioned above.
- I then selected Azure Active Directory and then External Identities.
- On the blade to the left I selected Cross-tenant access settings.
- I then selected add organization and then typed in my source tenant which right now is going to be countrycloudboy.onmicrosoft.com and clicked Add.

- My source tenant now shows in the list under organizations found. Here I clicked on Inherited from default under Inbound access.
- On the page that popped up I selected Cross-tenant sync (Preview) on the menu at the top. Then I put a check in the Allow users sync into this tenant check box. Then of course I hit save at the bottom.

Target Tenant Configuration - Configure automatic redeem Invitations
I am still in some ways following the Microsoft Learn documentation at this point. This step is allow the automatically redeem invitations so users from the source tenant don’t have to accept the prompt. This will be configured on both the source and the target.
This was really easy, to accomplish this I did the following:
- On my target tenant, sheepandcows.onmicrosoft.com, on thee same Inbound access settings page I was already on, I clicked the Trust settings tab.
- Here I placed a check next to Suppress consent prompts for users from the other tenant when they access apps and resources in my tenant check box. Then I clicked Save.

Source Tenant Configuration - Automatically redeem invitations
The following are the steps I followed for this step:
- I signed on to the countrycloudboy.onmicrosoft.com tenant as a user with the proper rights as mentioned above.
- I went back to Active Directory and External Identities.
- Then selected Cross-tenant access settings.
- Again, like the target tenant, I selected Organization settings and then I clicked on Add organization.
- For the target I added sheepandcows.onmicrosoft.com then I clicked Add.

- Here instead of clicking on Inherited from default under Inbound access, I needed to click on inherited from default under Outbound access.
- Then click Trust settings, and placed a check in the Suppress consent prompts for users from my tenant when they access apps and resources in the other tenant check box. Then click Save.

Source Tenant Configuration - Create a configuration
In my source tenant, countrycloudboy.onmicrosoft.com, the following steps I took:
- From Azure Active Directory, I clicked on Cross-tenant synchronization (Preview). Then clicked Configurations.
- Here it asked me to provide a name for my configuration. I hadn’t really thought of one so I decided to use This Is My Demo Production. Then I clicked Create.

The documentation said it should take about 15 seconds for the configuration to show but mine took about a minute.
Source Tenant Configuration - Testing Connection to Target Tenant.
Again from my source Tenant, countrycloudboy.onmicrosoft.com I did the following steps:
- From Active Directory clicked on Cross-tenant synchronization, then selected Configurations.
- From the This Is My Demo Production configuration, I selected Provisioning under the Manage menu.
- Here I changed Provisioning Mode from Manual to Automatic. Under Admin Credentials, Authentication Method needed to be set at Cross Tenant Synchronization Policy. Then I needed to add my target tenant, sheepandcows.onmicrosoft.com, tenant id.

- Here I needed to click Test Connection.
Oh what the flying cows???? I got the following error:

Fortunately the troubleshooting section had the error and had a solution?
However, I wasn’t too sure. It says the cause of the error indicates that the policy to automatically redeem invitations in both the source and target tenants wasn’t setup. However, I am pretty sure I did.
The solution is te repeat the stepsAutomatically redeem invitations in both the target and source.
The first thing I did was look in the target tenant settings:
- sheepandcows.onmicrosoft.com Active Directory, then External Identities, then Cross-tenant access settings.
- Here I clicked on Inherited from default under Inbound access and then I selected Trust settings.
I was a little shocked to see that there was no check in the check box next to Suppress consent prompts for users from the other tenant when they access apps and resources in my tenant. I had sworn I had did this. I must not have hist save? So I checked it again and hit save.
This time, I noticed that it went from inherited from default to Configured under Inbound Access.
Here is a hint at least I think it may be a hint. Since I am doing a Mess topology, I am going to assume that I will be doing the same under Outbound Access as well. But we will wait until I get there before I find out if my assumptions are correct. You do know what assume means? :)
Just to double check, I went back to the other settings to make sure it said configured as well. This one said Configured so I think I just forgot to hit save on the inbound access.
Now back to our test……
After hitting Test Connection we have a successful test.

At this point I clicked Save and made sure I clicked Save. This started the process for Updating user provisioning settings.

Once this was successful, I saw two more sections pop up called Mappings and Settings. At this time I just closed this window to move on the the next steps.
Defining User Scope for Provisioning
For this section everything is configured from the Source tenant which is countrycloudboy.onmicrosoft.com. We are going to define who will be provisioned. This will be done either by attributes of the user or assignment to the configuration.
The documentation says to start small. However, if you don’t go big then you shouldn’t show up or something like that? Kidding, this is a non-production environment anyway. I also only have about 2 users in each of these tenants anyway. So I will go big and include everyone.
To start the documentation had me following the tasks:
- I went back to Azure Active Directory, then Cross Tenant Synchronization. Clicking on Configurations I then clicked on the Configuration created earlier, This Is My Demo Production.
- From the This Is My Demo Production configuration, click on Provisioning and then I expanded Settings.
- Here I can set the scope of the provisioning. In most cases you would pilot this and only select a specific group of users for testing. For my blog, I kept the default scope, Sync only assigned users and groups, so I can mimic what I may need to do in a customer environment.
- I also added my email to get notifications if a failure occurs.
- There is section to prevent accidental deletion of users and groups as well.
- Next click on Users and Groups. This is where I will add a group I created with my test users for provisioning. Once selected I clicked Assign.

There is another step that could be taken to include scoping filters on who has been defined for provisioning. This would assist in further limiting which users I would sync. This can be done using attributed-based scoping filters. At this time I wouldn’t do anything with attribute mapping but I may in other parts of this blog.
However, it would be good to at least look at the Attribute mappings to better understand what data is flowing between the source tenant and my target tenant.
Testing My Provisioning Configurations
So, now from what I understand, everything is ready for testing. Cross my fingers that things will work. :
Following the Microsoft Learn documentation I am going to do an on-demand provisioning test on one of my users.
- First I went back to my This Is My Demo Production configuration. Next click on Provision on demand just under Overview.
- I searched for one of my test accounts using the Select a user or group field.

- I then hit Provision and waited and waited and waited as it first ran validations.

From what I understand it worked. I will read more on why it skipped those actions. To double check, I went over to sheepandcows.onmicrosoft.com. This time I didn’t log on to my tenantadmin@sheepandcows.onmicrosoft.com account. I just switched directories using my tenantadmin@countrycloudboy.onmicrosoft.com. This was one sign that my provisioning worked. The next sign was seeing the account in that tenants Active Directory.

So now I know that provisioning is configured correctly. Time to move forward with my next steps which is starting my provisioning job and monitoring the provisioning job.
Enabling the Provisioning Job and Monitoring
This step was quick and easy. I logged back on to my source tenant, countrycloudboy.microsoft.com.
- Going back to Azure Active Directory then Cross-Tenant synchronization, I selected the configuration, This Is My Demo Production, and then on the overview screen I clicked Start Provisioning.

This is also where I would monitor provisioning. I can check audit logs and provision logs here.
The Rest of the story…
At this point I have successfully configured Cross-Tenant synchronization between my countrycloudboy.onmicrosoft.com tenant and my sheepandcows.onmicrosoft.com tenant. This topology right now is configured as a single source, single target design. In future parts of this blog, I will add more tenants and configure everything as a Mesh topology. I will also try using Graph API to configure my other tenants. So I end this blog with the following configuration:
My users in my countrycloudyboy.onmicrosoft.com now will be synced to my sheepandcows.onmicrosoft.com tenant and have the same access to my Microsoft and Non-Microsoft services and applications. This sync right now is only one way. This I will change in future blogs as well to allow synchronization both directions.
