Azure Stack HCI - Part VI - Using The Windows Admin Center To Deploy A Cluster
This is a series of blogs about my experiences with Azure Stack HCI
In this blog series I plan to blog about everything I know about Azure Stack HCI. So, it should be a very short blog series. Just kidding. Again, I tend to blog about subjects that I am currently working on or will be currently working on. So, Azure Stack HCI is fresh on my mind again these days.
The last few blogs I have talked about deploying a single-node cluster and then how to scale that single-node cluster to a two-node cluster, then again on how to add a third-node and more to that existing cluster. We also did everything in PowerShell. This blog will be my last blog on how to deploy an Azure Stack HCI cluster but I wanted to show how to do it using Windows Admin Center.
So, this is what I will cover in this blog. I hope you enjoy!
Overview
Thanks and Praise
The first thing I would like to do before I start is again give credit to Dell’s own Matt McSpirit and Jaromir Kaspar. I have done this in the past but I really am thankful to the work they have already accomplished.
Jaromir is the creator of MSLab. MSLab is the base for the Hybrid Jump Start I used to deploy my Azure environment. Hybrid Jump Start was created and being worked on by Matt McSpirit. A lot of my knowledge comes from there two gentlemen. Then of course, a lot of my references will come from Microsoft Learn documentation on Azure Stack HCI. There is also a Slack Channel dedicated to Azure Stack HCI that I pull some information from as well.
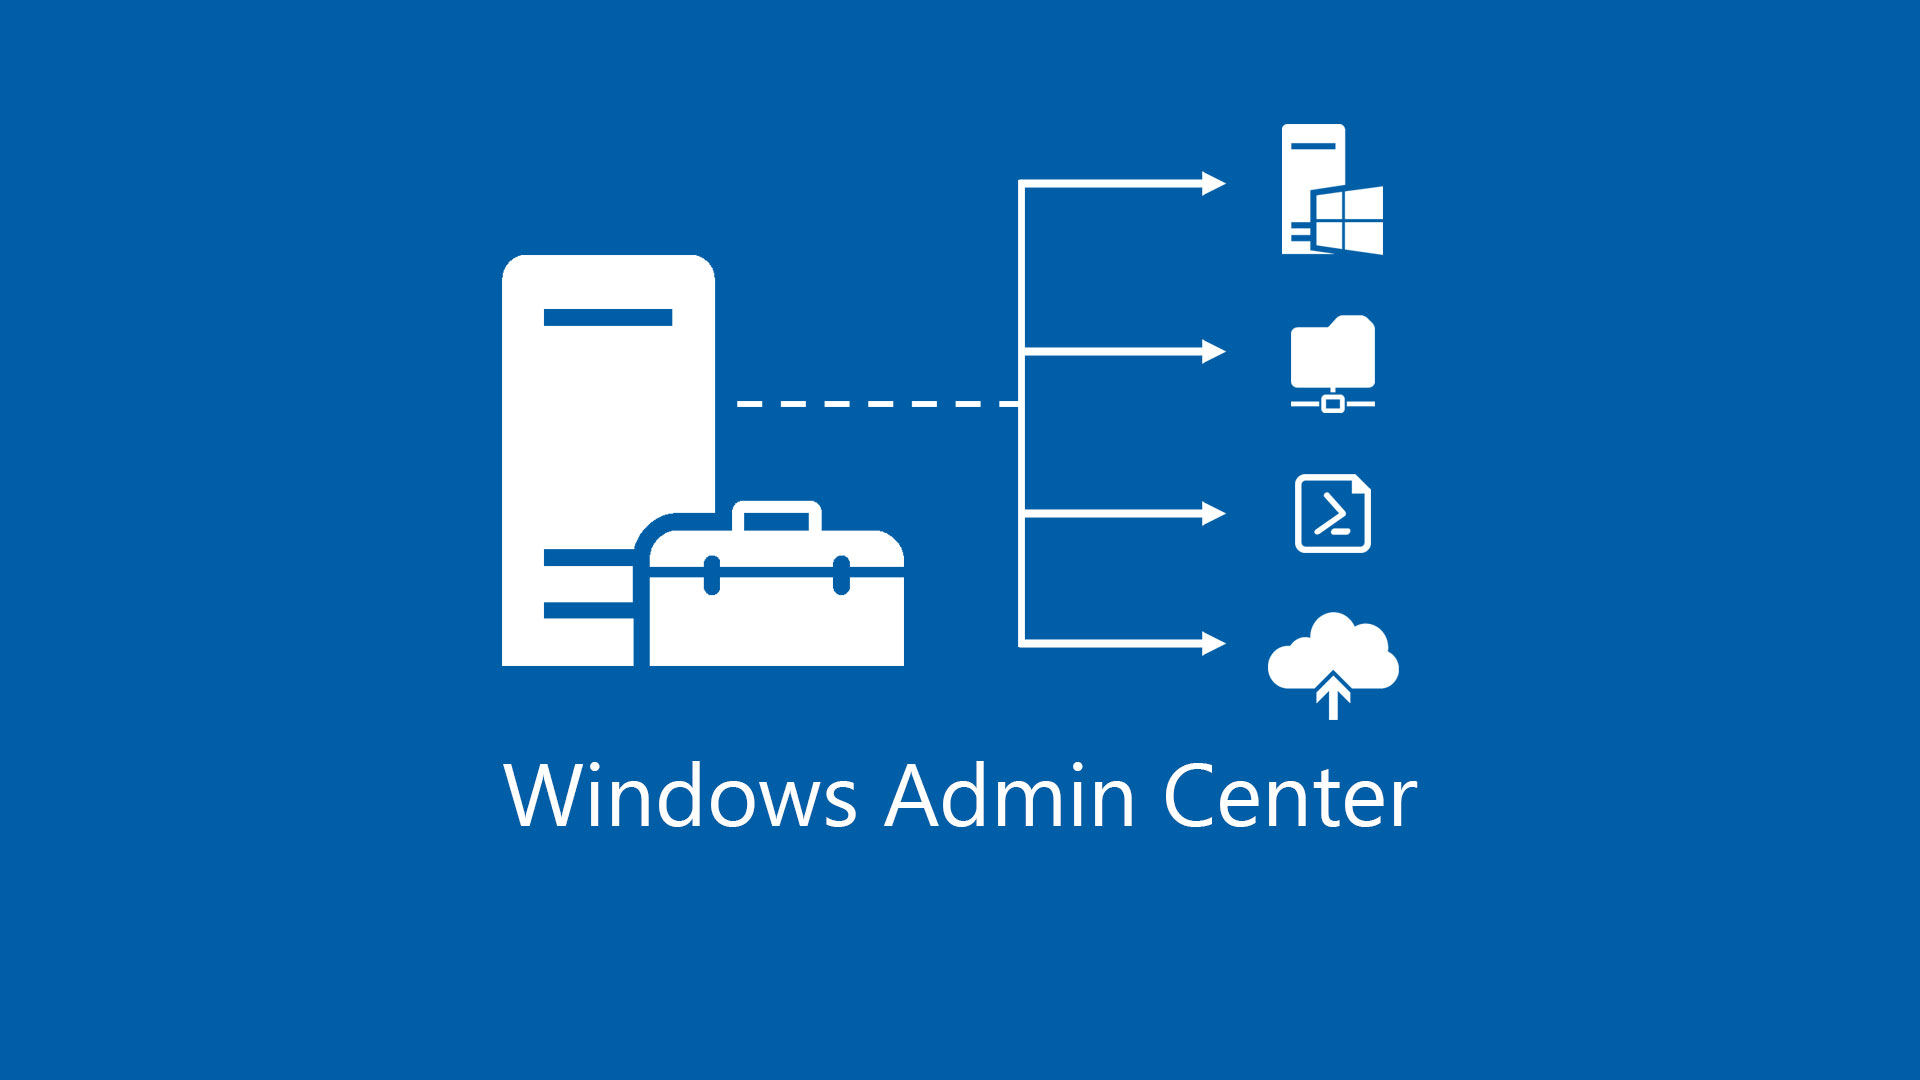
Windows Admin Center
Since we are deploying our Azure Stack HCI Cluster using Windows Admin Center it would be a good idea to have our Windows Admin Center deployed and ready to go. This is a farley easy process to do, at least for me since I have my lab environment deployed using the Hybrid Jump Start. It comes with a Windows Admin Center gateway already deployed and configured. However, just for the fun of it, I will blow my WACGW server away and redeploy that VM.
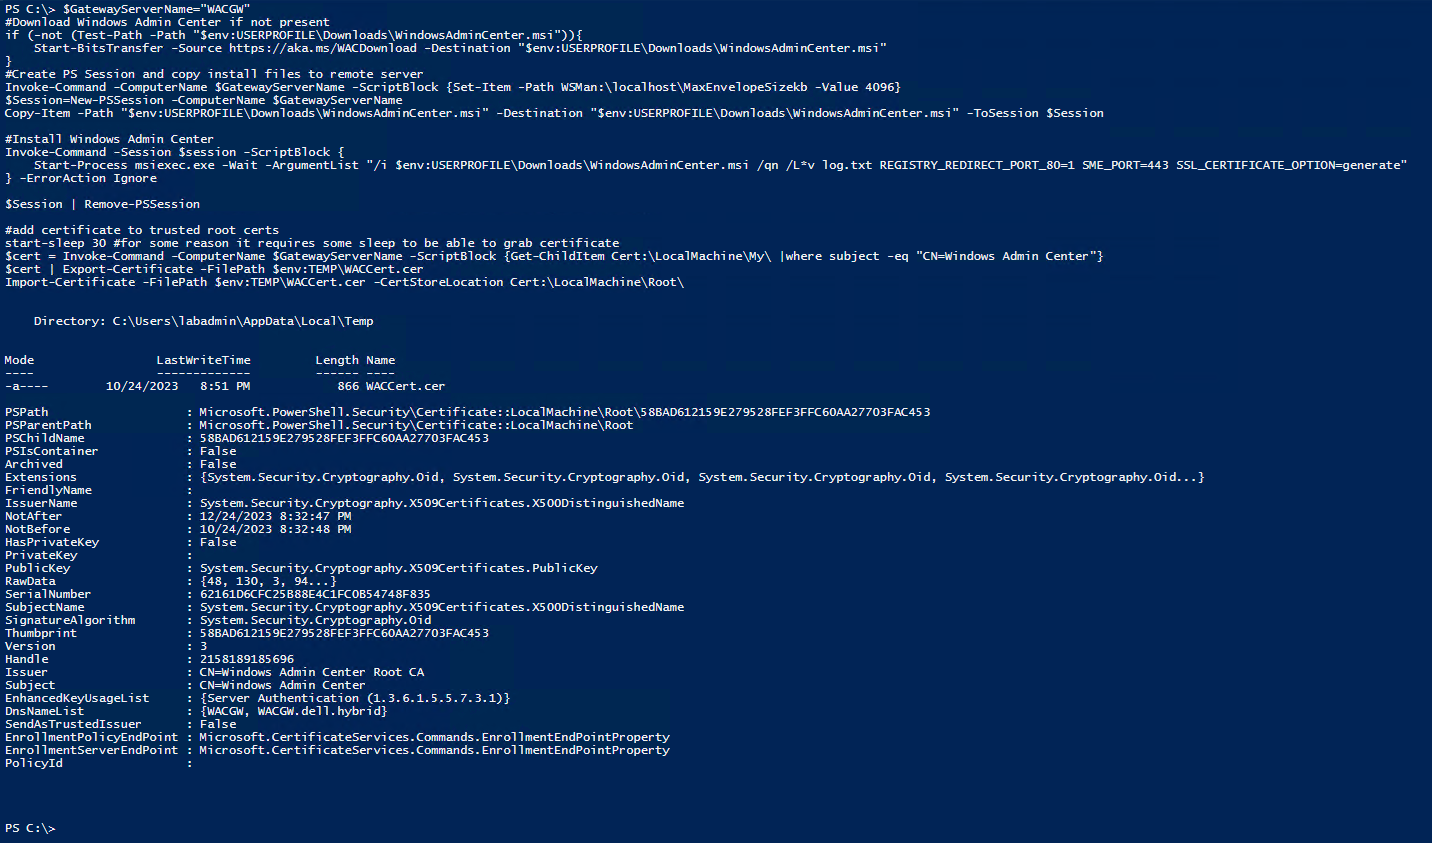
The following script as taken from the Azure Stack Hands On Lab Github repo was run to deploy and configure Windows Admin Center.
$GatewayServerName="WACGW"
#Download Windows Admin Center if not present
if (-not (Test-Path -Path "$env:USERPROFILE\Downloads\WindowsAdminCenter.msi")){
    Start-BitsTransfer -Source https://aka.ms/WACDownload -Destination "$env:USERPROFILE\Downloads\WindowsAdminCenter.msi"
}
#Create PS Session and copy install files to remote server
Invoke-Command -ComputerName $GatewayServerName -ScriptBlock {Set-Item -Path WSMan:\localhost\MaxEnvelopeSizekb -Value 4096}
$Session=New-PSSession -ComputerName $GatewayServerName
Copy-Item -Path "$env:USERPROFILE\Downloads\WindowsAdminCenter.msi" -Destination "$env:USERPROFILE\Downloads\WindowsAdminCenter.msi" -ToSession $Session

#Install Windows Admin Center
Invoke-Command -Session $session -ScriptBlock {
    Start-Process msiexec.exe -Wait -ArgumentList "/i $env:USERPROFILE\Downloads\WindowsAdminCenter.msi /qn /L*v log.txt REGISTRY_REDIRECT_PORT_80=1 SME_PORT=443 SSL_CERTIFICATE_OPTION=generate"
} -ErrorAction Ignore

$Session | Remove-PSSession

#add certificate to trusted root certs
start-sleep 30 #for some reason it requires some sleep to be able to grab certificate
$cert = Invoke-Command -ComputerName $GatewayServerName -ScriptBlock {Get-ChildItem Cert:\LocalMachine\My\ |where subject -eq "CN=Windows Admin Center"}
$cert | Export-Certificate -FilePath $env:TEMP\WACCert.cer
Import-Certificate -FilePath $env:TEMP\WACCert.cer -CertStoreLocation Cert:\LocalMachine\Root\
Let’s look at the script above and talk about what it is doing?
Of course this line is declaring the name of the gateway server as our variable.
$GatewayServerName="WACGW"
This section of the code will download the Windows Admin center if it is not present in the current directory.
#Download Windows Admin Center if not present
if (-not (Test-Path -Path "$env:USERPROFILE\Downloads\WindowsAdminCenter.msi")){
    Start-BitsTransfer -Source https://aka.ms/WACDownload -Destination "$env:USERPROFILE\Downloads\WindowsAdminCenter.msi"
}
This next section creates a PS Session to copy the installation files to our WACGW server.
Invoke-Command -ComputerName $GatewayServerName -ScriptBlock {Set-Item -Path WSMan:\localhost\MaxEnvelopeSizekb -Value 4096}
$Session=New-PSSession -ComputerName $GatewayServerName
Copy-Item -Path "$env:USERPROFILE\Downloads\WindowsAdminCenter.msi" -Destination "$env:USERPROFILE\Downloads\WindowsAdminCenter.msi" -ToSession $Session
Then we have this section which will install the Windows Admin Center on our server.
#Install Windows Admin Center
Invoke-Command -Session $session -ScriptBlock {
    Start-Process msiexec.exe -Wait -ArgumentList "/i $env:USERPROFILE\Downloads\WindowsAdminCenter.msi /qn /L*v log.txt REGISTRY_REDIRECT_PORT_80=1 SME_PORT=443 SSL_CERTIFICATE_OPTION=generate"
} -ErrorAction Ignore
This, as it says, kills and removes the current PSSession we created earlier.
$Session | Remove-PSSession
Here we will grab the certificate and add it to our trusted root certs store.
#add certificate to trusted root certs
start-sleep 30 #for some reason it requires some sleep to be able to grab certificate
$cert = Invoke-Command -ComputerName $GatewayServerName -ScriptBlock {Get-ChildItem Cert:\LocalMachine\My\ |where subject -eq "CN=Windows Admin Center"}
$cert | Export-Certificate -FilePath $env:TEMP\WACCert.cer
Import-Certificate -FilePath $env:TEMP\WACCert.cer -CertStoreLocation Cert:\LocalMachine\Root\
Installed and ready for some configurations.
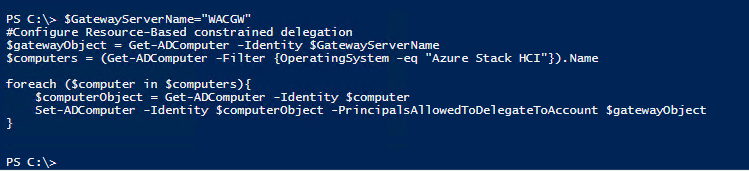
Configure Kerberos Constrained Delegation
Next that we have Windows Admin Center install we will configure Kerberos Constrained Delegation for our Windows Admin Center Gateway.
$GatewayServerName="WACGW"
#Configure Resource-Based constrained delegation
$gatewayObject = Get-ADComputer -Identity $GatewayServerName
$computers = (Get-ADComputer -Filter {OperatingSystem -eq "Azure Stack HCI"}).Name

foreach ($computer in $computers){
    $computerObject = Get-ADComputer -Identity $computer
    Set-ADComputer -Identity $computerObject -PrincipalsAllowedToDelegateToAccount $gatewayObject
}
Verify Connection to WAC
Now we are ready to actually connect to our Windows Admin Center. Just navigate in Edge to https://wacgw
Register WAC with Azure
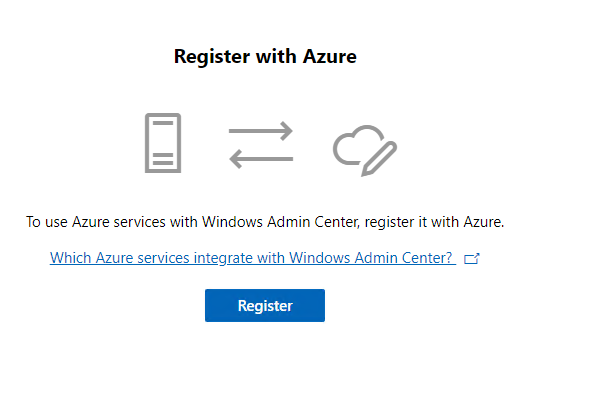
Before we begin, we need to register our Windows Admin Center with Azure.
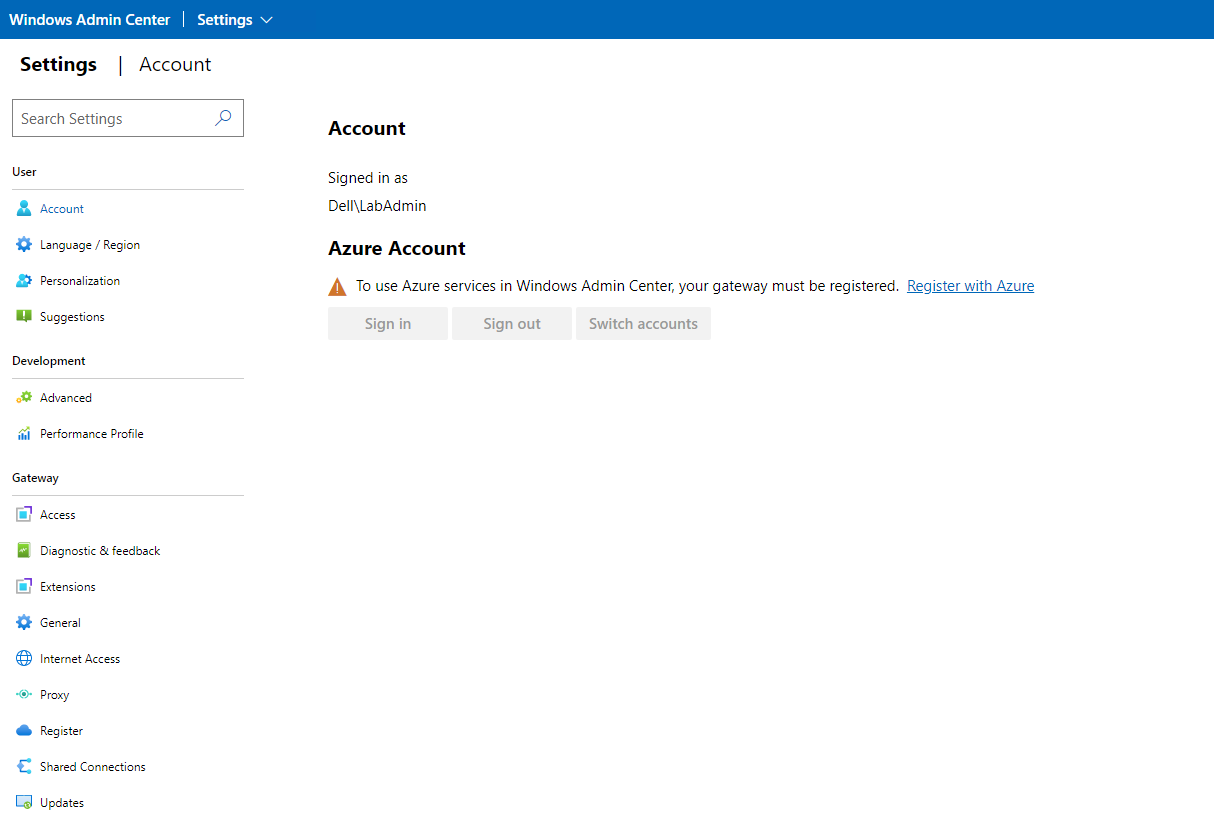
On the settings blade, if we go down to Register under the Gateway section we will see the prompt to register this instance of the Windows Admin Center.
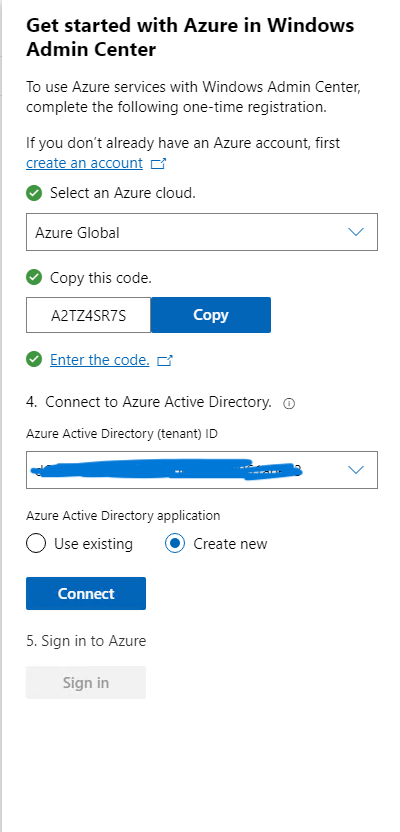
At this point, it will authenticate us and sign us into our Azure Tenant.

Once that is done, on the far right, a new blade will pop up asking for some information. Here we will select which Azure Cloud, for myself I will select Azure Global. It will provide a Code, once you click on copy, an Edge browser will start directing you to microsoft.com/devicelogin where you will enter the code provided, then sign on into your tenant. Here we have a choice, I could either use an existing Azure Active Directory Application or have one created. In this case, I just had it create a new one for me. In a production environment, we should be using a pre-created application that also has specific roles assign to it. Finally we click connect.
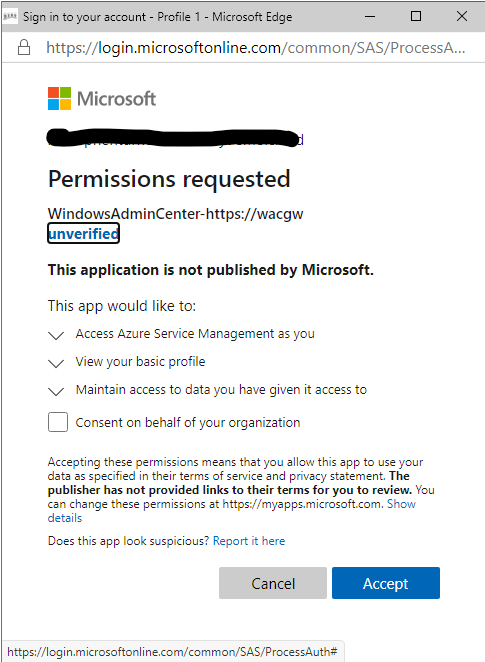
The next prompt is to allow permissions to our tenant for this application. Click on Consent and click accept.
Once we have signed on, it takes a few seconds. We can go back to our portal and we can now see that we are registered with Azure and connected.
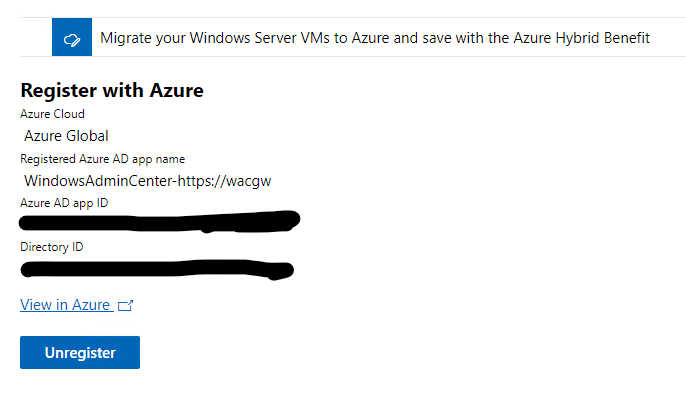
So now our WAC instance is registered with Azure.
Create Cluster
Now, it is time to create our cluster. Let’s start by logging into our Windows Admin Center again. We should land on the All Connections screen. If not, in the upper left hand corner next to Windows Admin Center, click the down arrow and select All Connections.

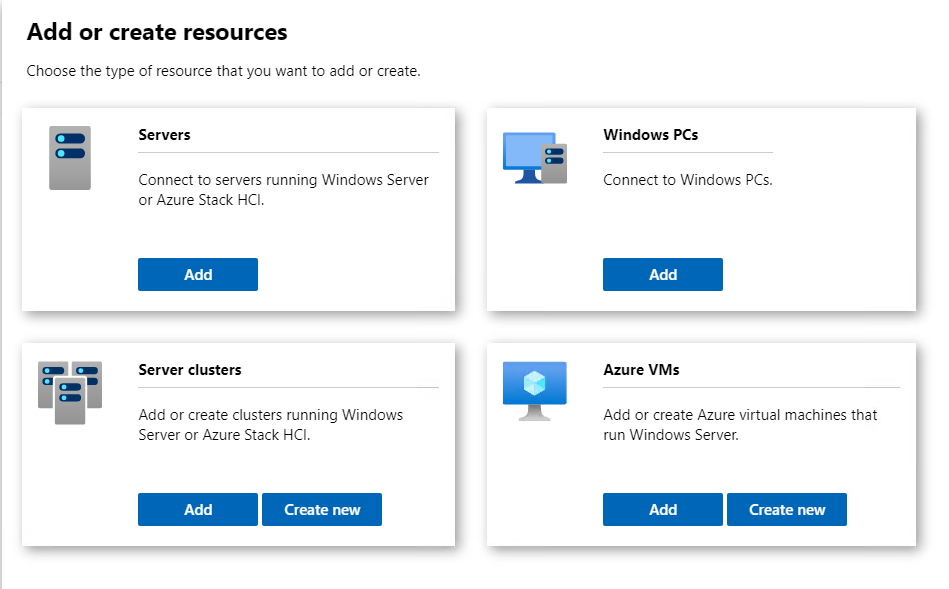
In the upper left of the window, we should see +Add. Click to add a new connection. From here, we will click “Create New” under the Server Clusters section.
On the following Cluster Creation page, we have a choice between Windows Server or Azure Stack HCI. Of course we will select Azure Stack HCI and at this point make sure that the option for All servers in one site is selected as well. We can go into stretch clusters another day. We will click on Create at this time.

Get Started (Node Configuration)
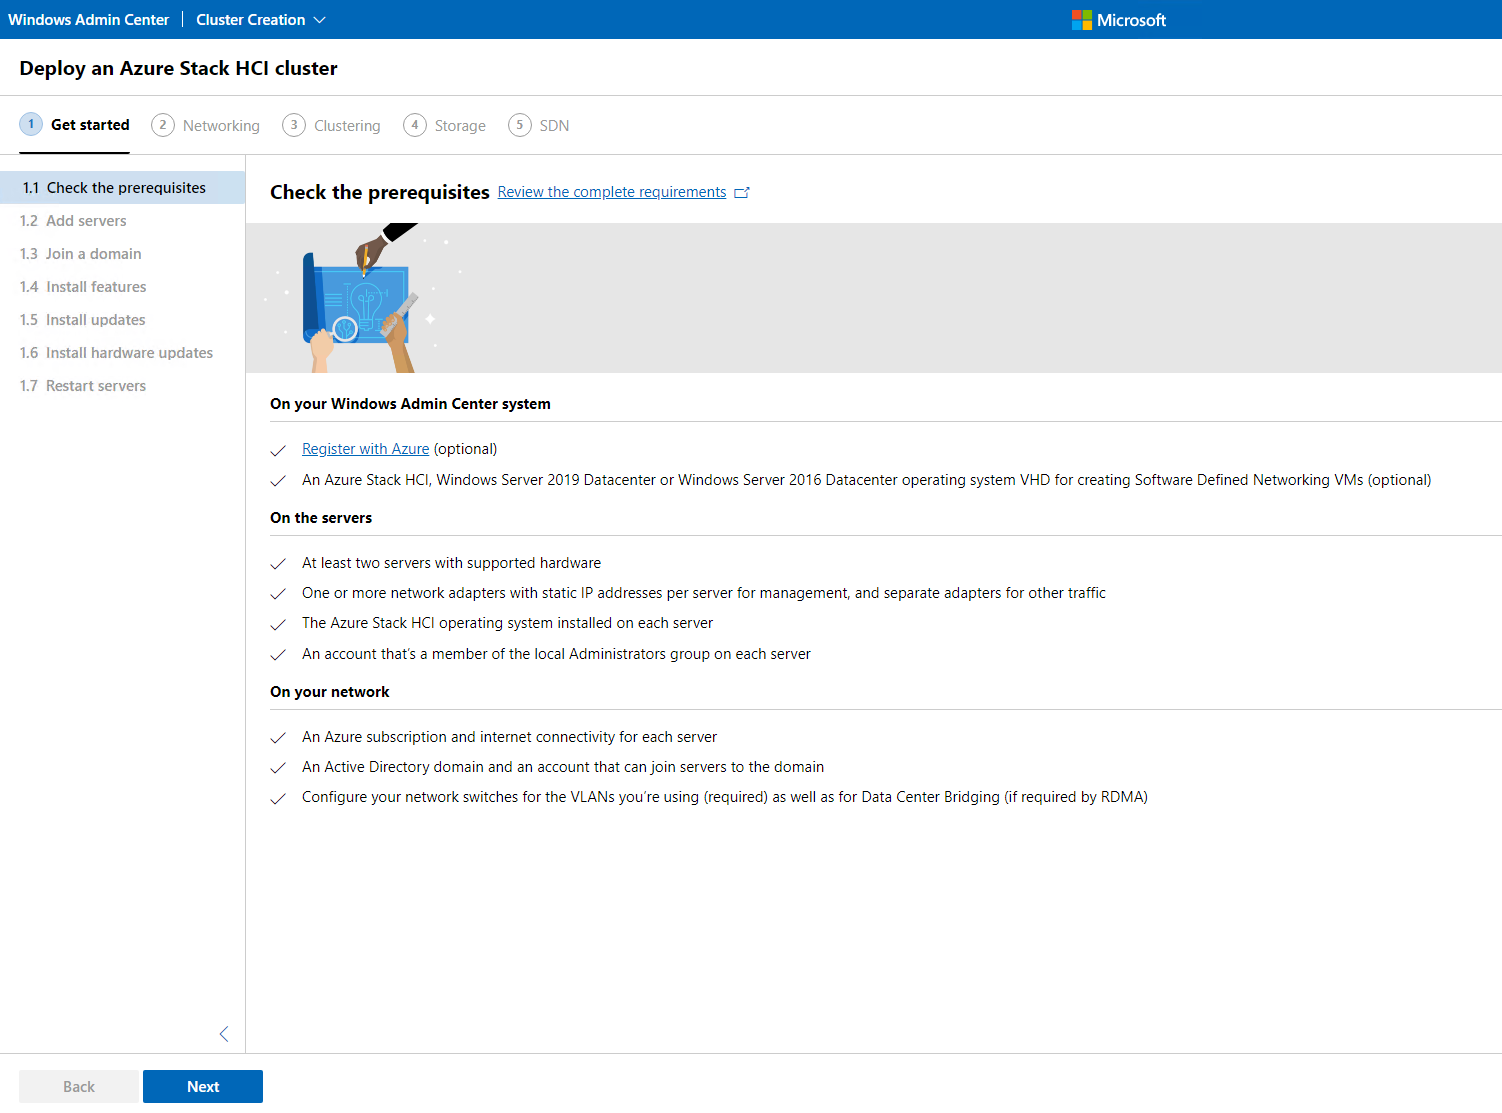
This next screen talks about the prerequisites that are needed. The fist, Register with Azure we just did on the previous step. This is an optional setup but it was good to get it out of the way. At this time we will click Next.
On the add servers section, we will need to enter our credentials that have access to these servers. Then we will need to enter the fully qualified domain name for each of the four nodes we will be adding to this cluster. Once all four nodes have been validated and are in Ready status we can continue by clicking Next.

The next screen is going to join these nodes to our domain. However, these are already domain joined and we will just click Next to continue.
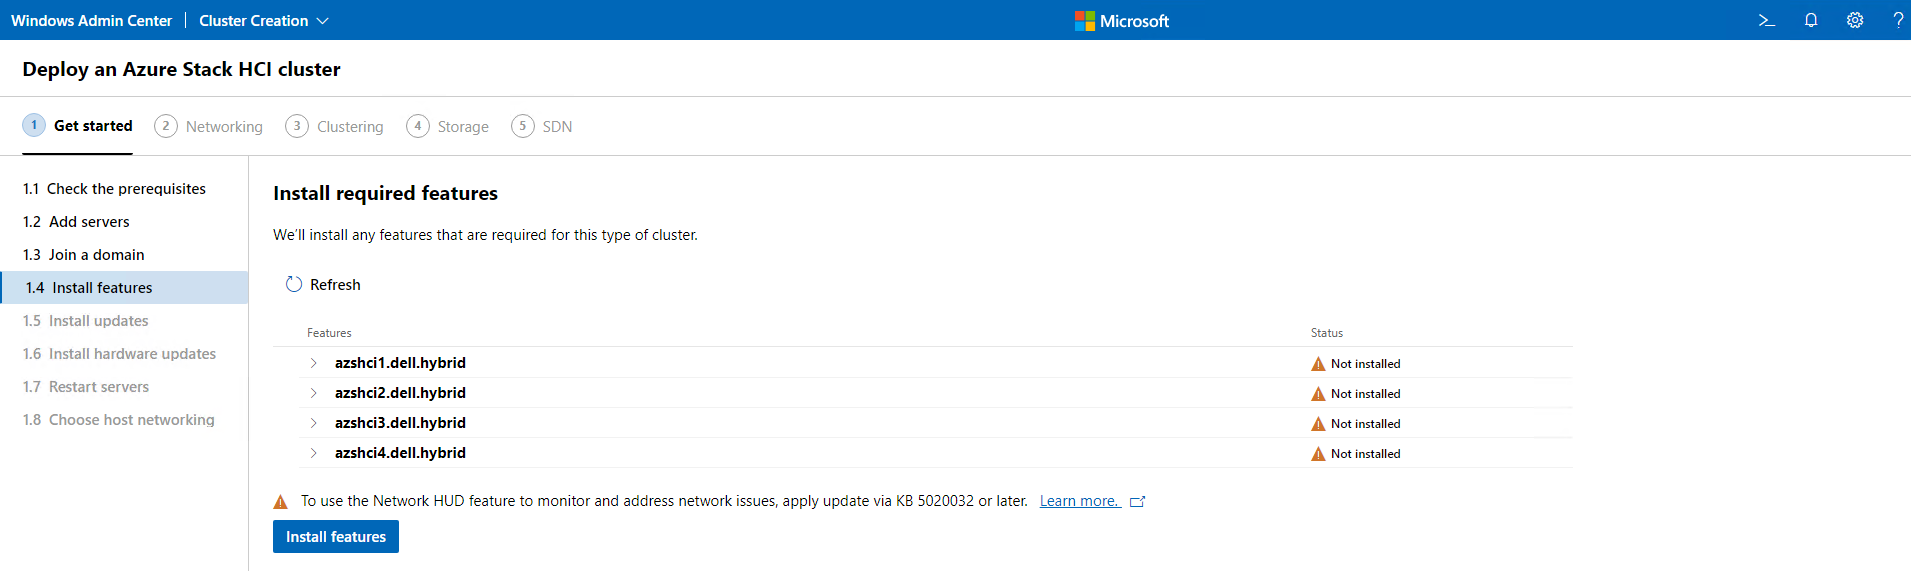
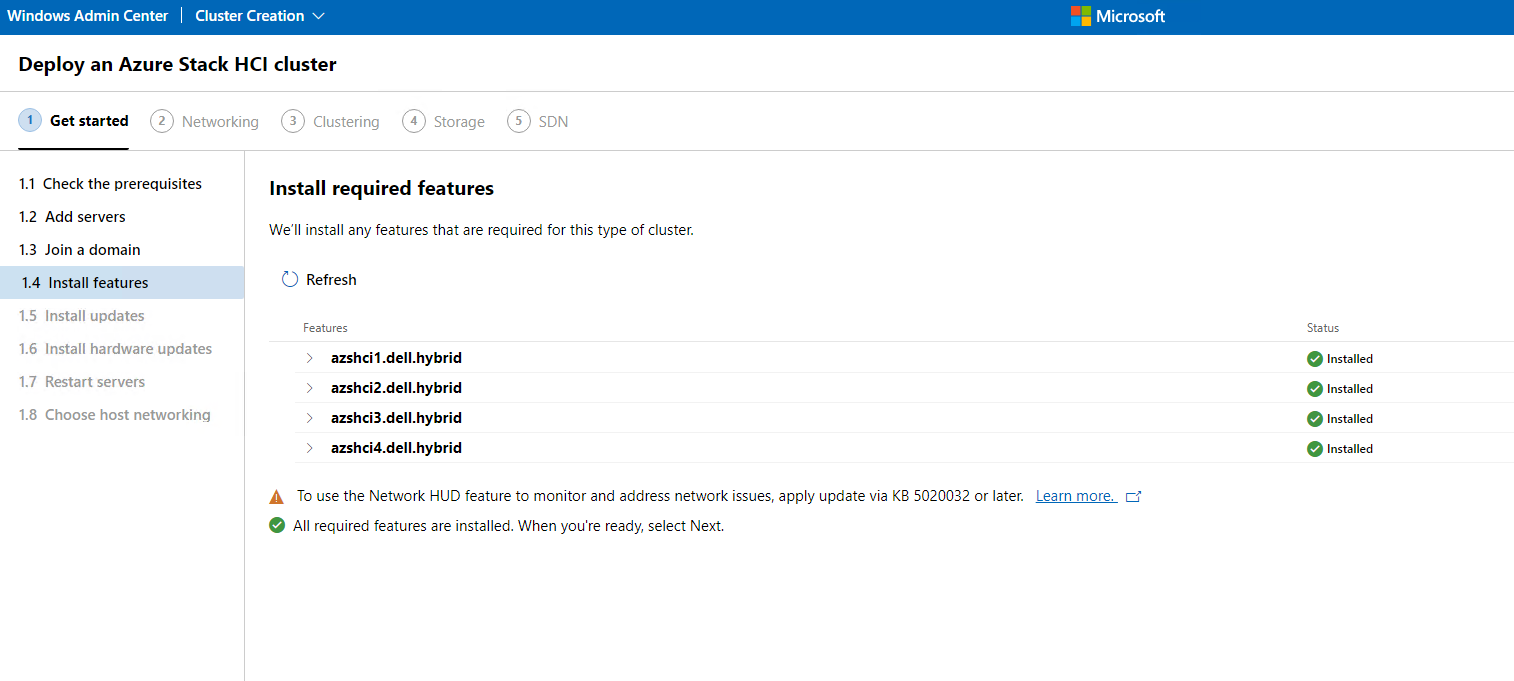
Our next window is where we will install all the required features needed. We had done this in the past with PowerShell, but this time we will allow Windows Admin Center to do it for us. Here we will click Instal features.
This is where I go out to pet my Lab, get some coffee, hug my wife, and watch the much needed rain come down….. Just a note, we could have done a lot of these updates and feature installs via PowerShell to get the nodes ready as well.
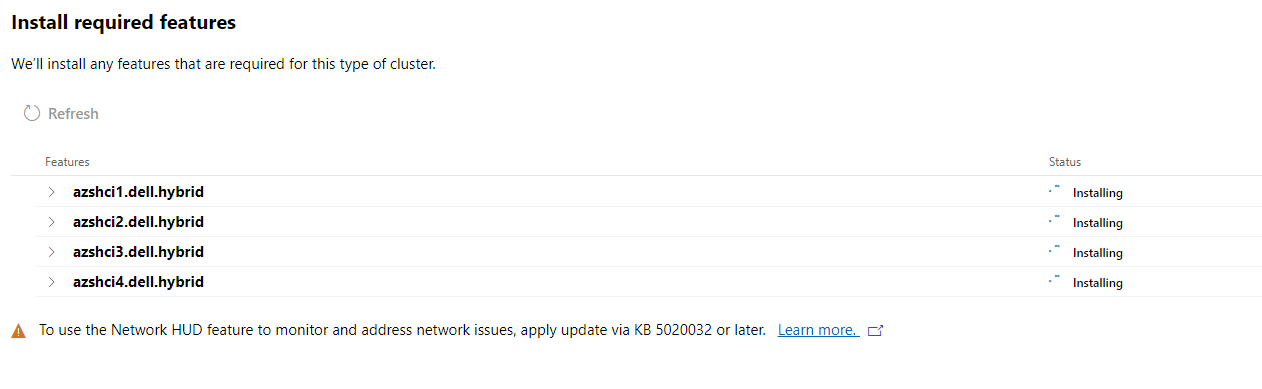
Once these features are installed we can click Next.
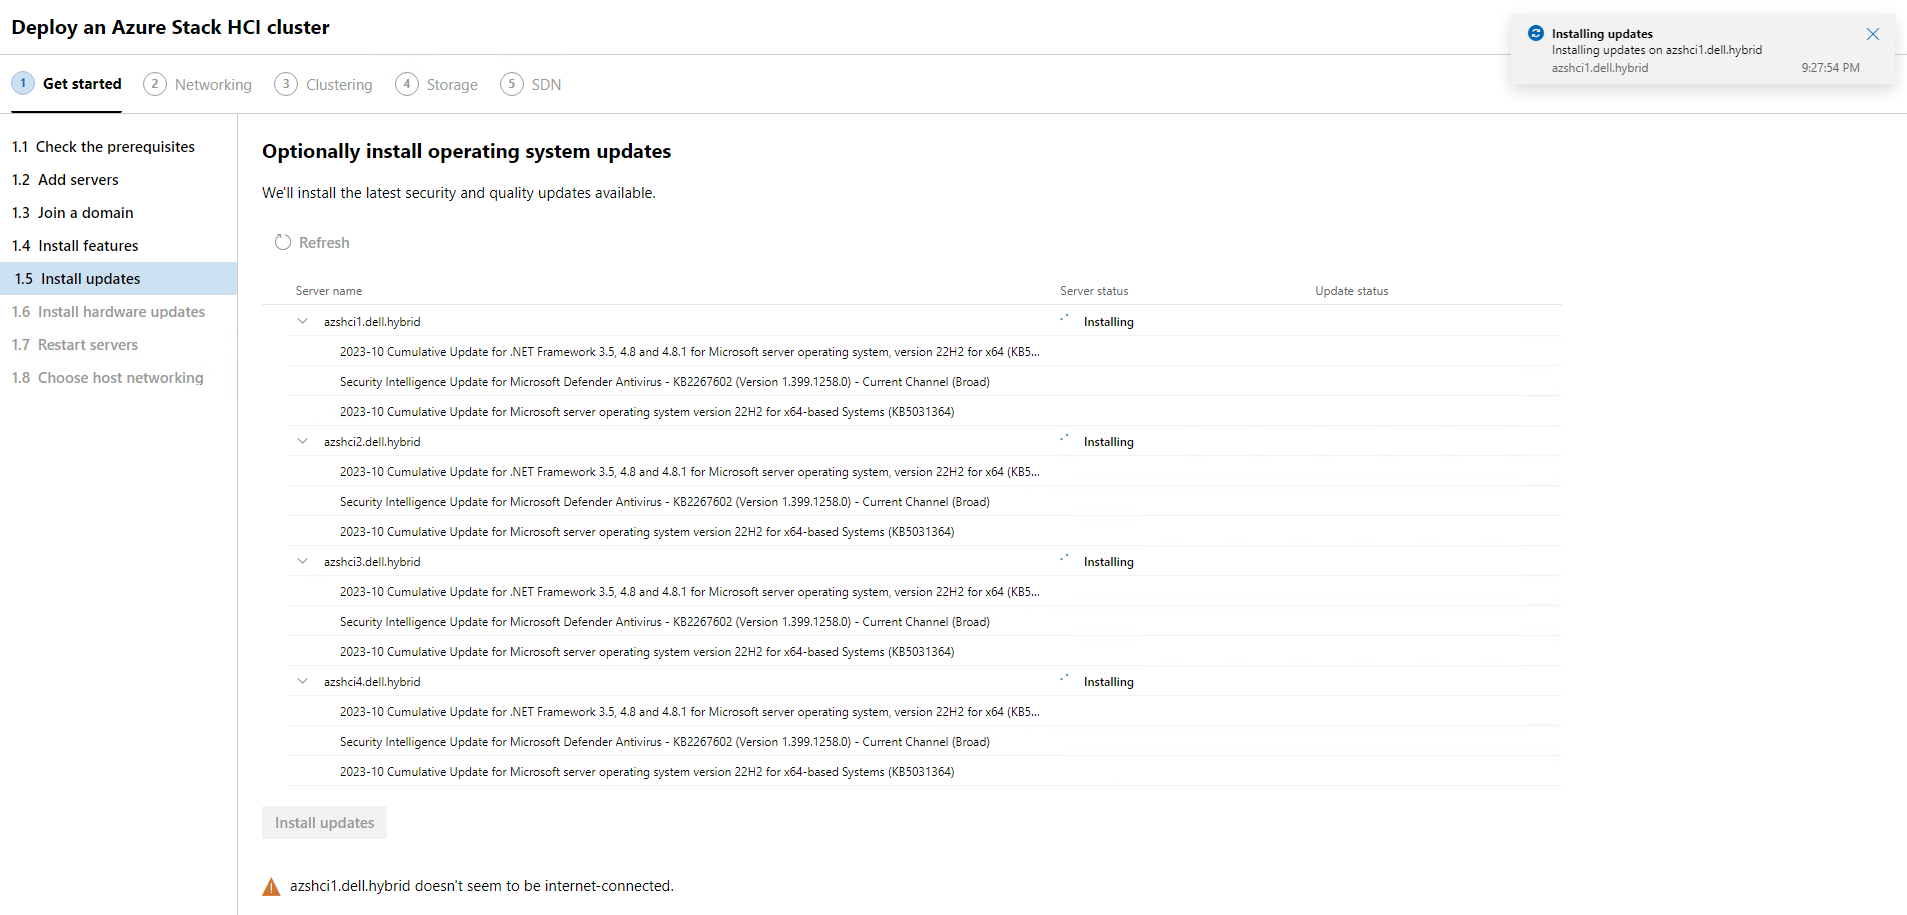
Now we get to install Updates. Which again, depending on how these images are, may mean another coffee run, more pets for my Labrador, and even more hugs for my wife and kids. The rain has stopped a little but it is still nice to site outside and enjoy the cooler evening. We can click Install Updates here.
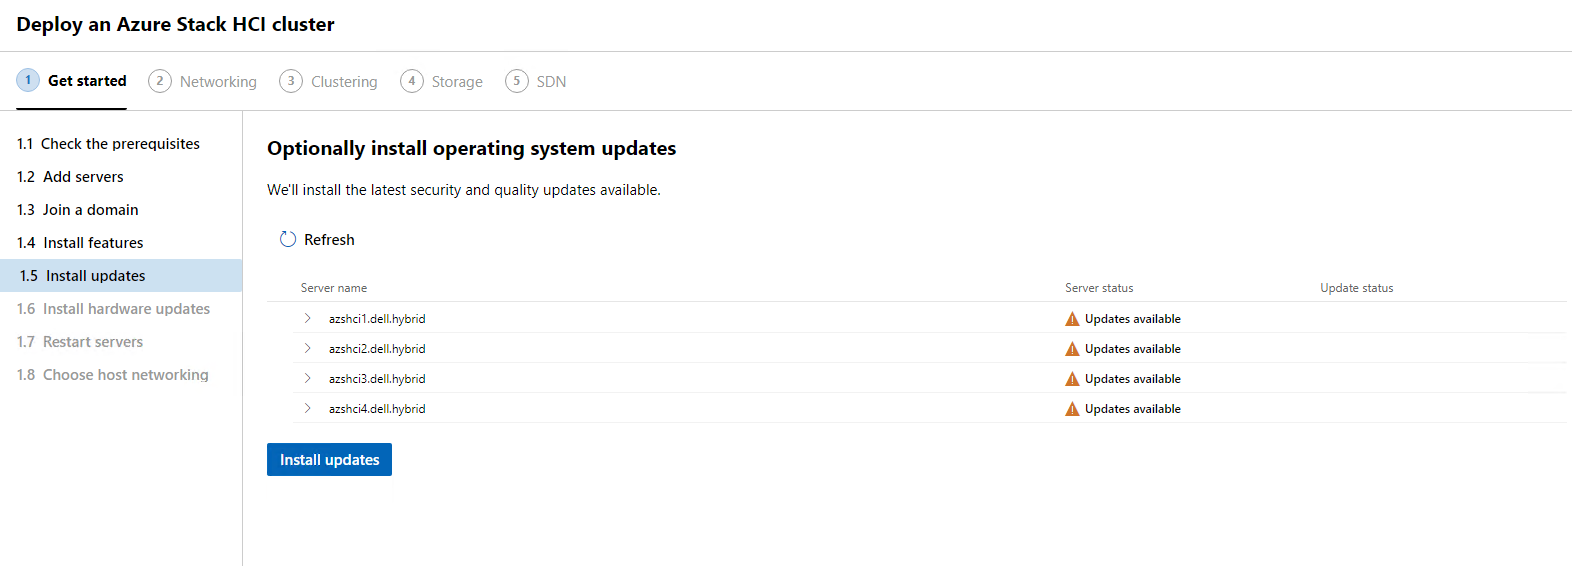
To give us an idea of how long it may take, we can drop down the arrow next to each node and see which updates are going to be applied.
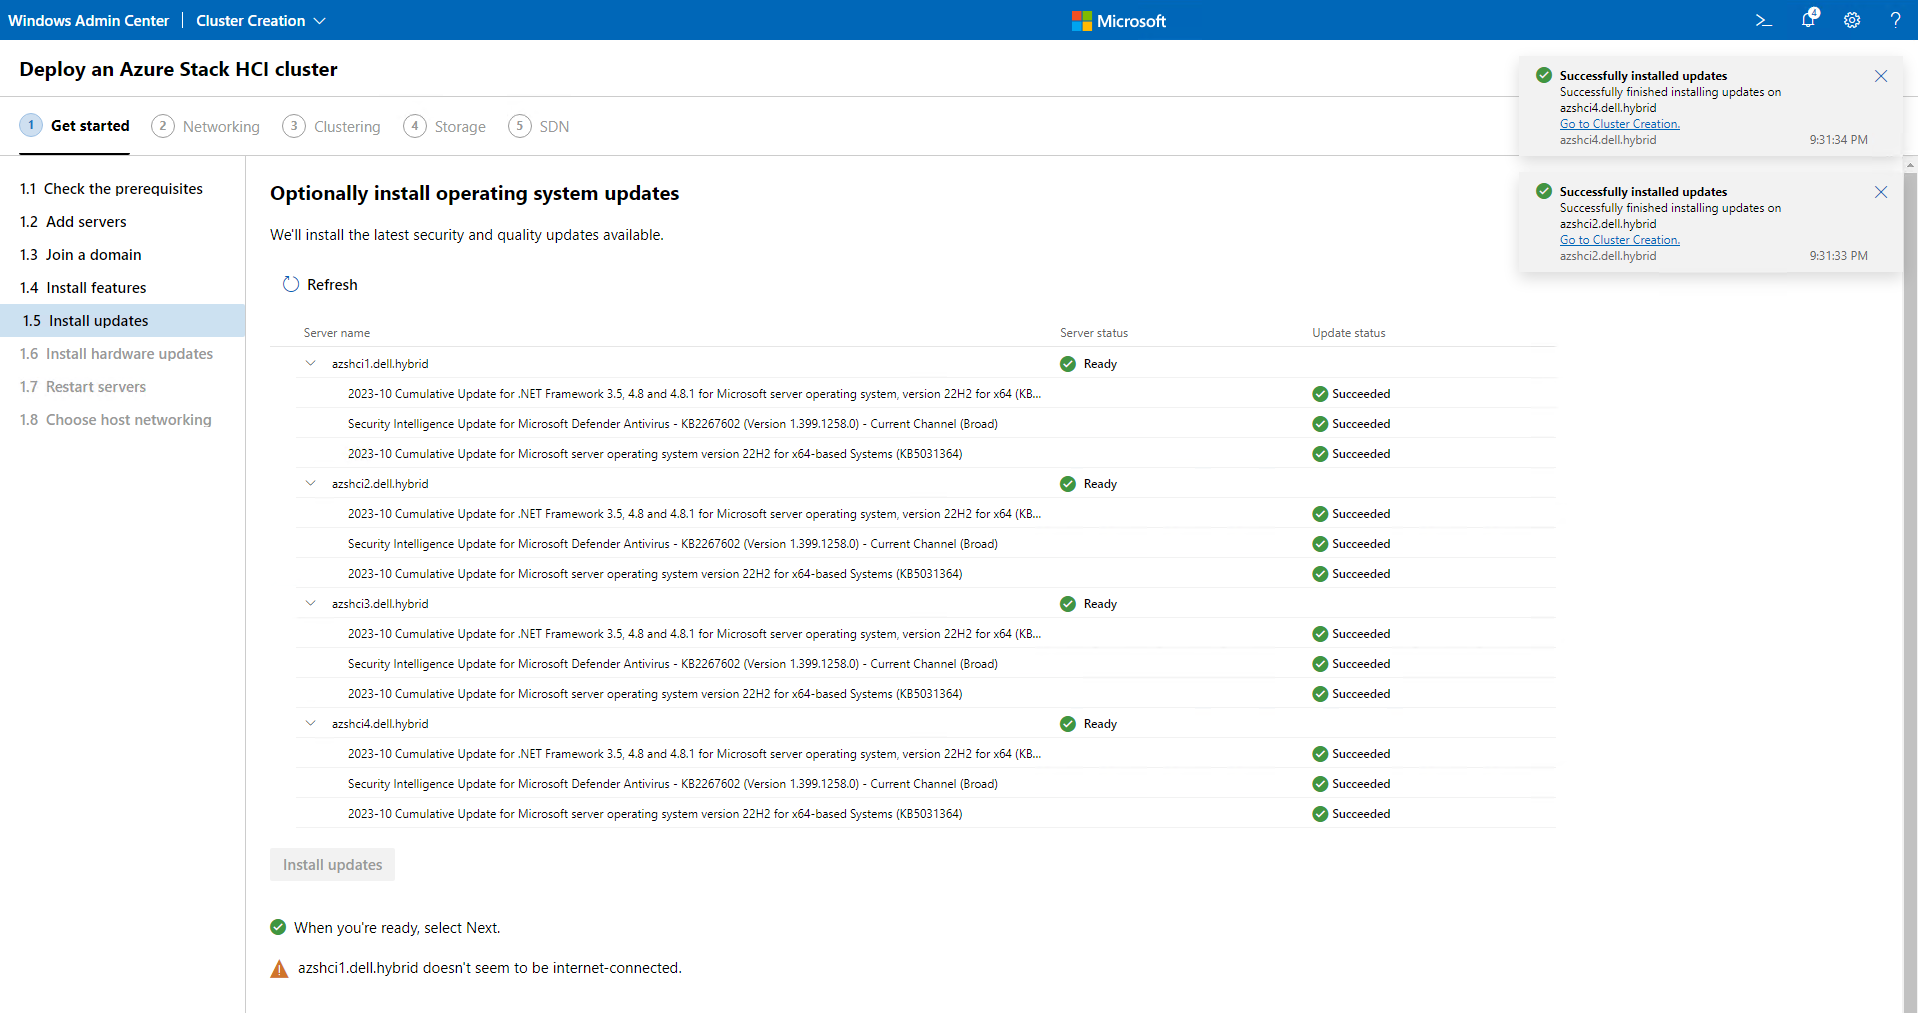
Our updates are done and now I can click Next.
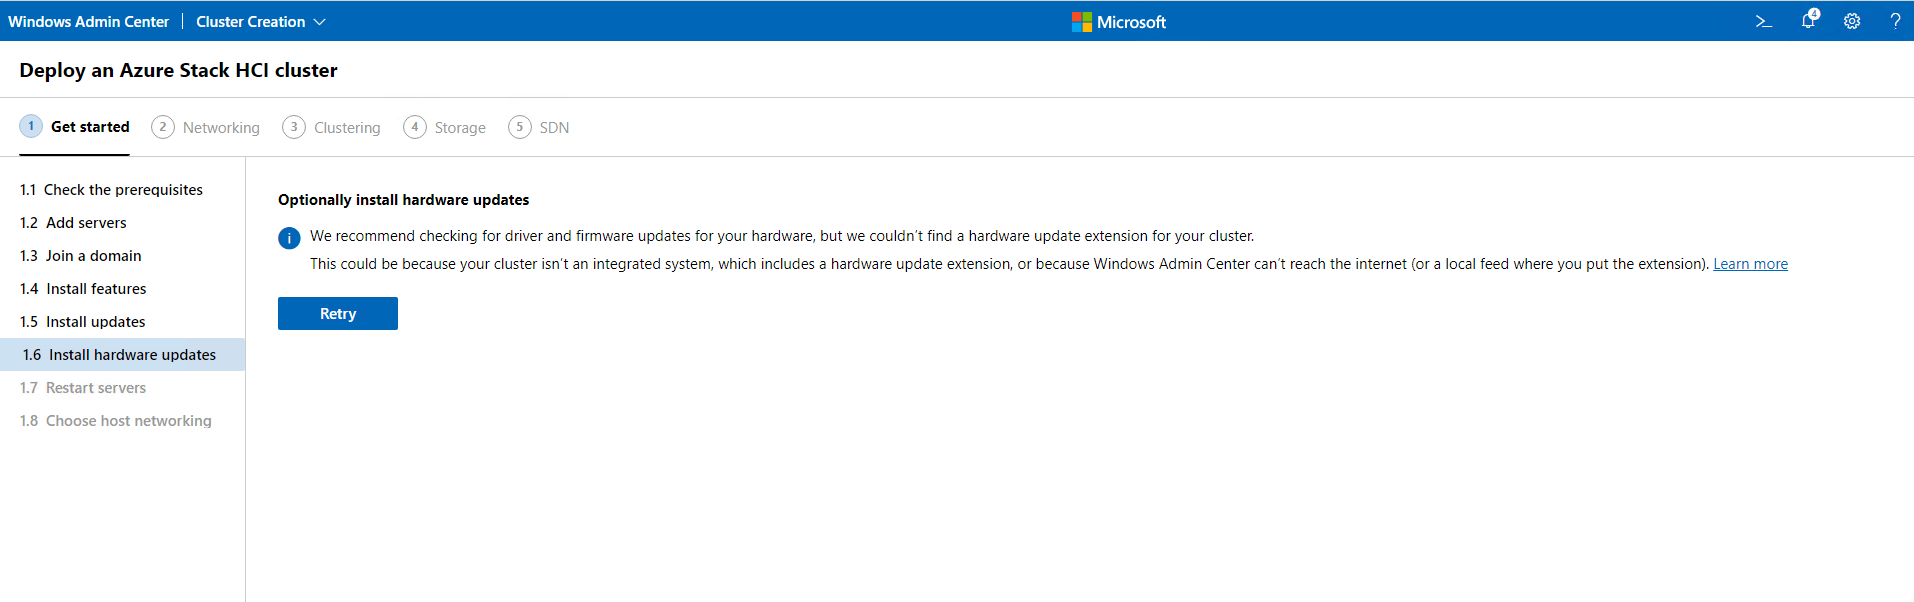
The next section is for hardware updates. Since these are all virtual machines I won’t have any. However, if this was a physical system like a Dell APEX Microsoft Azure Cloud, then most likely we could have some updates that would need to be install. We will see an error like mine if installing on a virtual machines as well. Just click Next now.
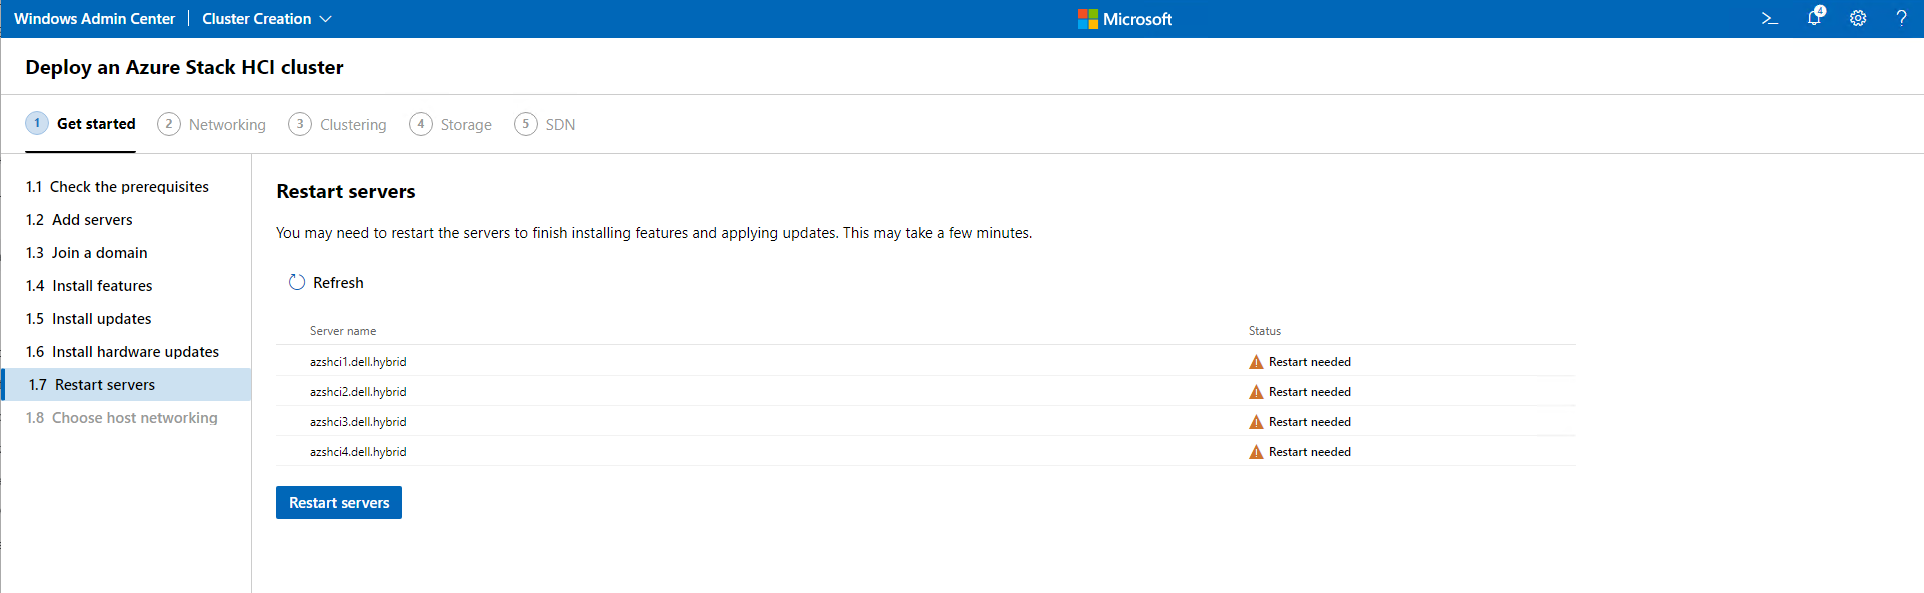
Our next step is to restart all our nodes. I will click Restart Servers and wait for them to reboot. Since these are virtual, it should not take a long time.
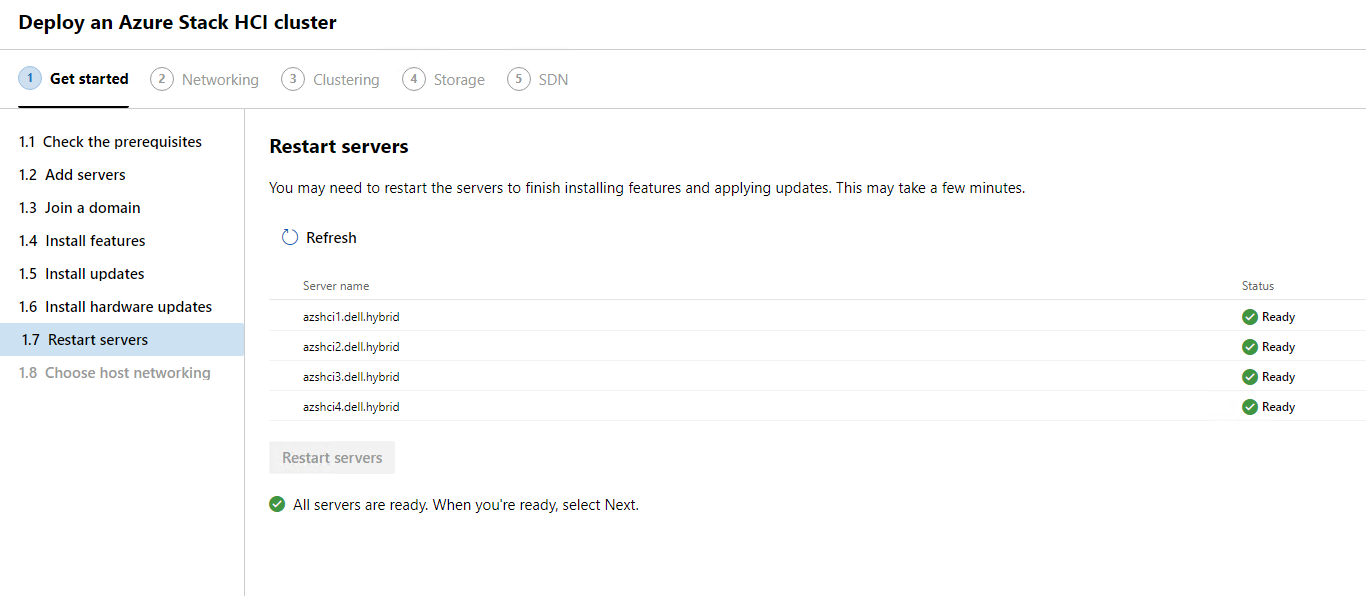
The reboot is done and I am ready to click Next.
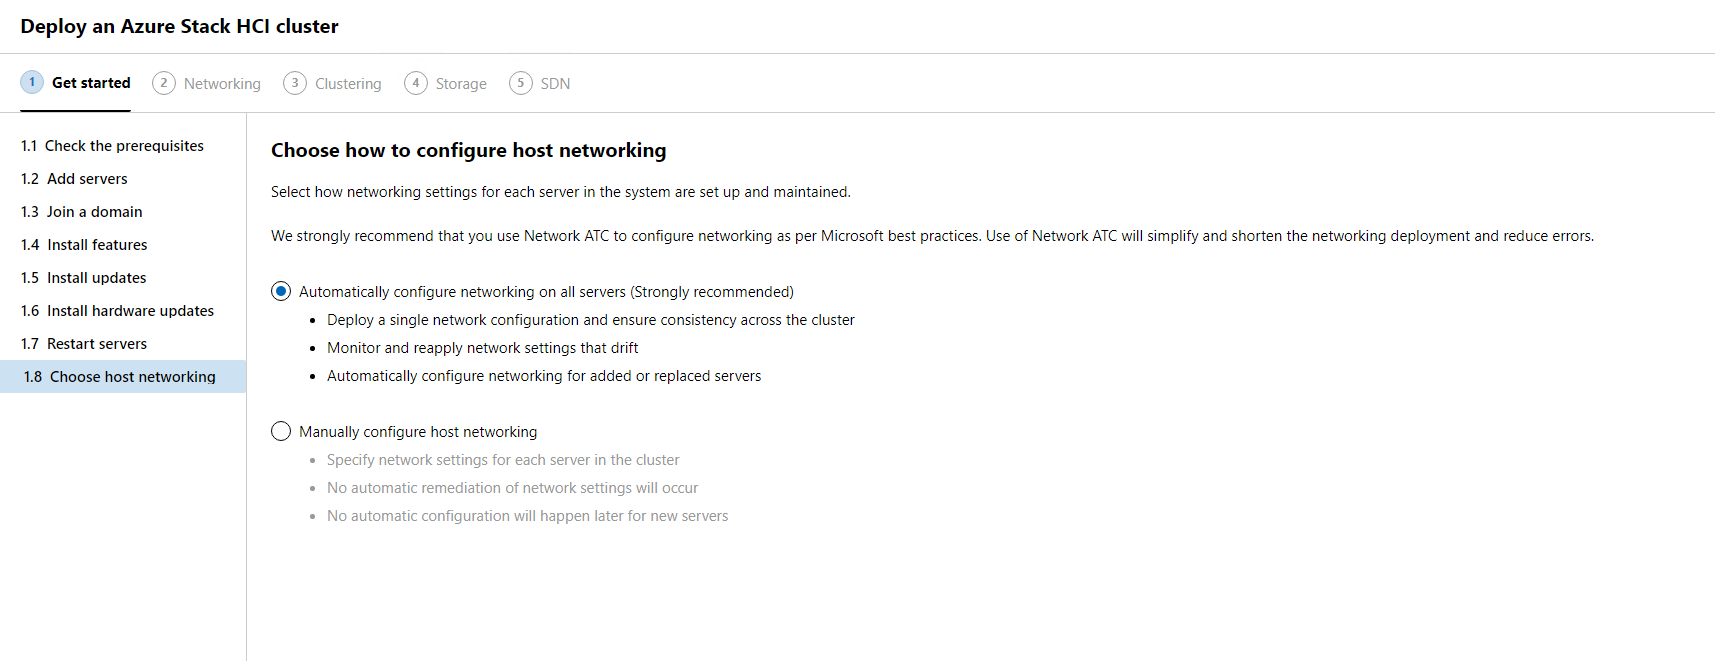
This last section of Getting Started will let us decided what method we will use to configure our cluster networking. We have the choice between automatic which is Network ATC, or manual which we will have a lot more work ahead of us if we go that route. I am going to select Automatic and click Next:Networking.
Networking
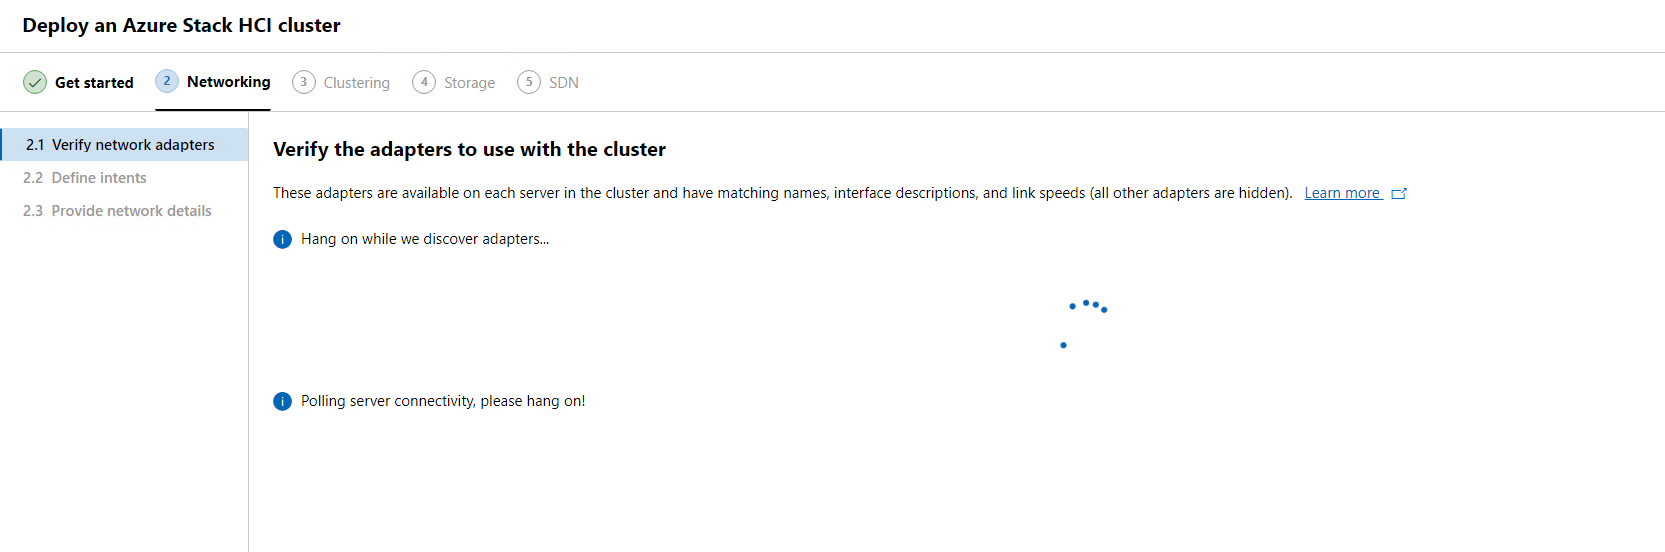
The first step in configuring networking is for Network ATC to discover our network adapters.
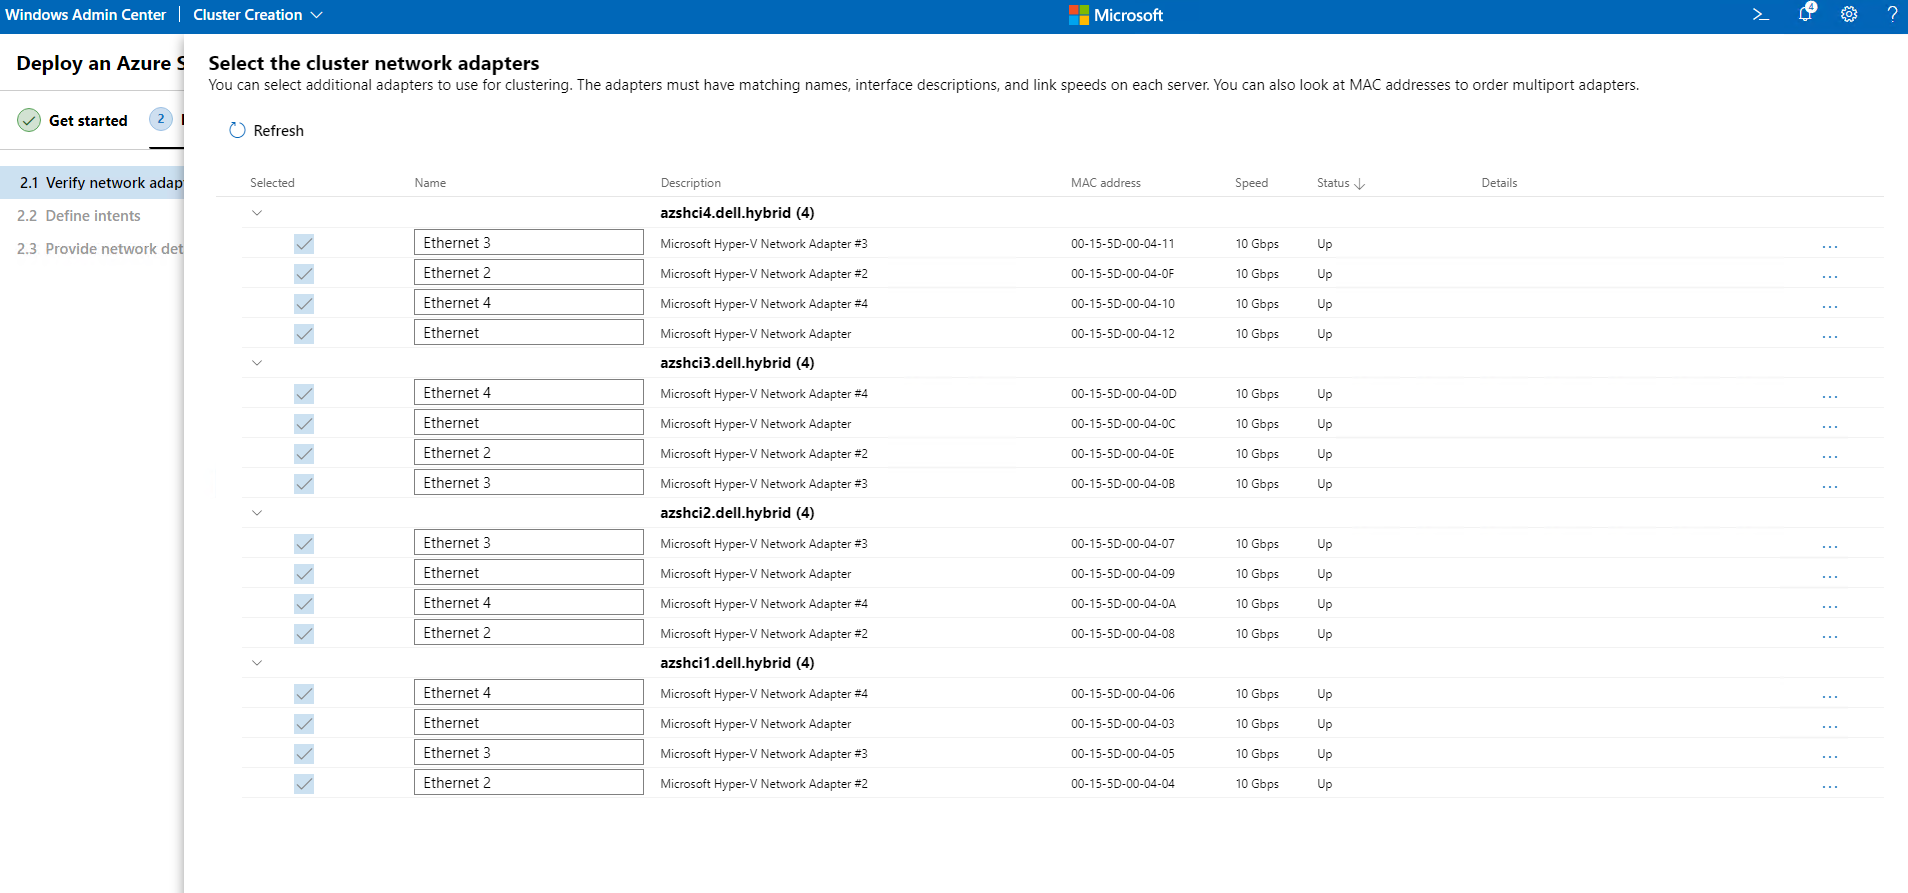
Once our network adapters have been identified we will have a list of all the adapters available on all our nodes. Here we can also rename our network adapters if we need. There are reasons to do so for better identification. For this blog I will leave the default names.
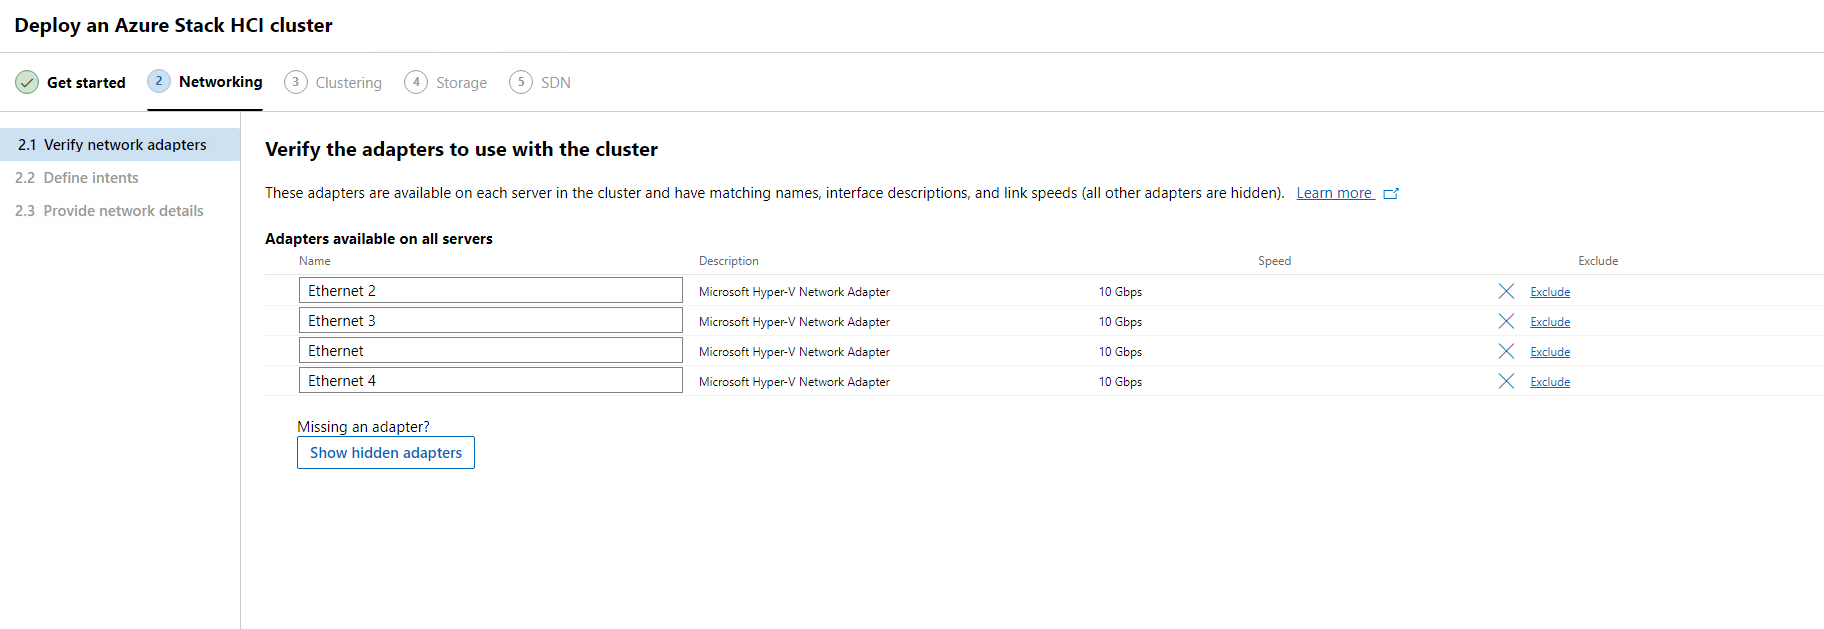
When we click on Show hidden adapters this will give us a full view of all adapters on all our nodes.
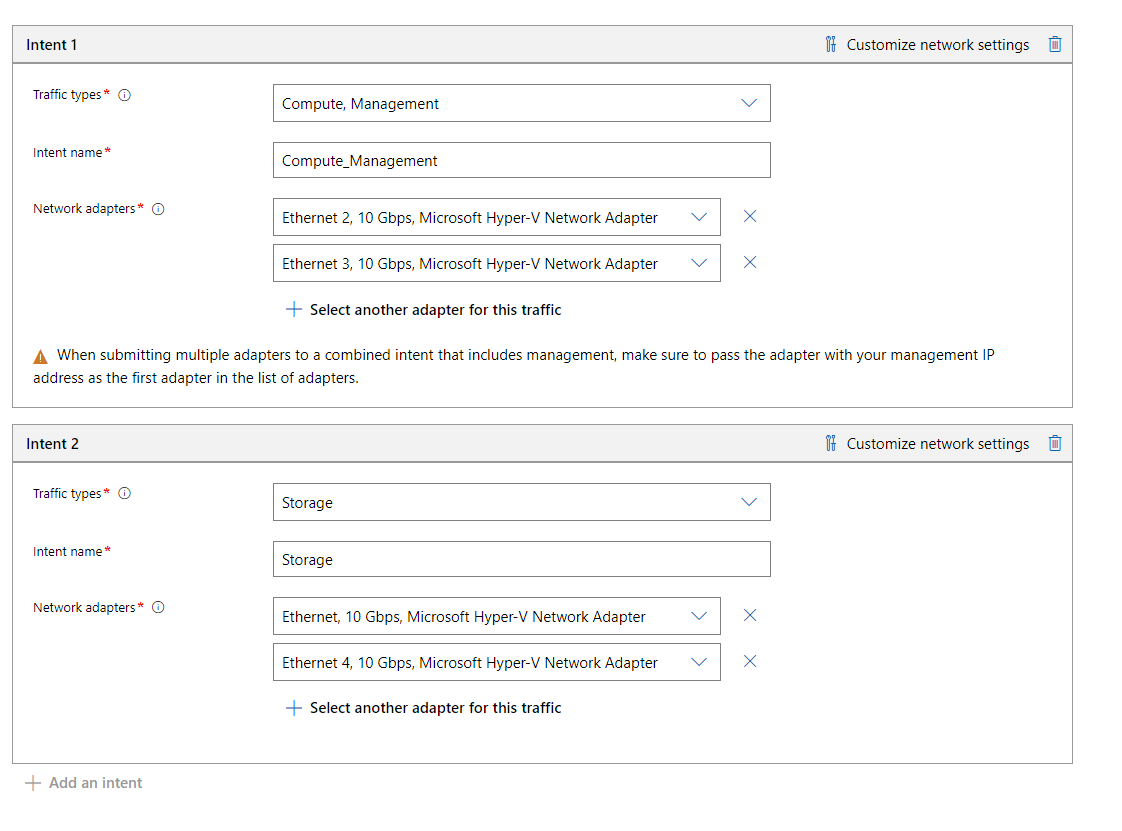
The next screen is where we will define our intents. I will be creating two intent configurations. The first will be for Compute and Management, the 2nd will be for Storage traffic.
On this screen the first intent will be named Compute_Management and will include the first two vNics on each node.
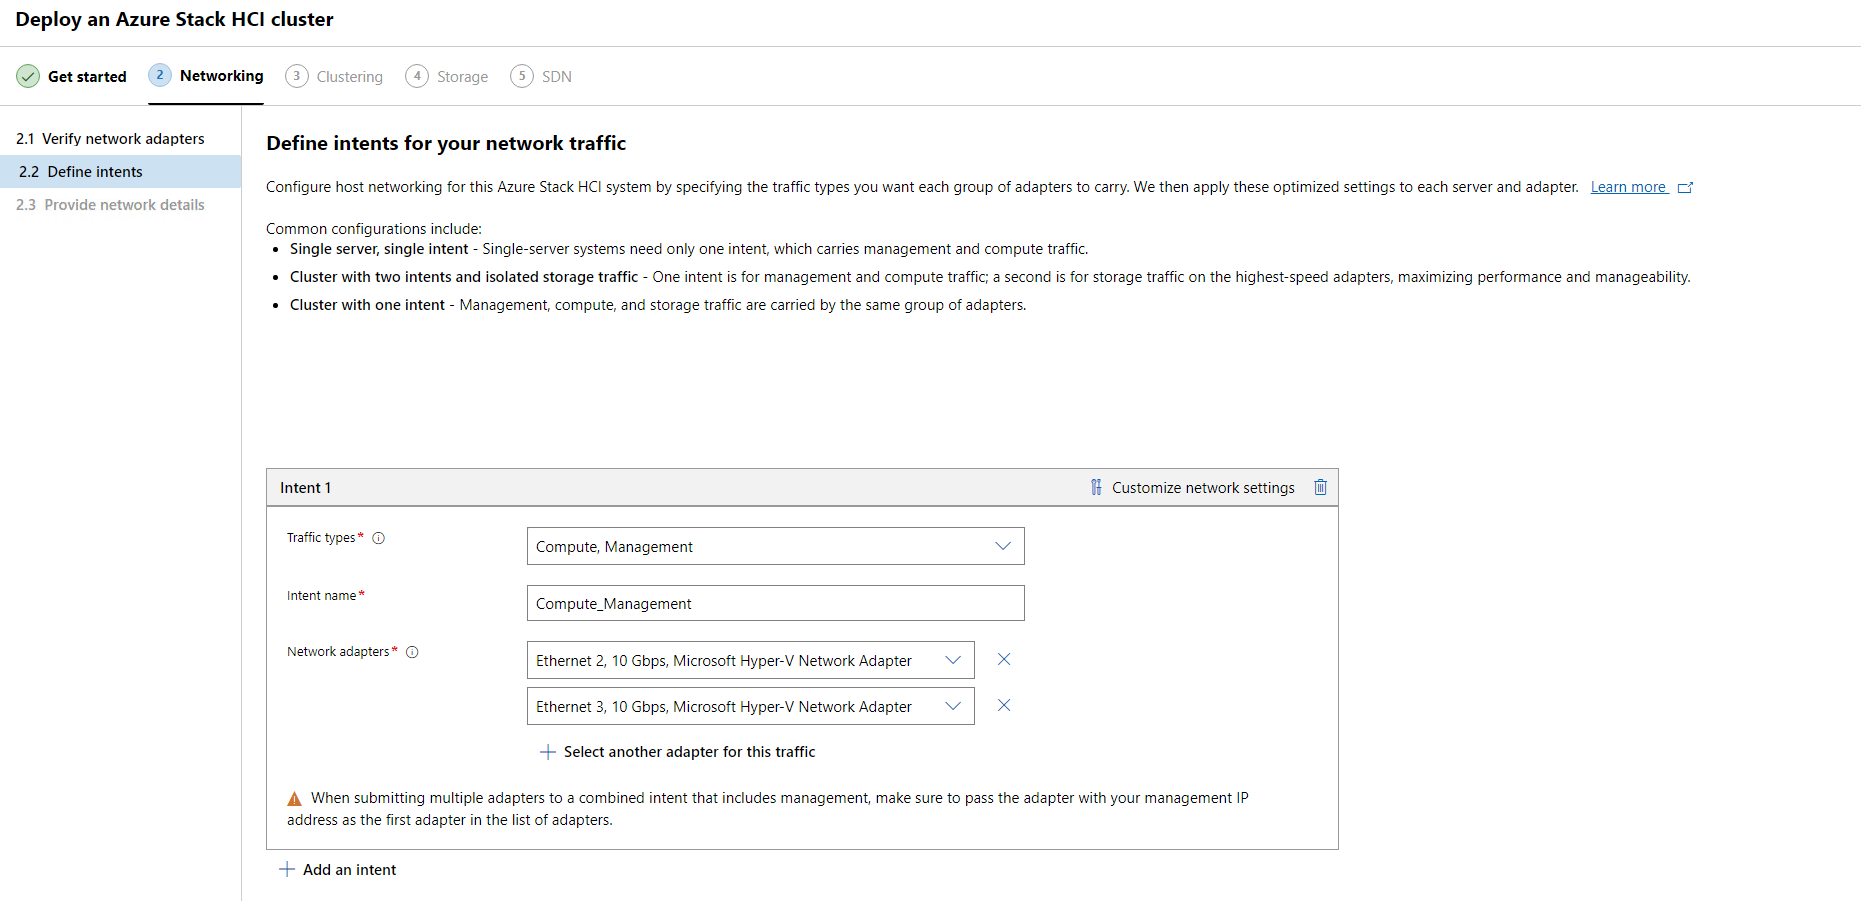
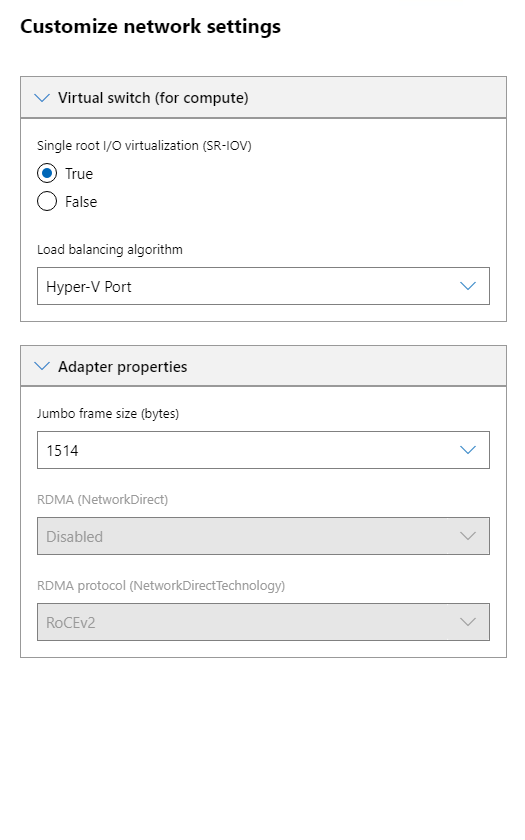
On this same page under the intent 1 box, there are some network customizable settings we can click on. Here we will have the option to configure our vSwitch settings and the type of load balancing algorithm, which I will keep at Hyper-V Port for now. Also, we can configure adapter properties like the Jumbo Frames size, RDMA configurations, etc.
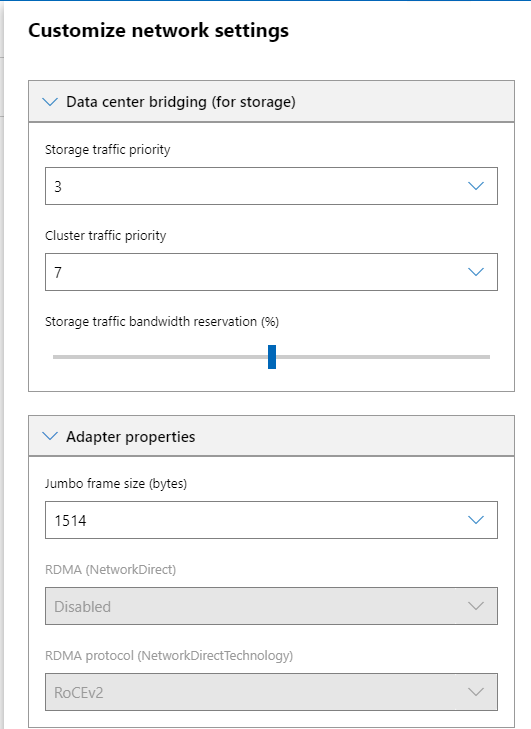
The storage network settings will have the ability to configure data center bridging for storage as well.
Once I have added both my Compute/Management and Storage Intents I will be able to click Next.
The final screen in our Networking configuration will allow us to provide storage network details. Here we can allow Network ATC to manage teh assignment of IP’s automatically. Or we can do it ourselves.
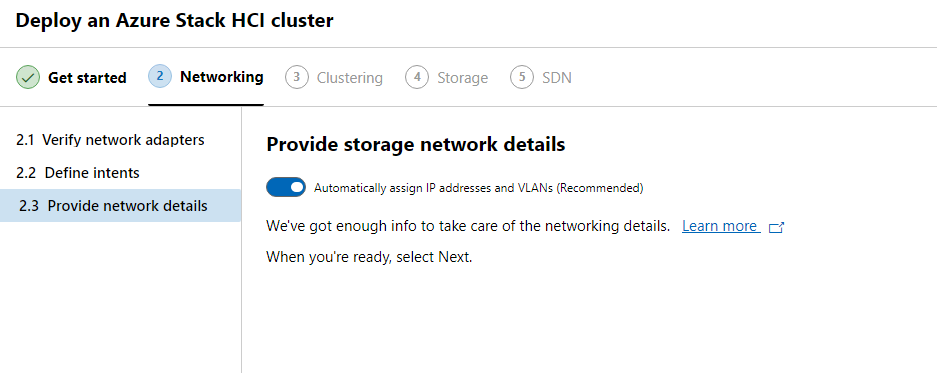
If this wasn’t a lab I would not allow Network ATC to assign IP’s. I would manually configure our network adapters using the manual the following interface.
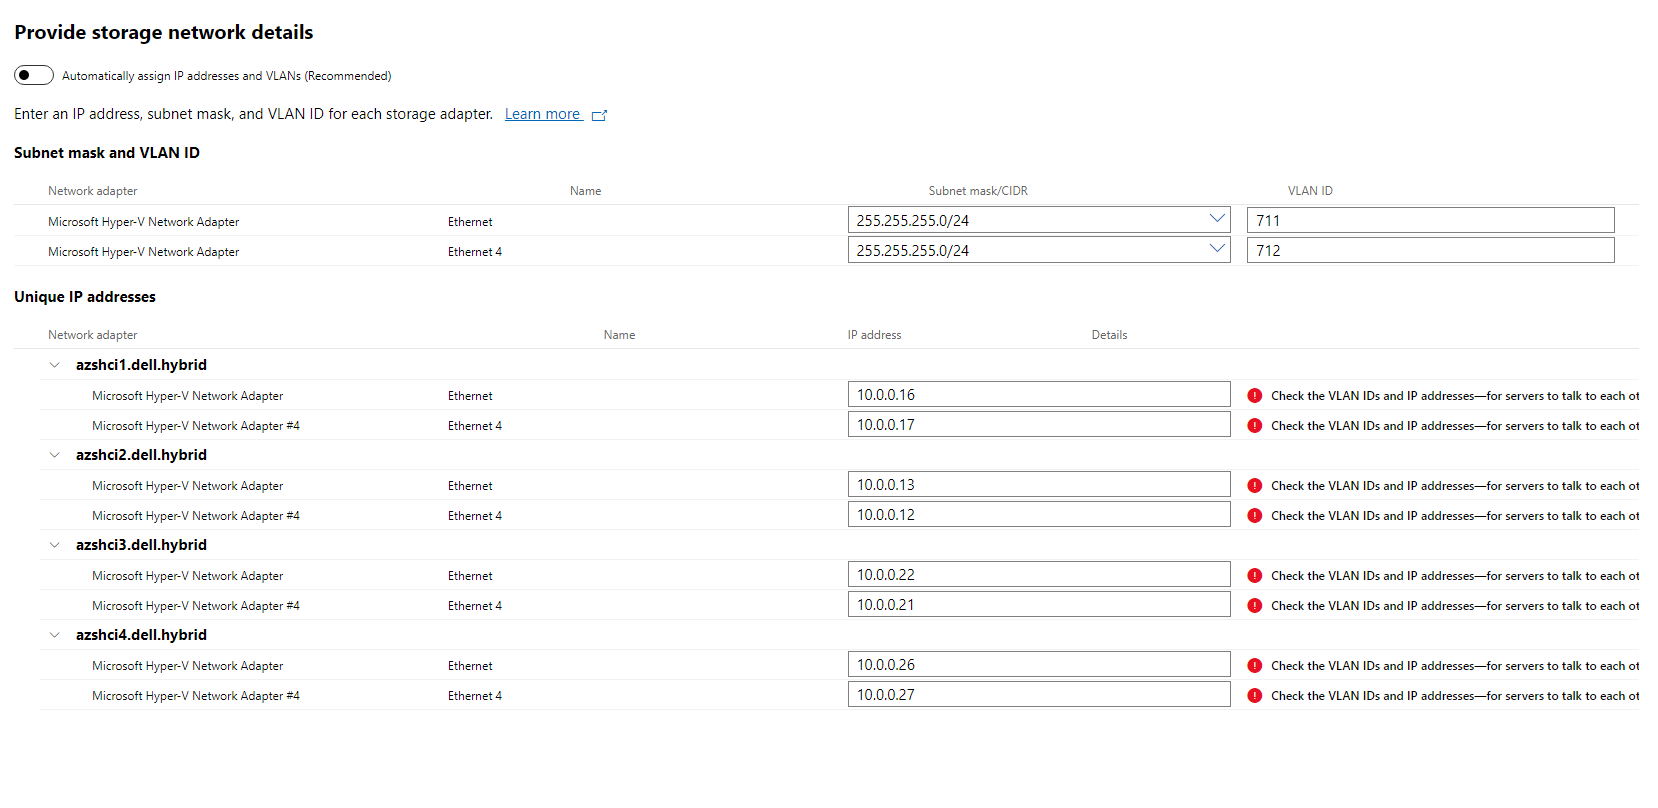
However, since this is a lab environment I am going to allow Network ATC to do all the work. So I will click Next:Clustering to continue.
Clustering
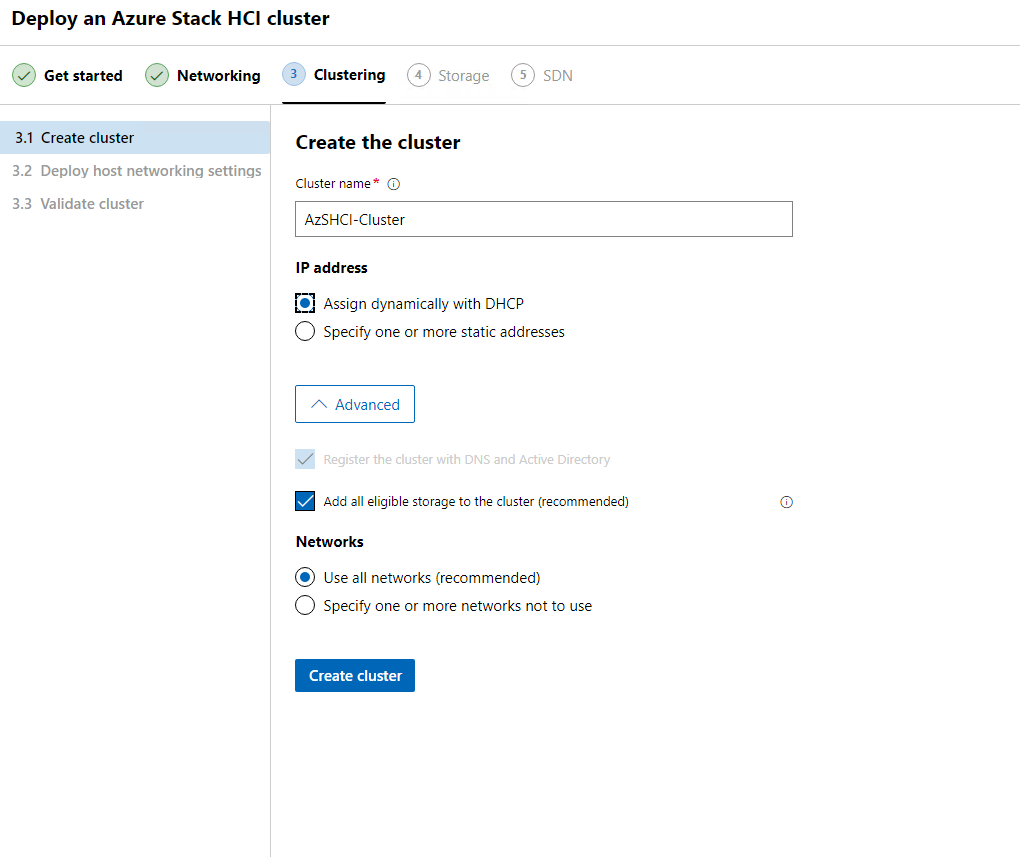
Now we are almost ready to build this cluster. On the first screen under clustering section, we will name our cluster. Again, this is a lab environment, so I will allow my cluster IP to be assigned with DHCP, also keeping the defaults we see on this screen. We then can click Create Cluster.
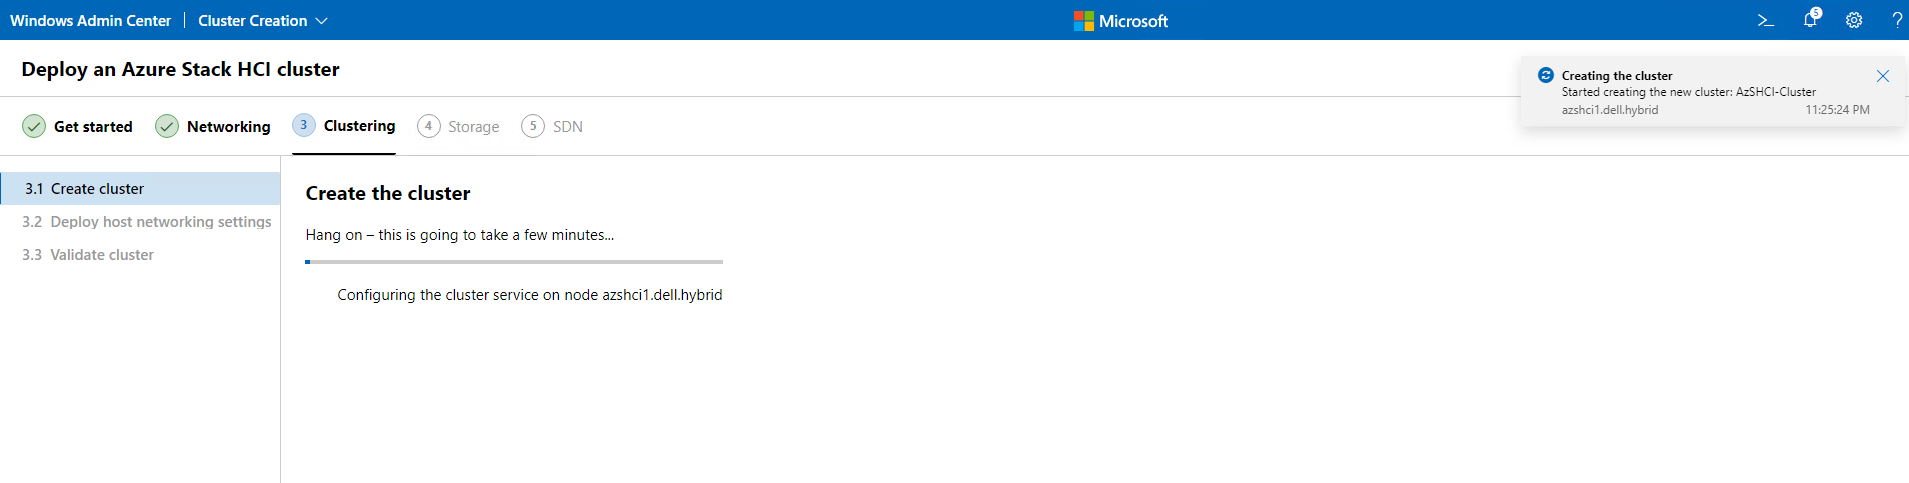
This should take a few minutes. Again, time for coffee and to watch the rain that has started up again. I do smell dinner so that is almost ready. Hoping to get this blog done before the roast is served.
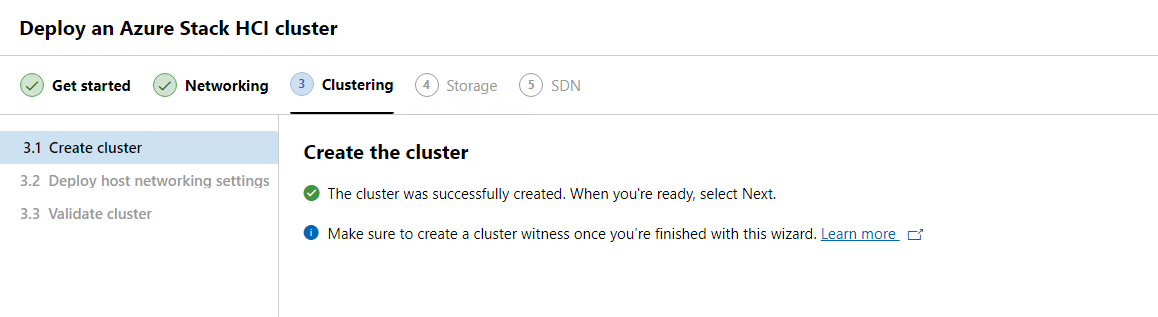
Once the cluster has been created. We will see that we need to create a cluster witness, that will come here shortly. For now, we will hit Next to continue on.
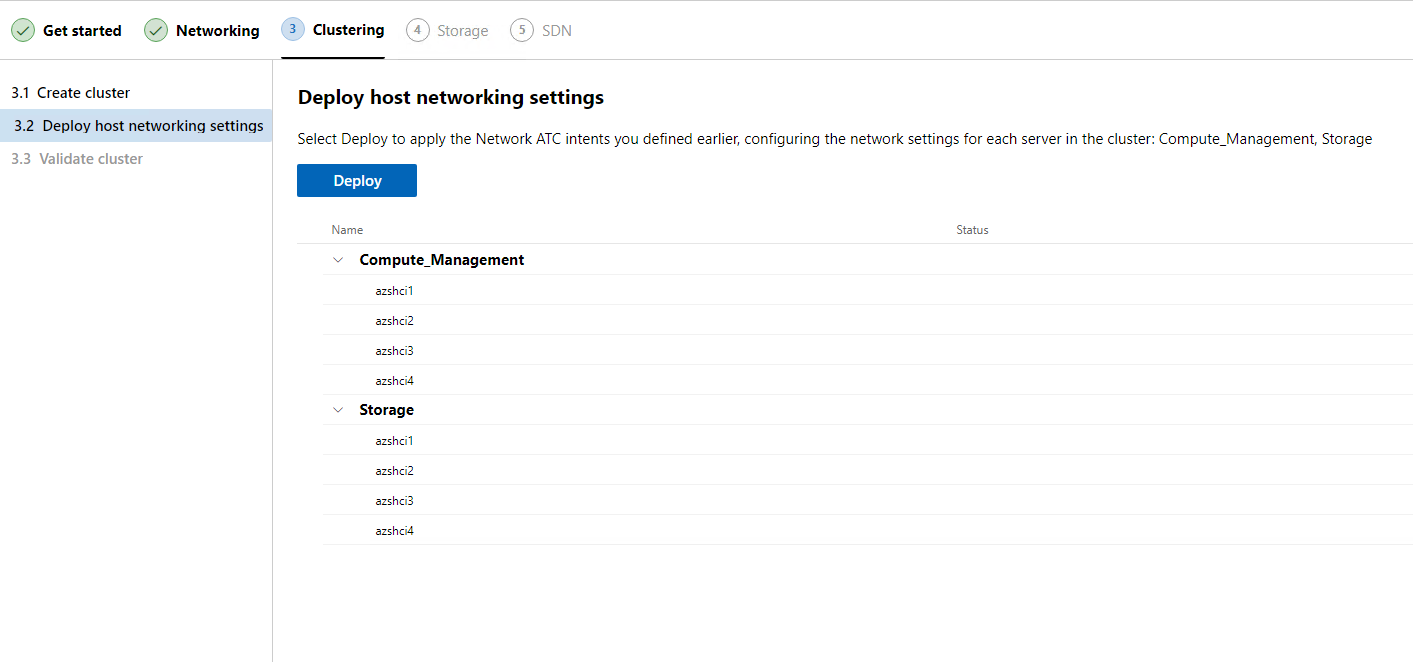
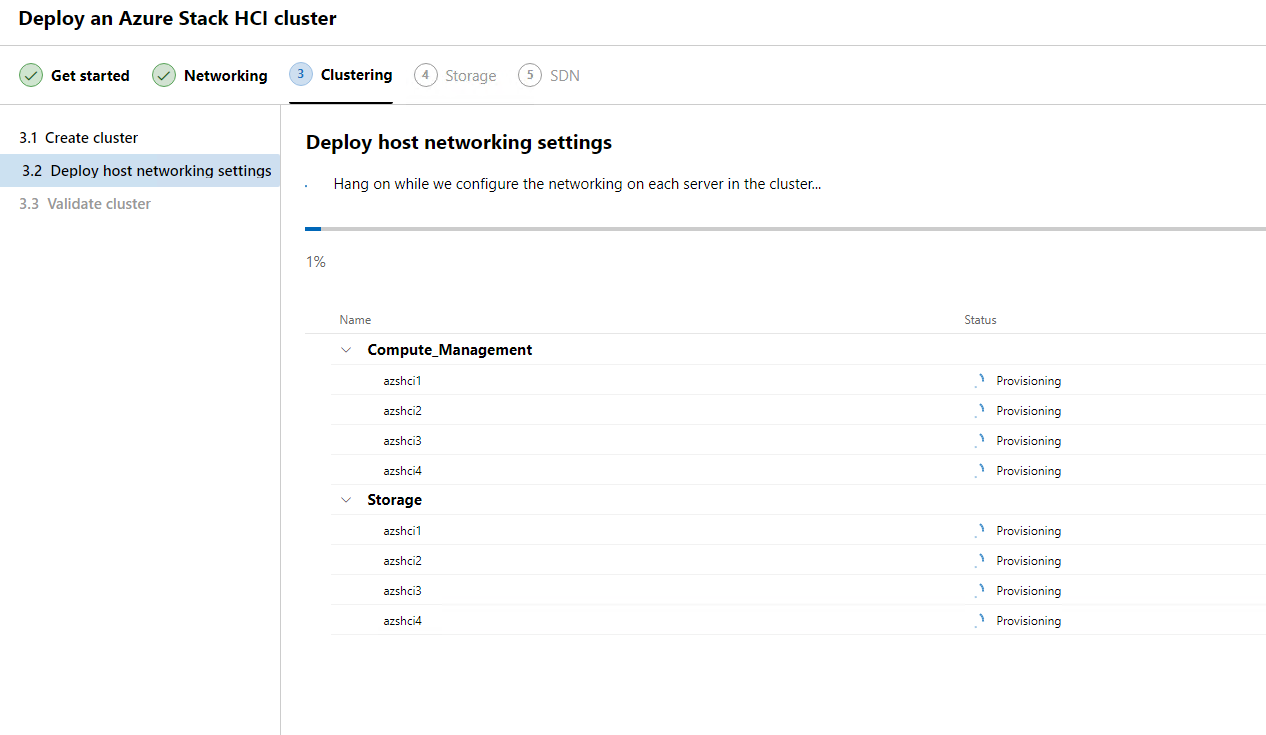
At this point the wizard will deploy host networking settings. We can review those settings after we hit deploy.
Yet, another chance to get more coffee. Wow will I be caffeinated greatly tonight!
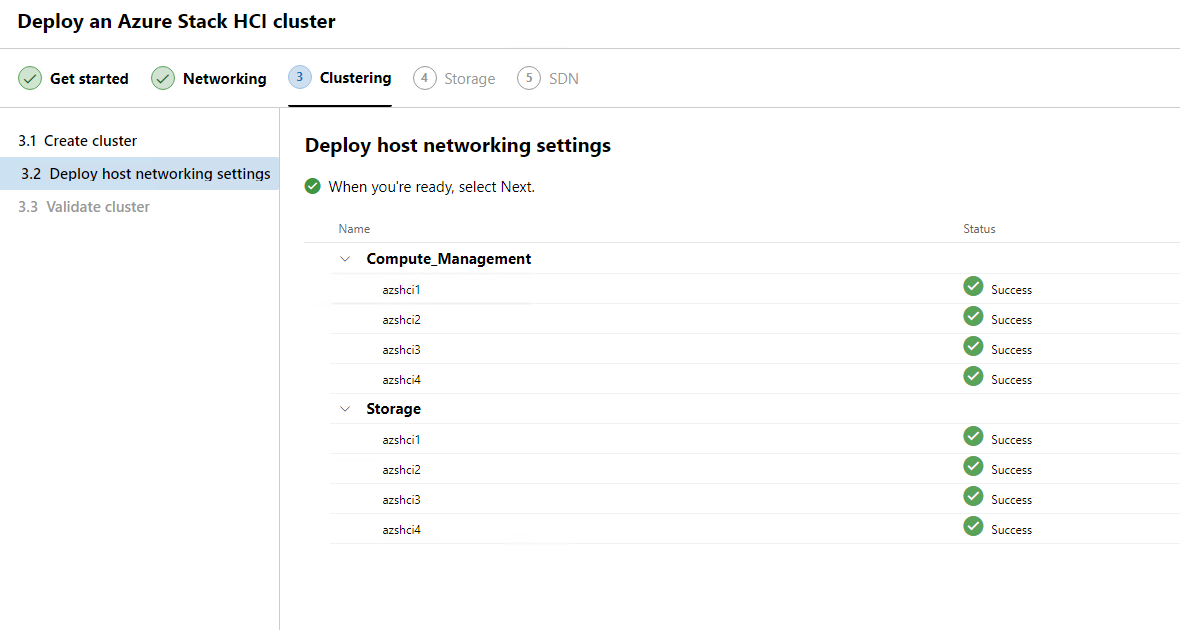
All done with the network setting deployment to our host. Now it is time to click Next.
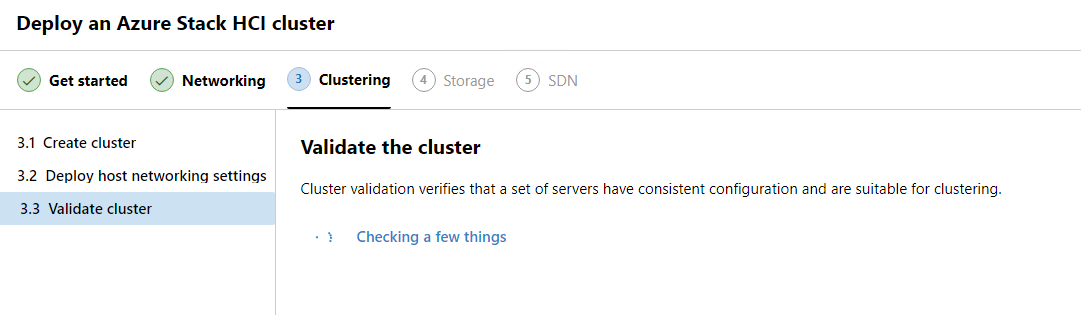
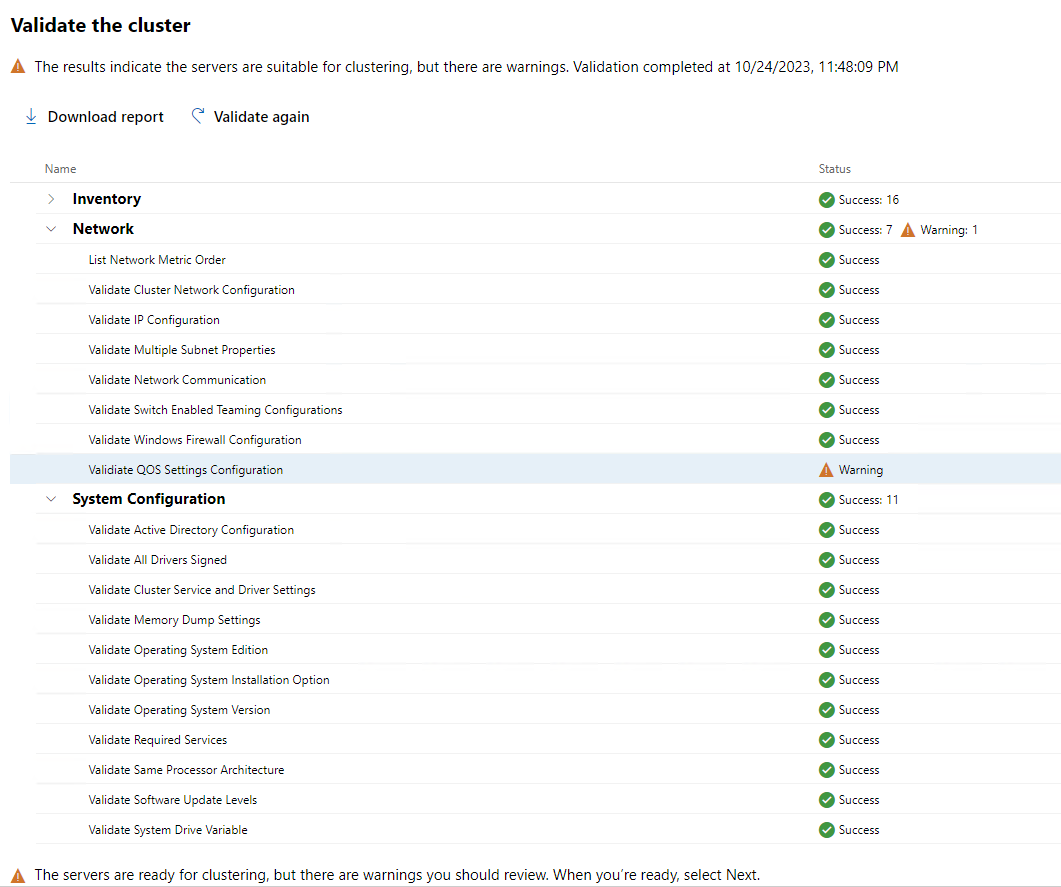
Now it is time to validate our cluster. When the prompt is ready, click on Validate. This will take a few minutes.
So we are ready to move on. No errors just one warning around QoS configurations. Clicking on Next:Storage is what we should do now.
Storage
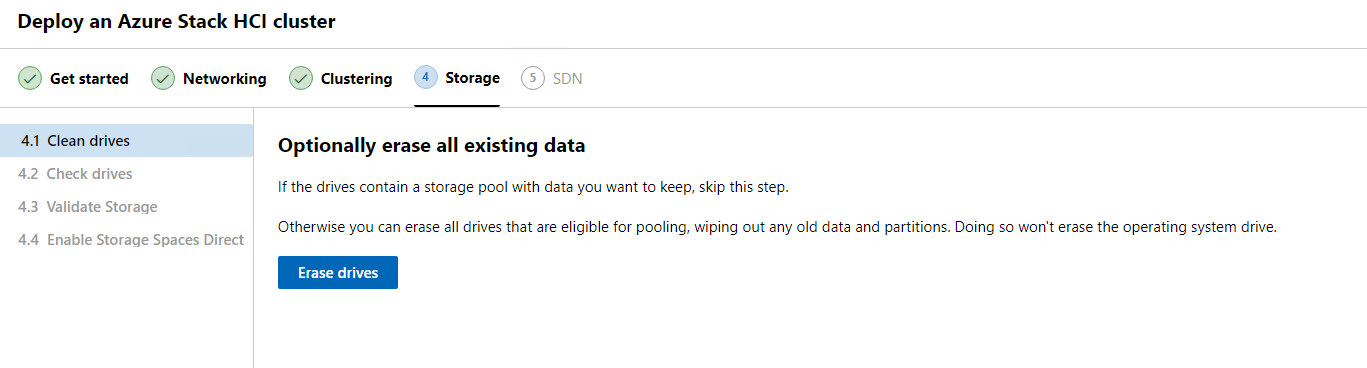
The first option under Storage configuration is the ability to erase all existing data. This is good for servers or old clusters we maybe redeploying to. Since this is a virtual environment and never used, I will just click next.
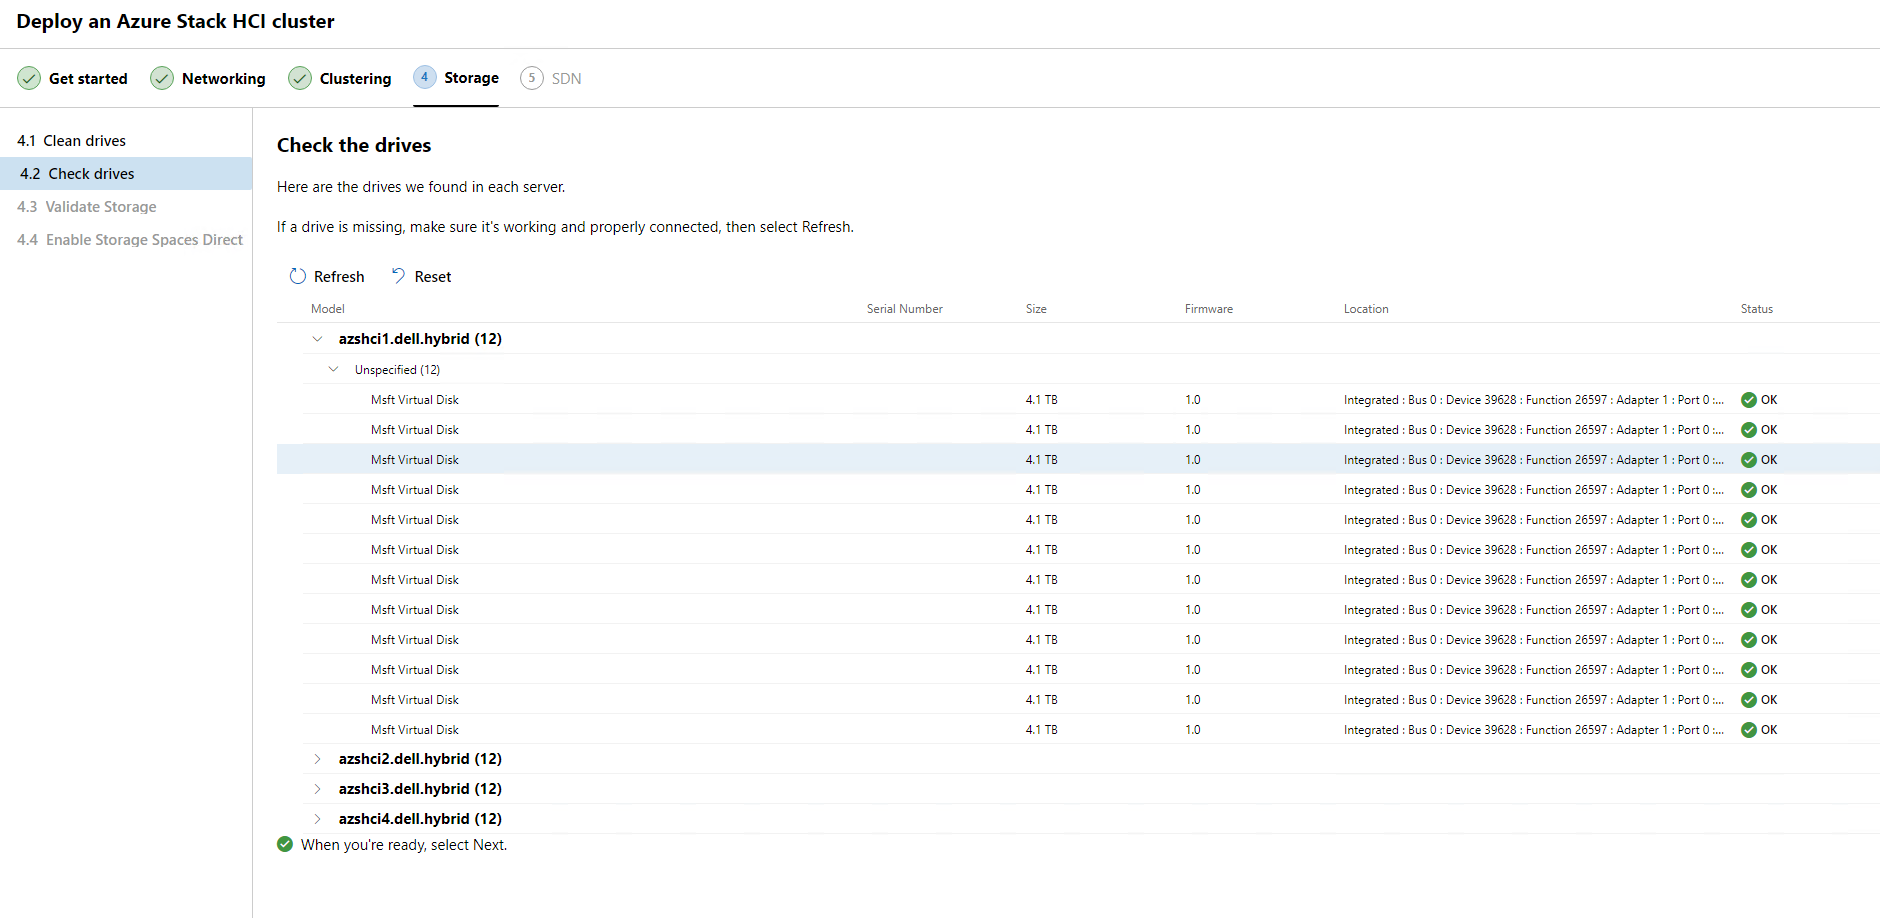
We now can see all the disk assigned to each node and get a report that everything looks good. At this point we click Next.
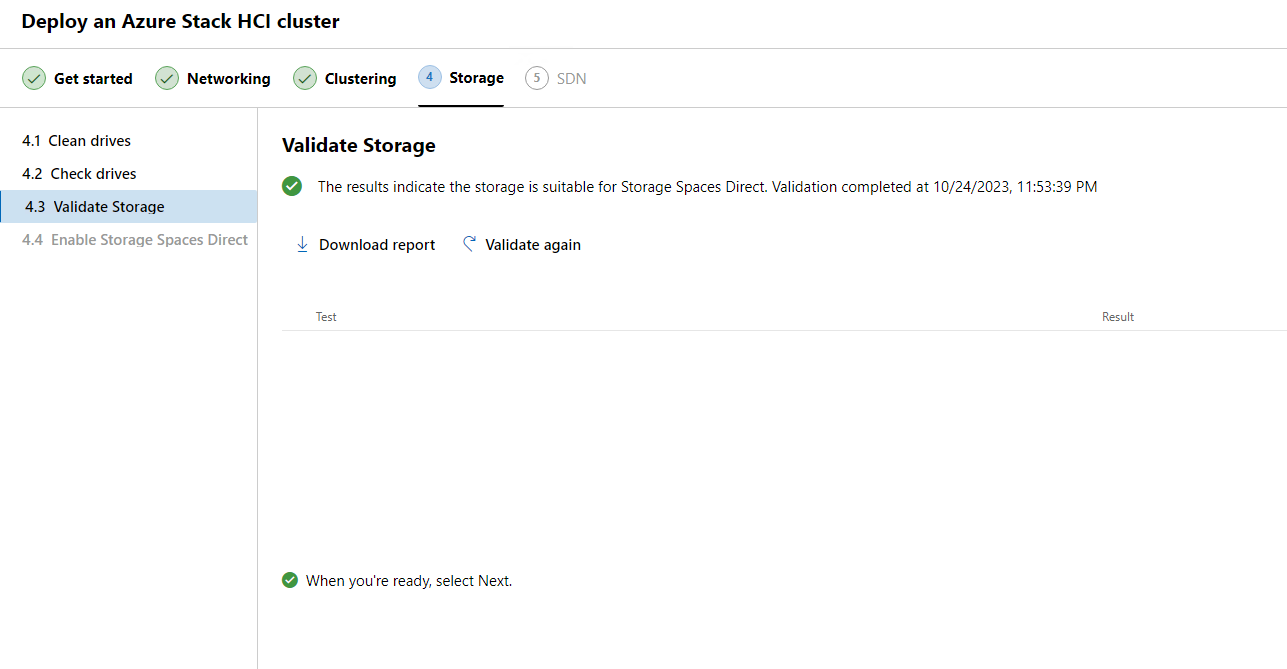
Next, we will validate the storage and get ready to provision storage spaces direct.
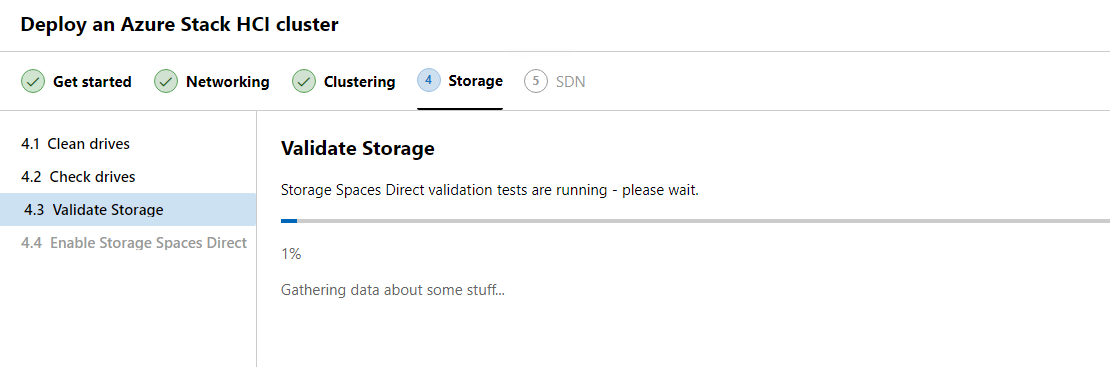
We got the green check. Our storage looks good and it is time to click Continue.
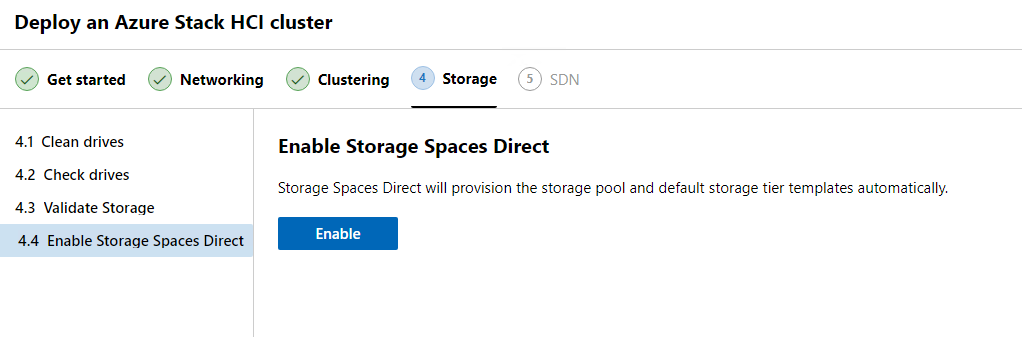
Now it is time to provision the Storage Spaces Direct storage pool and create default storage tier templates. Here we will click enable and watch the magic happen while drinking a nice cup of coffee.
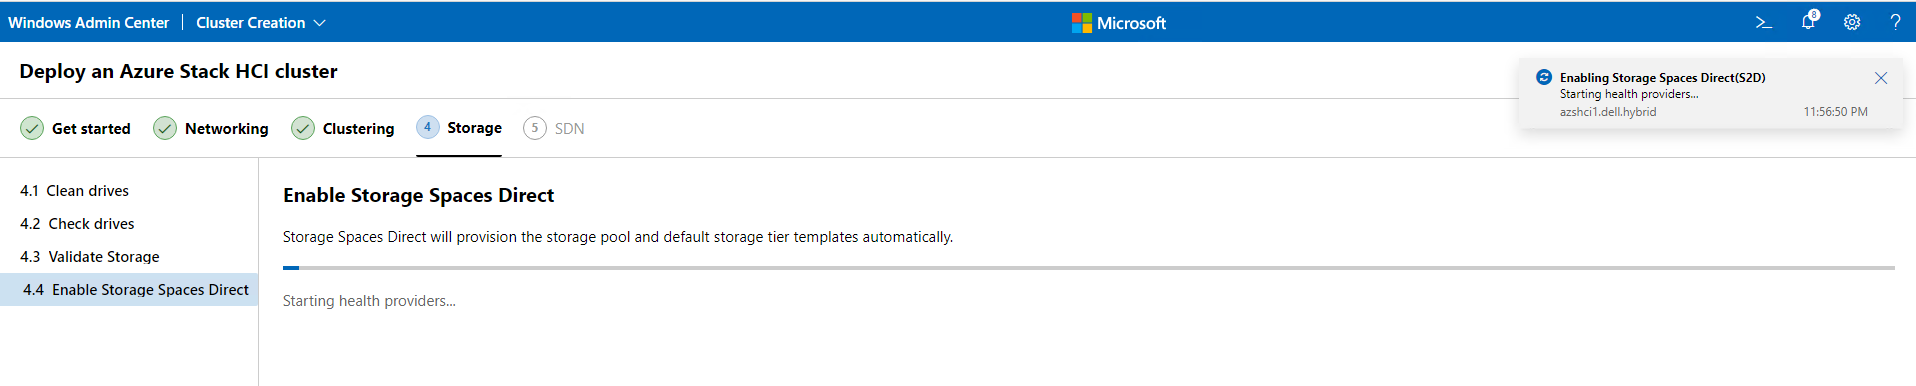
Yet again, another great time for coffee or a nap while we wait for storage spaces direct to be enabled and configured.
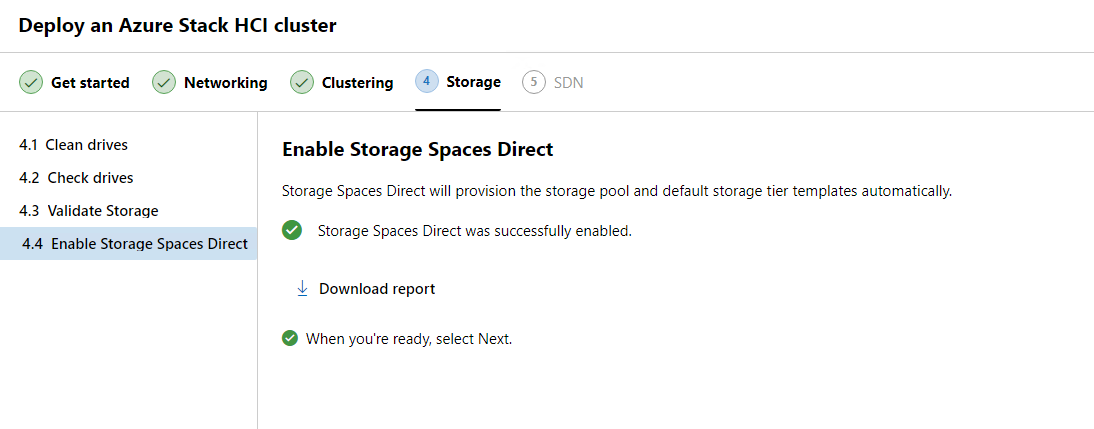
Storage spaces direct was enabled successfully and we have our storage pool deployed. Time for us to click on Next:SDN.
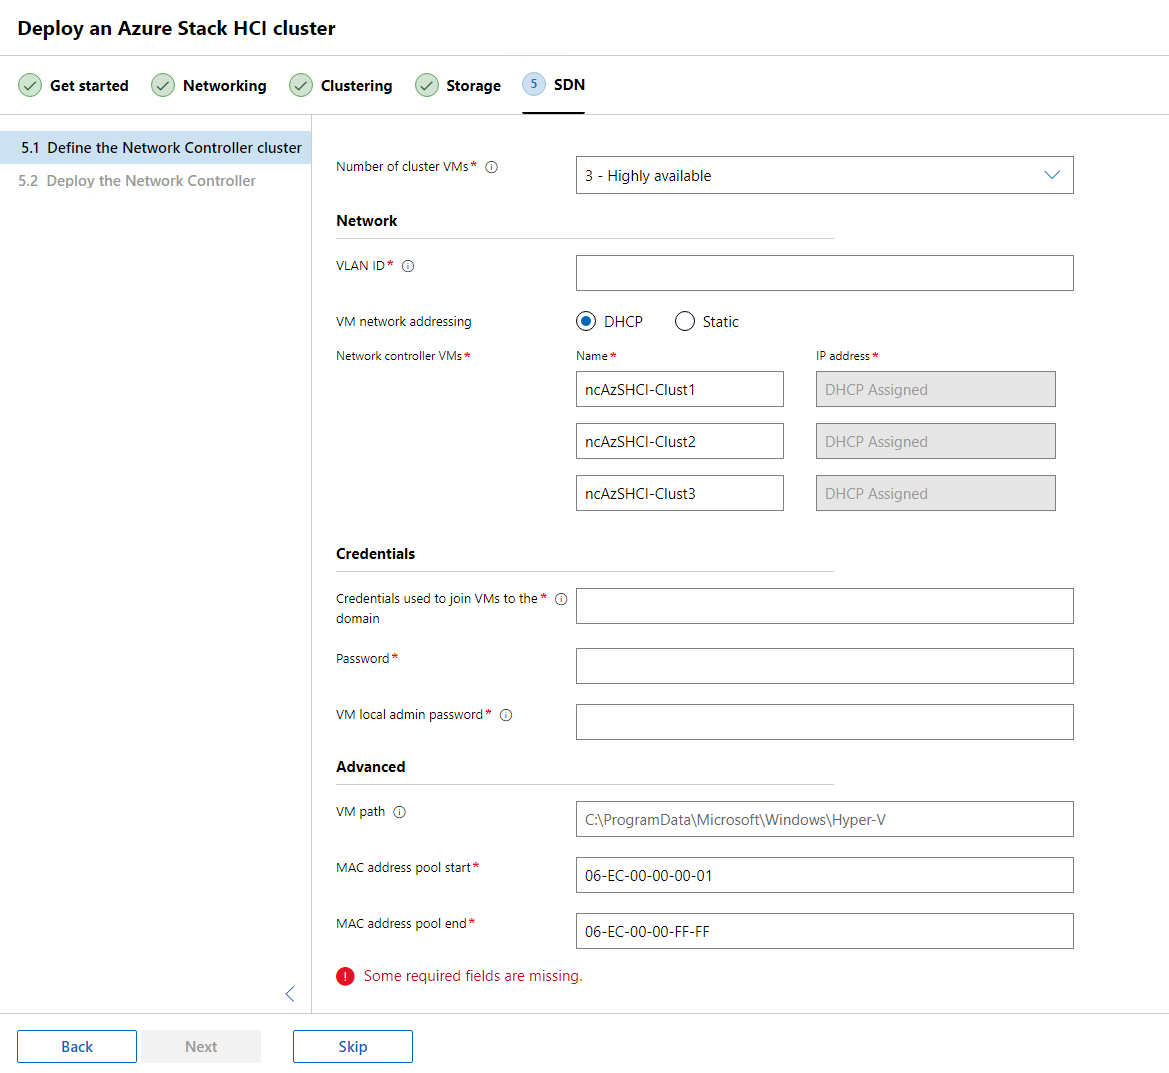
SDN
The next and last step that we wil come across is the configuration of Software Define Networking (SDN). At this time I will skip this configuration but we can come back and setup SDN anytime once we are ready to do so.
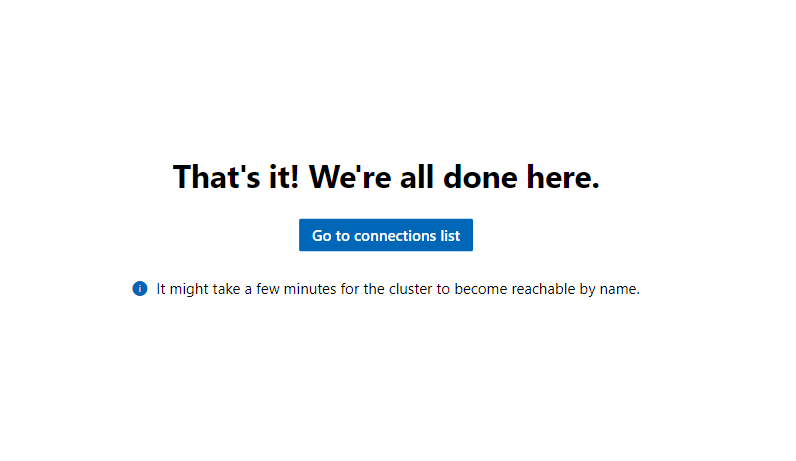
Just like the sign says.. we are done… well almost. We still ned to create that witness and configure a few other items like Cluster-aware-updates, etc.
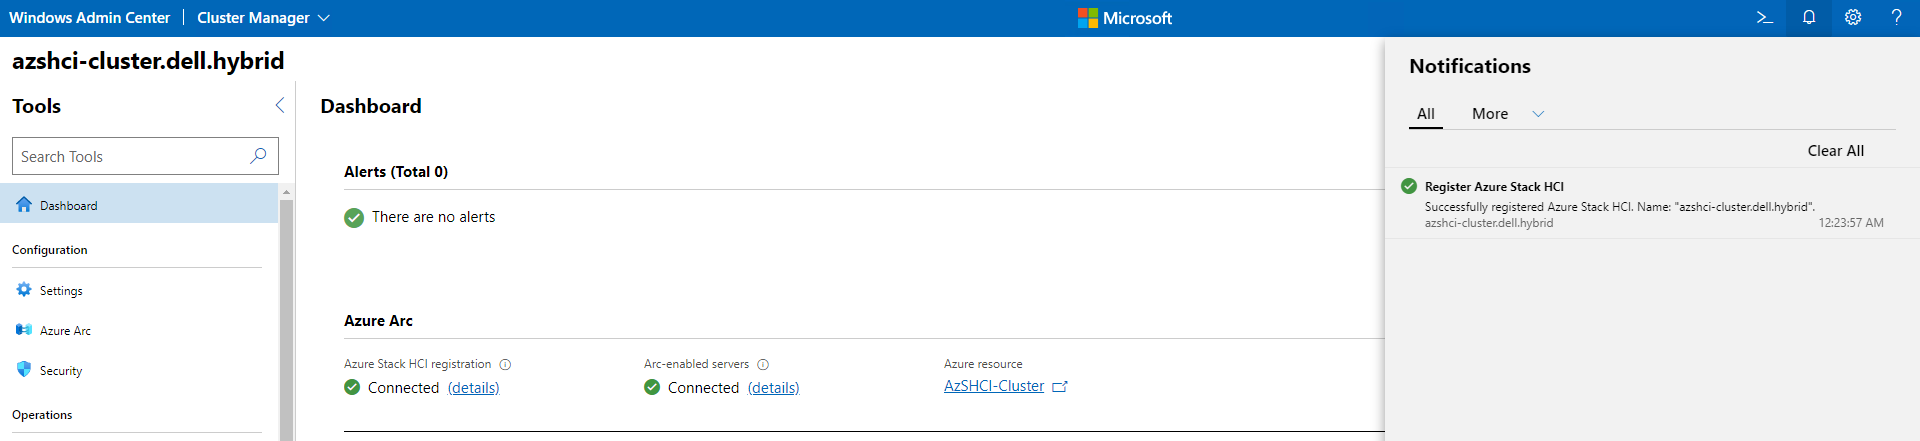
Register HCI Cluster with Azure
Once we have gotten to the cluster dashboard we will see that our HCI cluster isn’t registered yet. We will need to do that now by clicking on Register.

On the blade that pops up to the right we will enter the subscription, the region, and create a new resource group to place these resources.
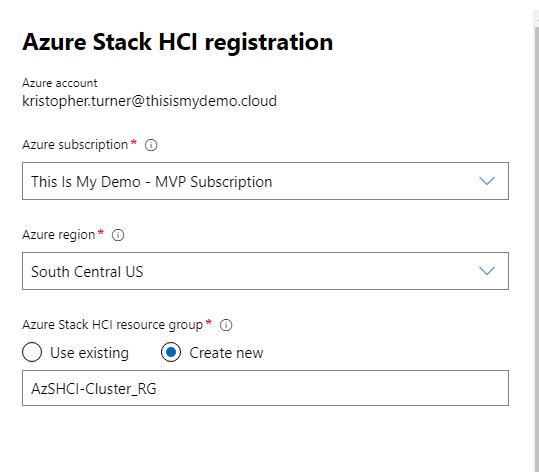
Then we wait for the registration to complete.
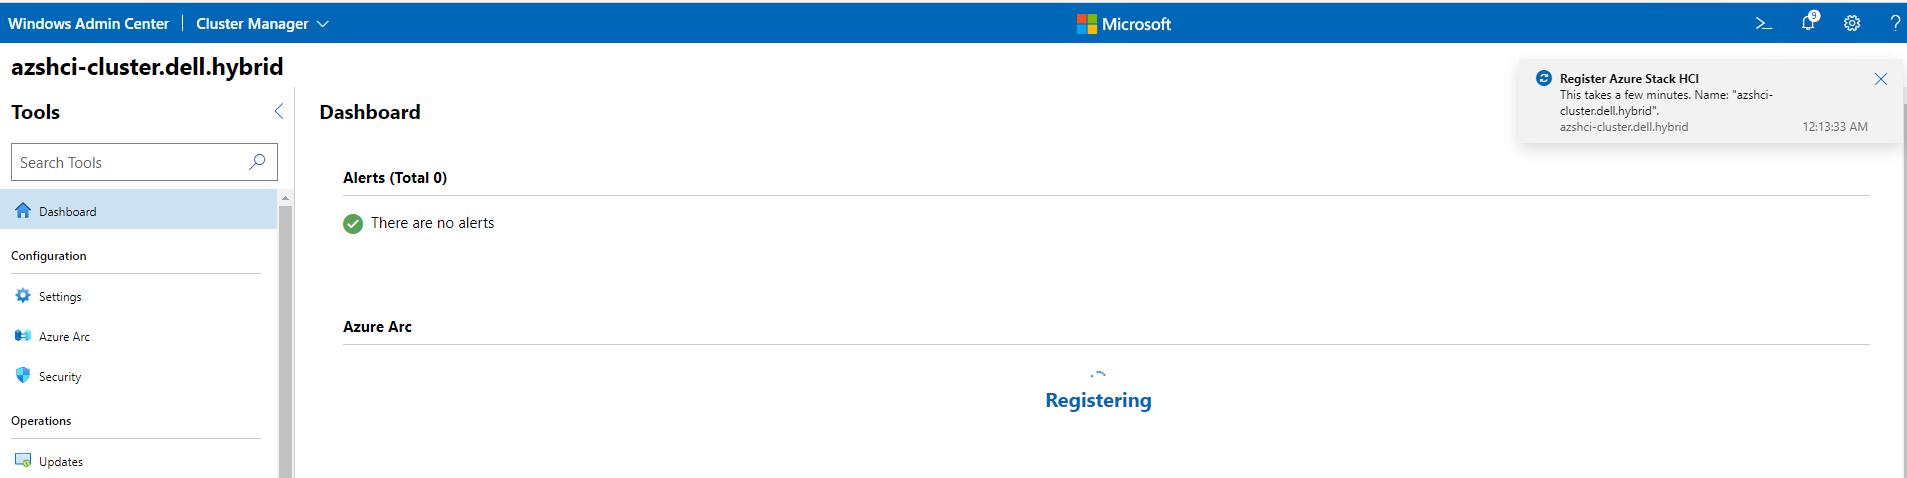
Once completed we should see that our cluster is now registered with Azure and also our nodes are managed by Azure Arc-enabled servers.
Witness
We have a choice to do a file based witness located locally on another server, or choose to create a cloud witness. For this demo I will create a file witness on my domain controller using PowerShell and the Windows Admin Center.
Create directory on File Server.
    $ClusterName="AzSHCI-Cluster"
    $WitnessServer="DC"
    #Create new directory
    $WitnessName = $Clustername + "Witness"
    Invoke-Command -ComputerName $WitnessServer -ScriptBlock { new-item -Path c:\Shares -Name $using:WitnessName -ItemType Directory -ErrorAction Ignore }
    $accounts = @()
    $accounts += "$env:userdomain\$ClusterName$"
    $accounts += "$env:userdomain\$env:USERNAME"
    #$accounts+="$env:userdomain\Domain Admins"
    New-SmbShare -Name $WitnessName -Path "c:\Shares\$WitnessName" -FullAccess $accounts -CimSession $WitnessServer
    #Set NTFS permissions
    Invoke-Command -ComputerName $WitnessServer -ScriptBlock { (Get-SmbShare $using:WitnessName).PresetPathAcl | Set-Acl }
If I where to include the next line in the script above we would have our witness created 100% with PowerShell. I left that off so I can show you how to do it from Windows Admin Center.
Set-ClusterQuorum -Cluster $ClusterName -FileShareWitness "\\$WitnessServer\$WitnessName"
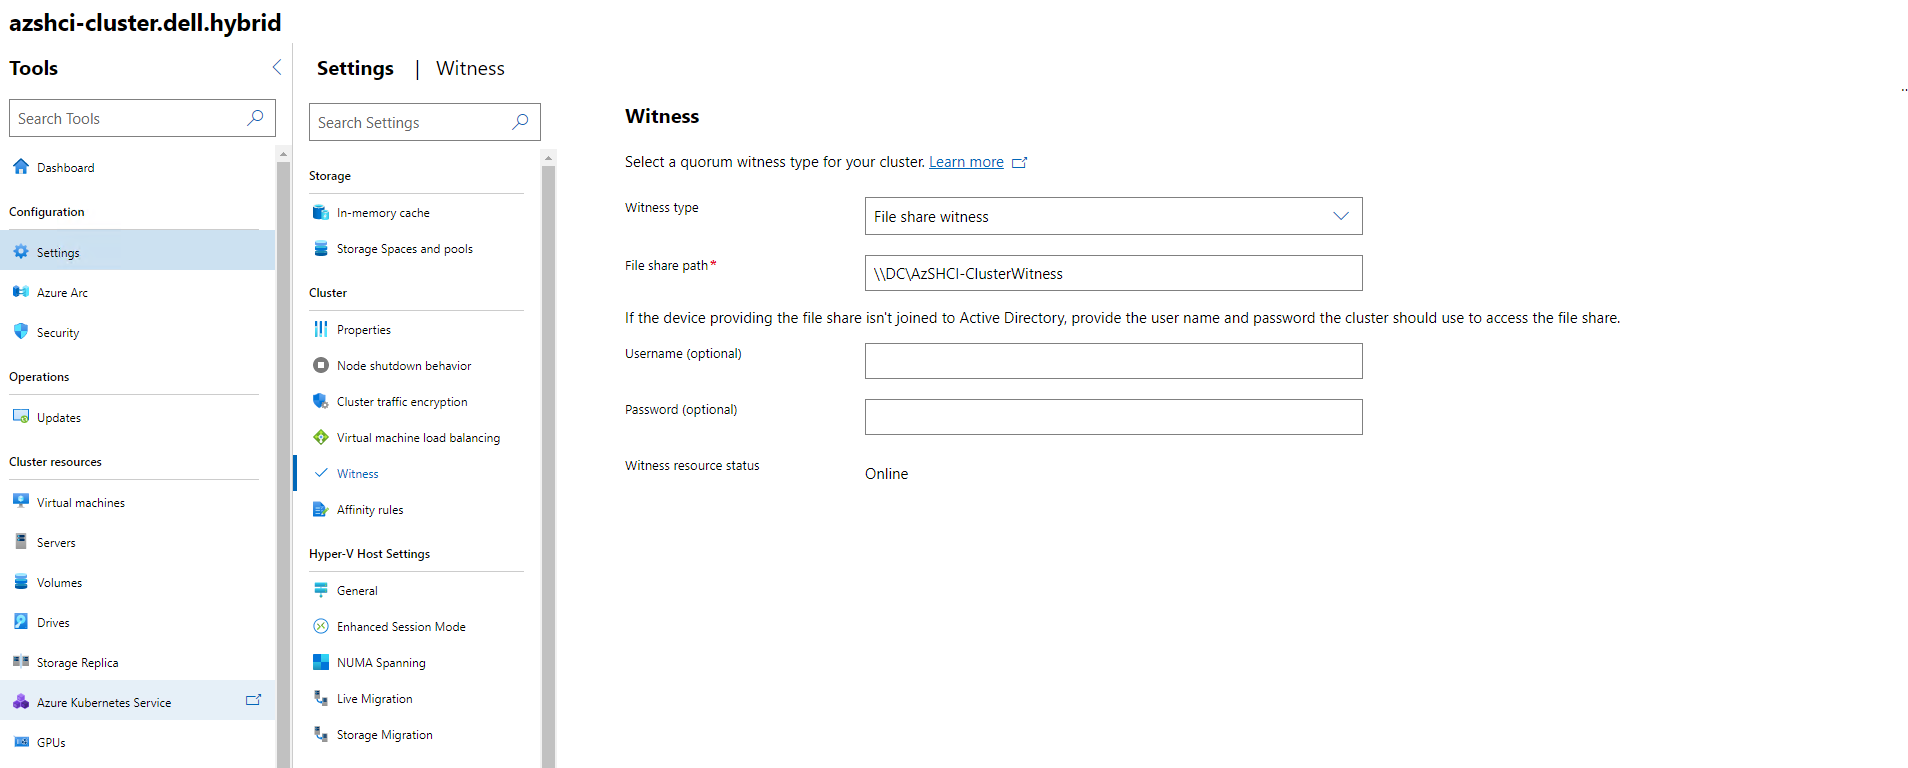
Create Witness in WAC
Now that we have created our file share we can create the Witness within Windows Admin Center. On the cluster dashboard, go to settings, then look for Witness under Cluster. For Witness type select File share Witness. We then enter the File share path and click save. If successful we should see Witness resource status is Online.
Cluster Aware Updating
To enable cluster aware updates we will go back to the cluster dashboard and click on Updates under Operations. Here we have an option to click Add Cluster-Aware-Updating role. We will click that button to continue.
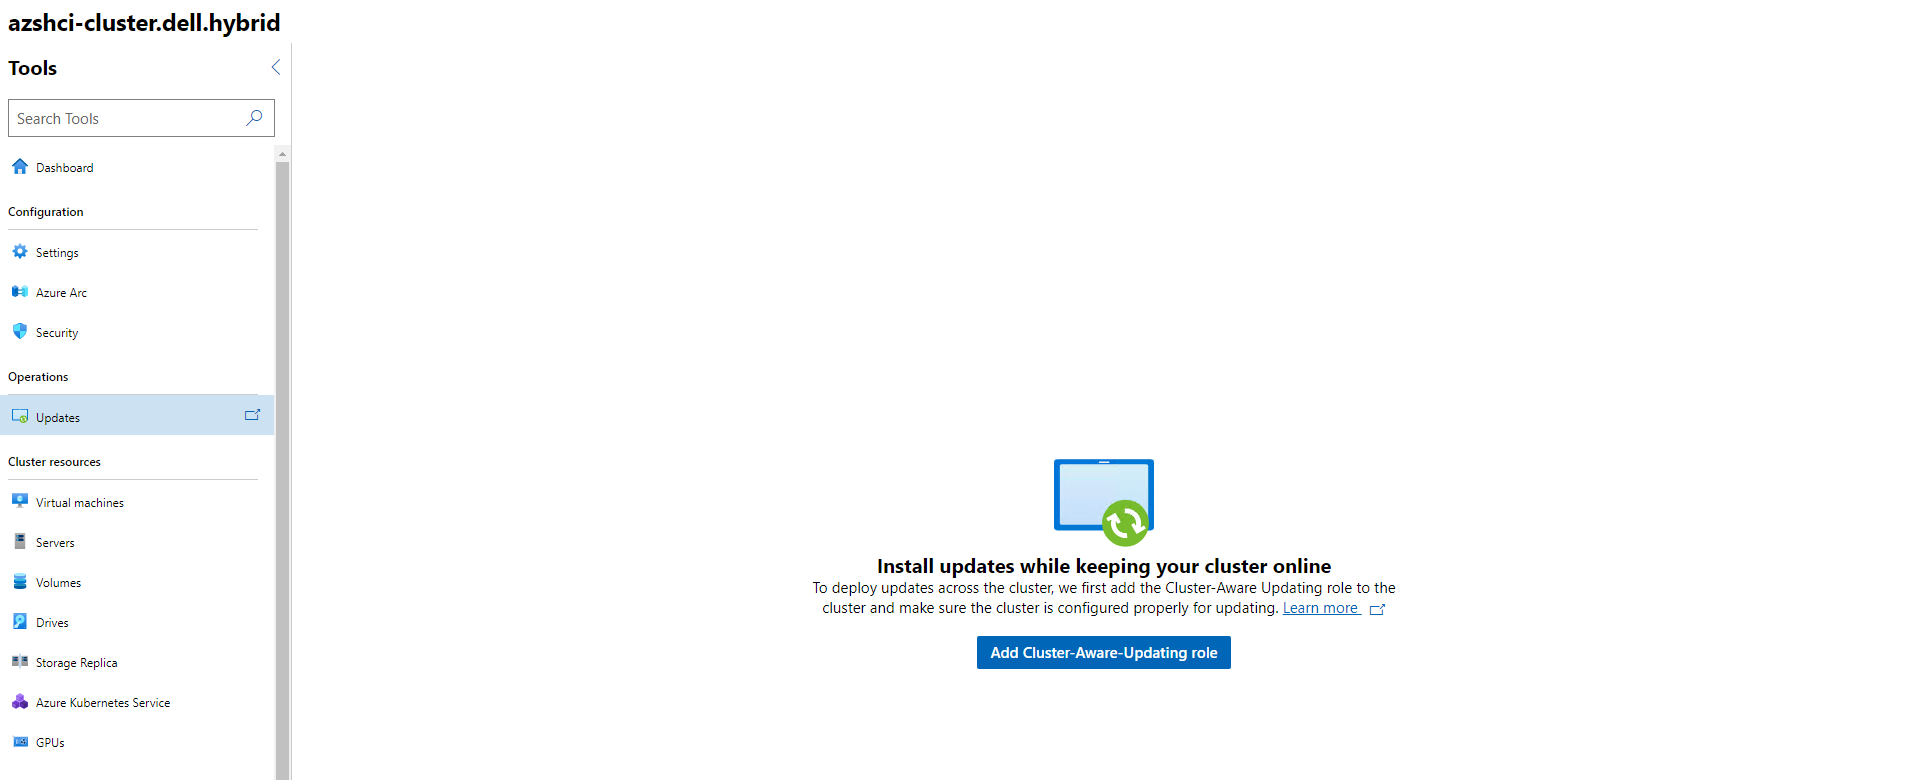
However, I got this error and I really don’t have time to troubleshoot this tonight.
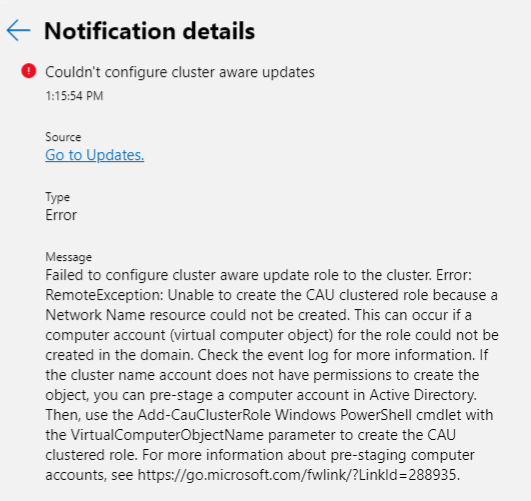
So I went the easy route and just ran a PowerShell Script to configure Cluster-Aware-Updating on my cluster.
$Servers="AzSHCI1","AzSHCI2","AzSHCI3","AzSHCI4"
$ClusterName="AzSHCI-Cluster"
$CAURoleName="AzSHCI-Cl-CAU"

#Make sure RSAT-Clustering-PowerShell is installed on nodes
    Invoke-Command -ComputerName $Servers -ScriptBlock {
        Install-WindowsFeature -Name RSAT-Clustering-PowerShell
    }
#add role
    Add-CauClusterRole -ClusterName $ClusterName -MaxFailedNodes 0 -RequireAllNodesOnline -EnableFirewallRules -GroupName $CAURoleName -VirtualComputerObjectName $CAURoleName -Force -CauPluginName Microsoft.WindowsUpdatePlugin -MaxRetriesPerNode 3 -CauPluginArguments @{ 'IncludeRecommendedUpdates' = 'False' } -StartDate "3/2/2017 3:00:00 AM" -DaysOfWeek 4 -WeeksOfMonth @(3) -verbose
#disable self-updating
    Disable-CauClusterRole -ClusterName $ClusterName -Force
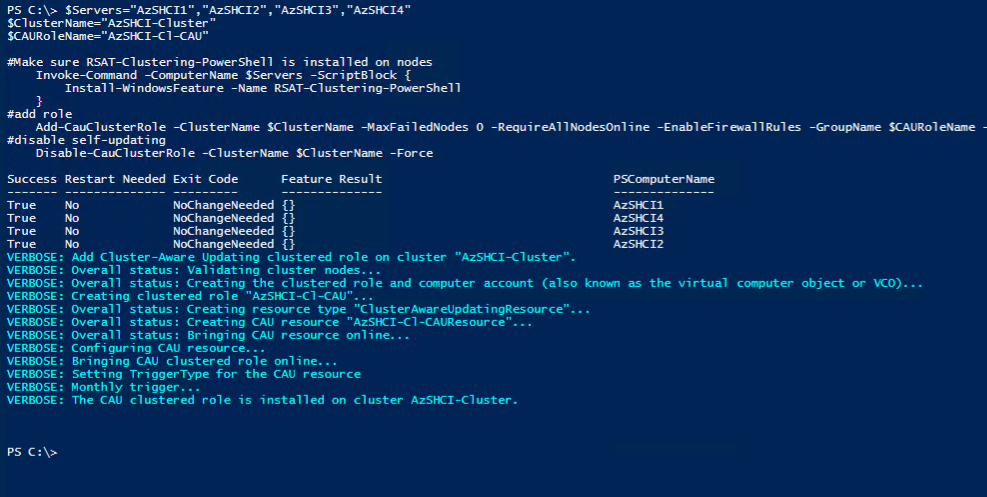
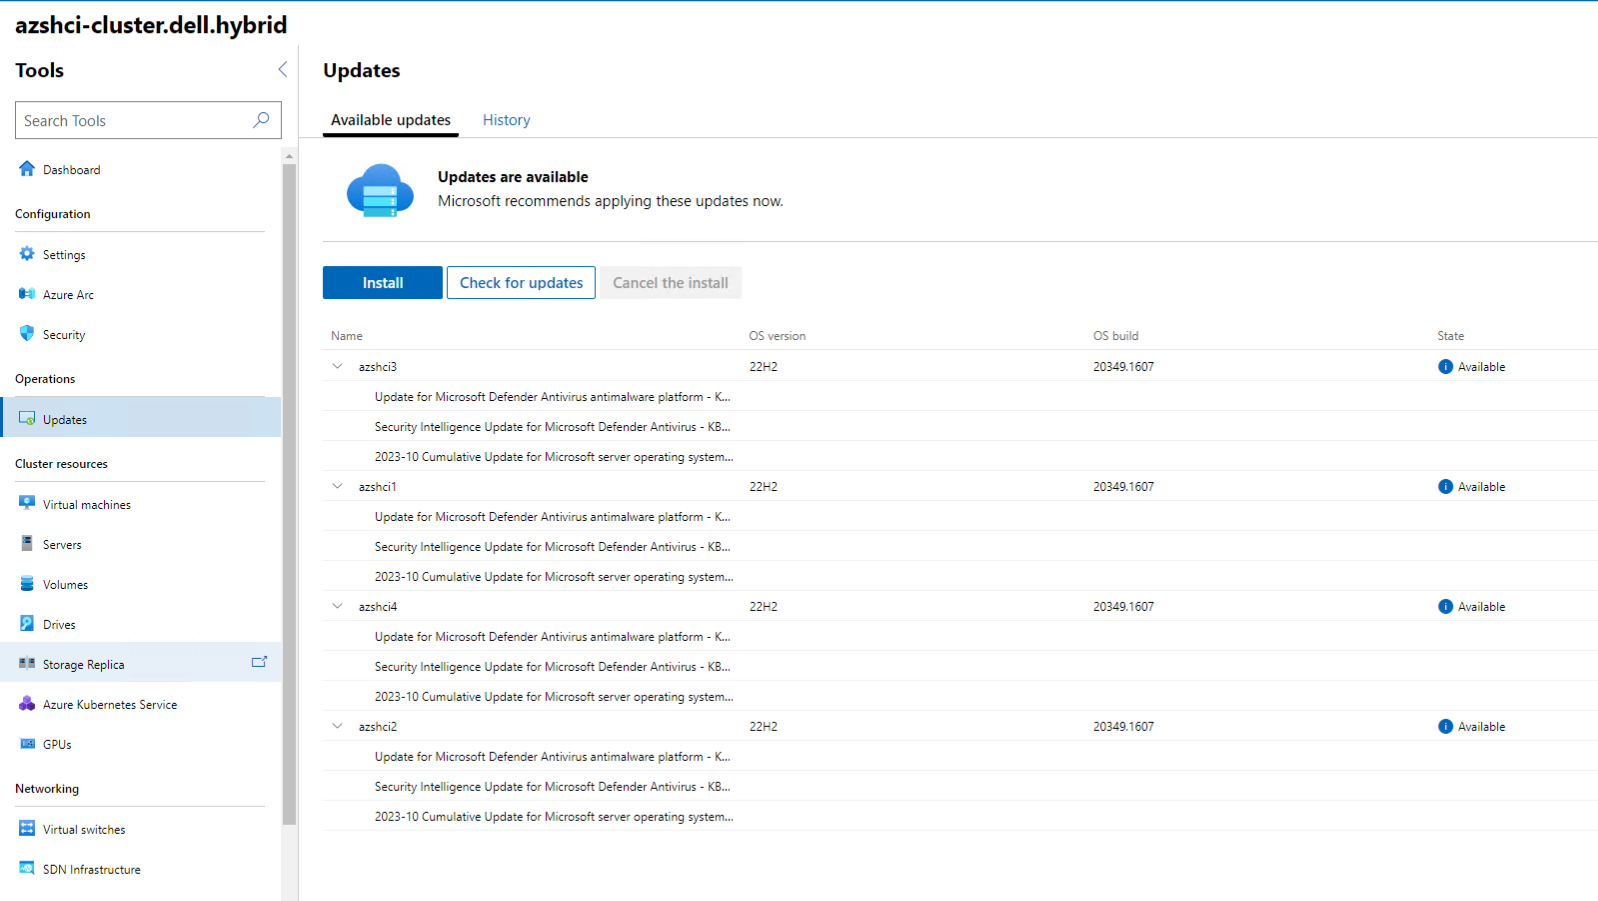
And now we can go back to Windows Admin Center and bingo. We have Cluster-Aware-Updates enabled.
Final Thoughts
So, my last blog for a while on how to deploy an Azure Stack HCI cluster. Again, as I have mentioned in the past, there is so much more that we can do to these clusters to get them production ready. There is so much more we can do with HCI as well. Which is why I will continue to blog about it for a while.
