Azure Stack HCI - Part V - From one to Sixteen
This is a series of blogs about my experiences with Azure Stack HCI
In this blog series I plan to blog about everything I know about Azure Stack HCI. So, it should be a very short blog series. Just kidding. Again, I tend to blog about subjects that I am currently working on or will be currently working on. So, Azure Stack HCI is fresh on my mind again these days.
The last three or so blogs I have talked about deploying a single-node cluster and then how to scale that single-node cluster to a two-node cluster. This blog I want to share my experience about scaling my Azure Stack HCI cluster to a three-node cluster and more. The over all process is fairly the same as scaling out a one-node to a two-node cluster. However, there are some differences that I wanted to call out. So instead of actually walking through the scale out process, I will discuss the differences between scaling out to a two-node cluster to three-nodes or more.
I think I will discuss the primary topics to scale out to a third node and stay only focused on what is different than scaling out to a two-node cluster. I will try and cover some of the following:
Overview
So we have deployed a single-node cluster in the previous blog Azure Stack HCI - Part III - Advanced Deployment of A Single Node Clusterand then I followed that blog up with how to scale out that single-node cluster to a two-node cluster in my blog, Azure Stack HCI - Part IV - Scale-out Azure Stack HCI Single Node Cluster. This blog as I mentioned already will focus just on the differences between scaling out from a one-node cluster to a two-node cluster and what we need to think about when scaling out to a three-node or higher Azure Stack HCI cluster.
To be honest, at this point if I were going to need a three node cluster I would just redeploy the entire cluster. In some cases this would be possible and not effect any production workloads, or critical workloads that might be running at a remote office or manufacture plant, etc. However, if you do need to keep those workloads up, scaling out would be the way to go. If you can manage to create a new multi-node cluster then that would be the route I would take. You do need to think again about the workloads running for that decision to be made. First, do you have extra servers that can be used in order to keep the old cluster up and then migrate those workloads over once the new cluster is running. Second, if you do not, do you have a CI/CD solution in place that will assist in getting those workloads redeployed quickly? In most cases, if you do and are taking advantage of AKS on your Azure Stack HCI solution you should already have deployment pipelines in place to assist with deploying those same containerized workloads to HCI.
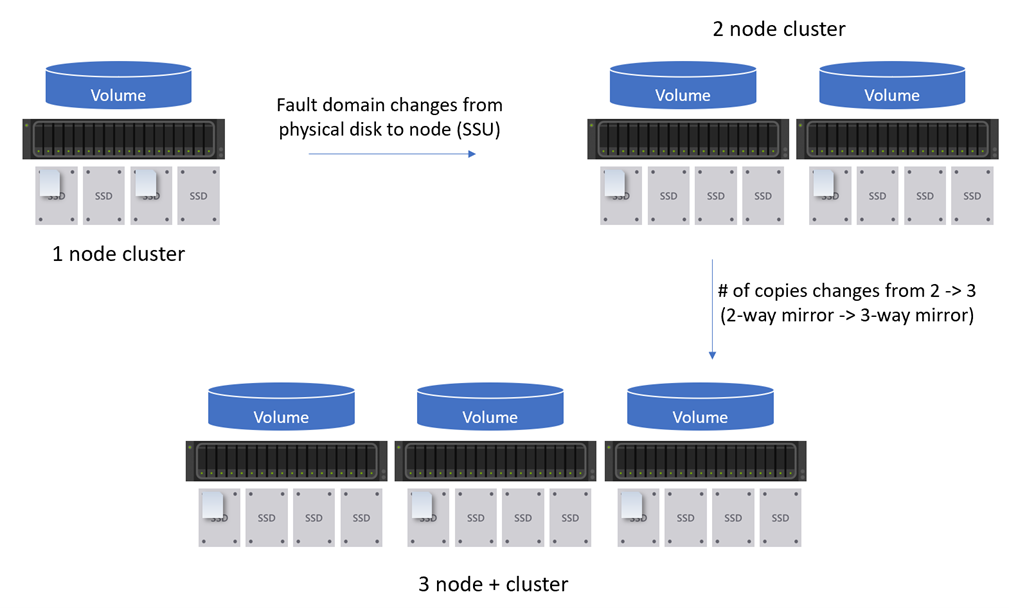
So what are we doing in this blog again? The image below is a decent high level road map of the last few blogs. We went from a single-node cluster to a two-node cluster. The major changes there would have been changes in our Storage Fault domain, which here we changed it from Physical Disk to StorageScaleUnit. Basically enabling that virtual disk to move across nodes. We also added our witness to the cluster when we scaled out to a two-node cluster. We provisioned a new Network ATC intent for SMB Traffic. We also enabled cluster aware updates for the cluster.
For the scale out to a three-node or higher cluster there will be two main areas I will cover here in this blog. The first is storage, and changing from a two-way mirror to a three-way mirror. There is also the physical cabling we will talk about as well as migrating our existing workloads from our old volumes on to newly created three-way mirror enabled volumes.
Networking Changes
Compared to the scaling out from a one-node to a two-node, this process to scale out to a three-node or larger Azure Stack HCI cluster shouldn’t be much different when it comes to configuring Network ATC and Network HUD and other networking topics such as DBX. The only thing I would call out here is how you have your physical network configured as in the top of the rack switches, etc.
Physical Networking Changes
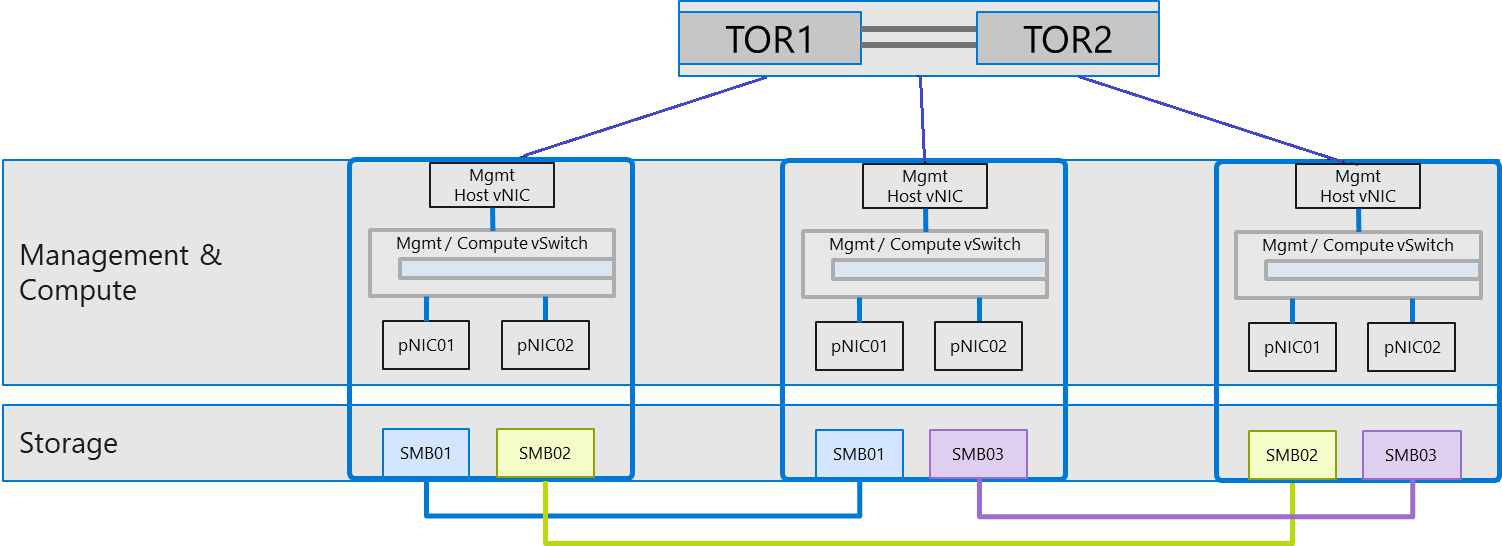
When it comes to the physical network and configuring our switches there are a number of configurations that are required now that we are going past a two-node cluster. With our two-node cluster, we could have gone switchless for storage. Management and compute could have been plugged into any our of customer switches at that point. Now, that being said, you could still go switchless even on clusters larger than two-nodes. The only requirements would be having enough redundant connections to each and every node in the cluster. So for East-West traffic on a three-node cluster, you would need to be able to connect every node to each other which means a lot of network cards if you have larger clusters.
Here is an example of a Switchless or a Direct configuration for a three-node cluster. Here the management and compute traffic still will traverse the top of the rack switches. However, our SMB traffic will still be interconnected to all our host without going through a switch. I for one have not seen this deployed this way, at least with anything with more than two-nodes in the cluster. You can read more information about this on the Microsoft Learn Documentation called Physical network requirements for Azure Stack HCI under the “Using Swtichless” section.
Switch Requirements
So at a high level, here are some areas that we should plan in order to get all our requirements ready at the top of the rack switches.
- VLANS: Make sure that our physical switches are configured to allow traffic on any VLANs we will be using.
- Make sure the physical switches meet all the Azure STack HCI requirements.
- Switches must comply with IEEE 802.1Q standards.
- Ethernet switches used for Azure Stack HCI storage traffic must comply with the IEEE 802.1Qbb specification that defines Priority Flow Control (PFC). PFC is required where Data Center Bridging (DCB) is used. Since DCB can be used in both RoCE and iWARP RDMA scenarios, 802.1Qbb is required in all scenarios.
- Ethernet switches used for Azure Stack HCI storage traffic must comply with the IEEE 802.1Qaz specification that defines Enhanced Transmission Select (ETS). ETS is required where DCB is used. Since DCB can be used in both RoCE and iWARP RDMA scenarios, 802.1Qaz is required in all scenarios.
- Ethernet switches must comply with the IEEE 802.1AB specification that defines the Link Layer Discovery Protocol (LLDP). LLDP is required for Azure Stack HCI
- The maximum transmission unit (MTU) is the largest size frame or packet that can be transmitted across a data link. A range of 1514 - 9174 is required for SDN encapsulation
- Ethernet switches used for Azure Stack HCI SDN compute traffic must support Border Gateway Protocol (BGP)
- Ethernet switches used for Azure Stack HCI management traffic must support DHCP relay agent
Host Networking Requirements
Important network adapter capabilities used by Azure Stack HCI include:
- Dynamic Virtual Machine Multi-Queue (Dynamic VMMQ or d.VMMQ)
- Remote Direct Memory Access (RDMA)
- Guest RDMA
- Switch Embedded Teaming (SET)
Firewall Requirements
Note: Azure Stack HCI doesn’t support HTTPS inspection. Make sure that HTTPS inspection is disabled along your networking path for Azure Stack HCI to prevent any connectivity errors.
For more details on Firewall requirements for Azure Stack HCI please read the following documentation: https://learn.microsoft.com/en-us/azure-stack/hci/concepts/firewall-requirements
Storage Changes
In my previous blogs I discussed how to configure our Storage Fault Domains for a scale out to a two-node cluster. Since this was already done we do not need to change our storage fault domain configuration. It should be configured for StorageScaleUnit now and not PhysicalDisk. However, there is one change we didn’t need to implement because it wasn’t supported in a two-node or a single-node deployment and that is the resiliency configurations, in turn, changing from a two-way mirror to a three-way mirror.
Store Mirroring Changes
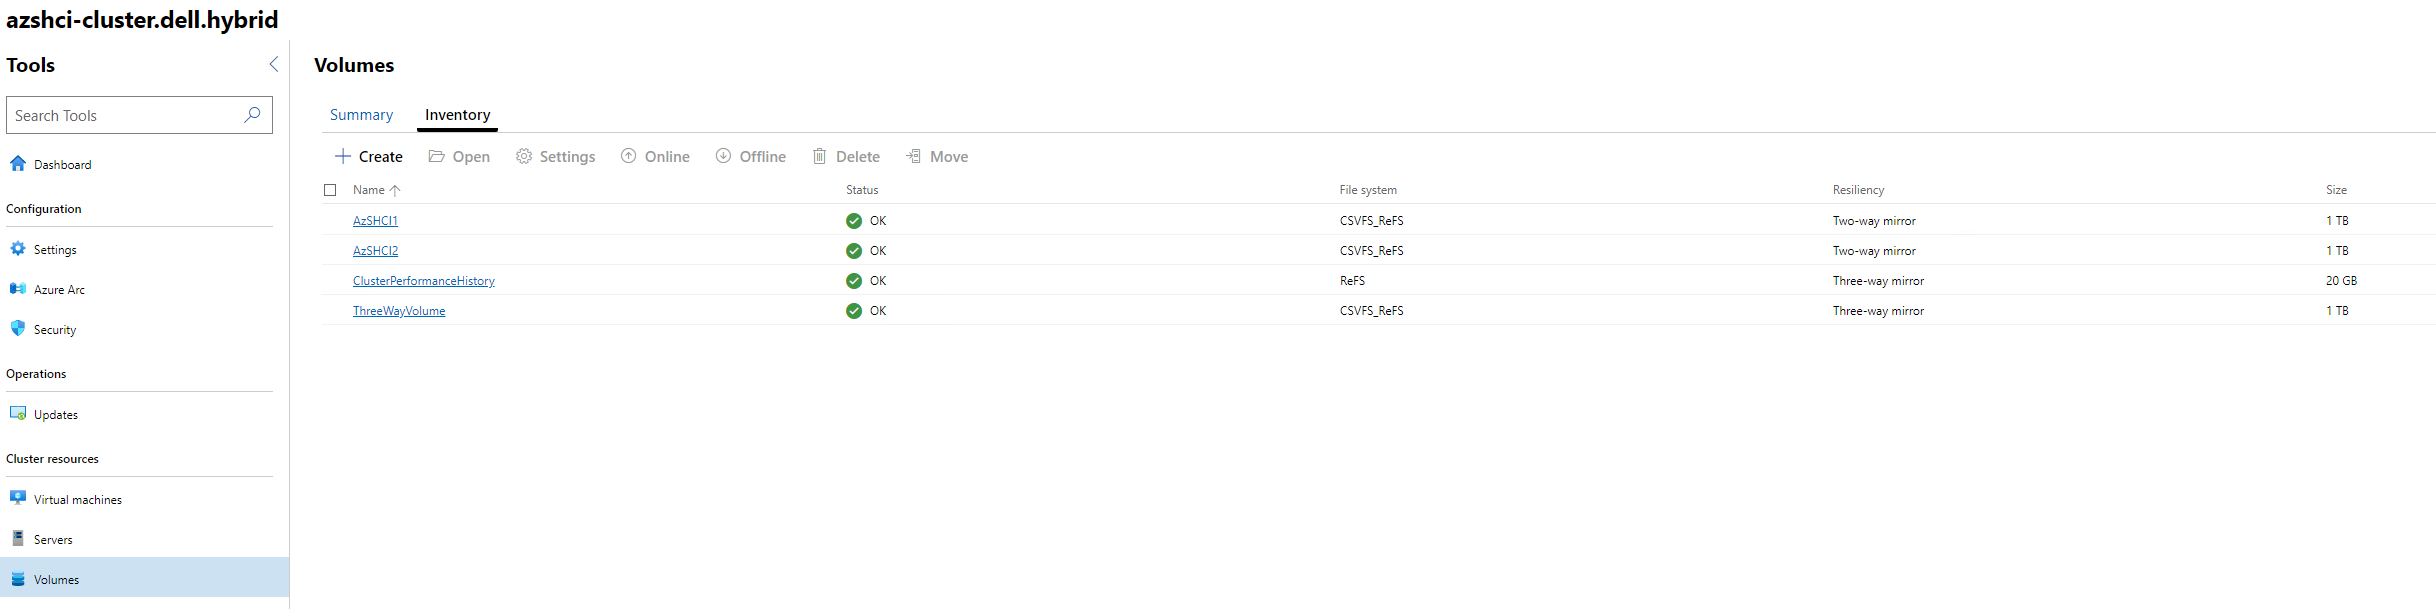
If you want existing volumes to remain as a two-way mirror nothing else needs to be done. To convert our volumes from two-way to three-way we will following the procedure below:
First we will check our configuration of mirror resiliency setting.
Get-StoragePool -CimSession $ClusterName -FriendlyName "S2D on $ClusterName" | get-resiliencysetting

Next we will configure our Mirror ResiliencySetting
Get-StoragePool -CimSession $ClusterName -FriendlyName "S2D on $ClusterName" | get-resiliencysetting -Name Mirror | Set-ResiliencySetting -NumberOfDataCopiesDefault 3
Now lets check on our configuration. We will see that NumberOfDatacopies should be 3 with FaultDomainRedundancy
Get-StoragePool -CimSession $ClusterName -FriendlyName "S2D on $ClusterName" | get-resiliencysetting -Name Mirror

Recreate Cluster Performance History Volumes
First we need to delete the performance history including the volume.
Invoke-Command -ComputerName $CLusterName -ScriptBlock {Stop-ClusterPerformanceHistory -DeleteHistory}


Here we will recreate the performance history
Start-ClusterPerformanceHistory -CimSession $ClusterName

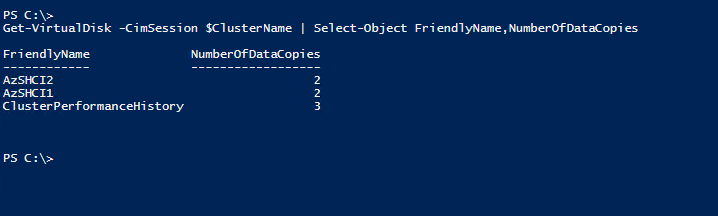
Next we will validate volume resiliency
Get-VirtualDisk -CimSession $ClusterName | Select-Object FriendlyName,NumberOfDataCopies
Create New Three-Way Volumes
I will create new volume that will be configured to use three-way mirroring and thin provisioning.
New-Volume -CimSession $ClusterName -StoragePoolFriendlyName "S2D on $ClusterName" -FriendlyName $VolumeFriendlyName -Size $VolumeSize -ProvisioningType Thin

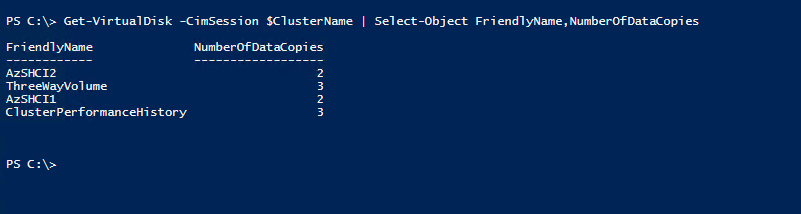
Verify
Get-VirtualDisk -CimSession $ClusterName | Select-Object FriendlyName,NumberOfDataCopies
Move VMs
Here we will move our vm’s off our old volumes on to the newly created volumes with three-way mirroring configured. You can also move each VM to the new three-mirror volume using the Windows Admin Center. However, I will use PowerShell.
$ClusterName="AzSHCI-Cluster"
$VolumeFriendlyName="Three+NodesMirror"
$DestinationStoragePath="c:\ClusterStorage\$VolumeFriendlyName"

$VMs=Get-VM -CimSession (Get-ClusterNode -Cluster $ClusterName).Name
foreach ($VM in $VMs){
    $VM | Move-VMStorage -DestinationStoragePath "$DestinationStoragePath\$($VM.Name)"
}
Bonus Content
Well, surprise! I wasn’t going to demo how to add the third node but I will go as far as showing how to add the node to the cluster using the Windows Admin Center. Everything that I did to node-two up until the add node to the cluster section I still did in PowerShell. At this point I am ready to add the third-node to my cluster.
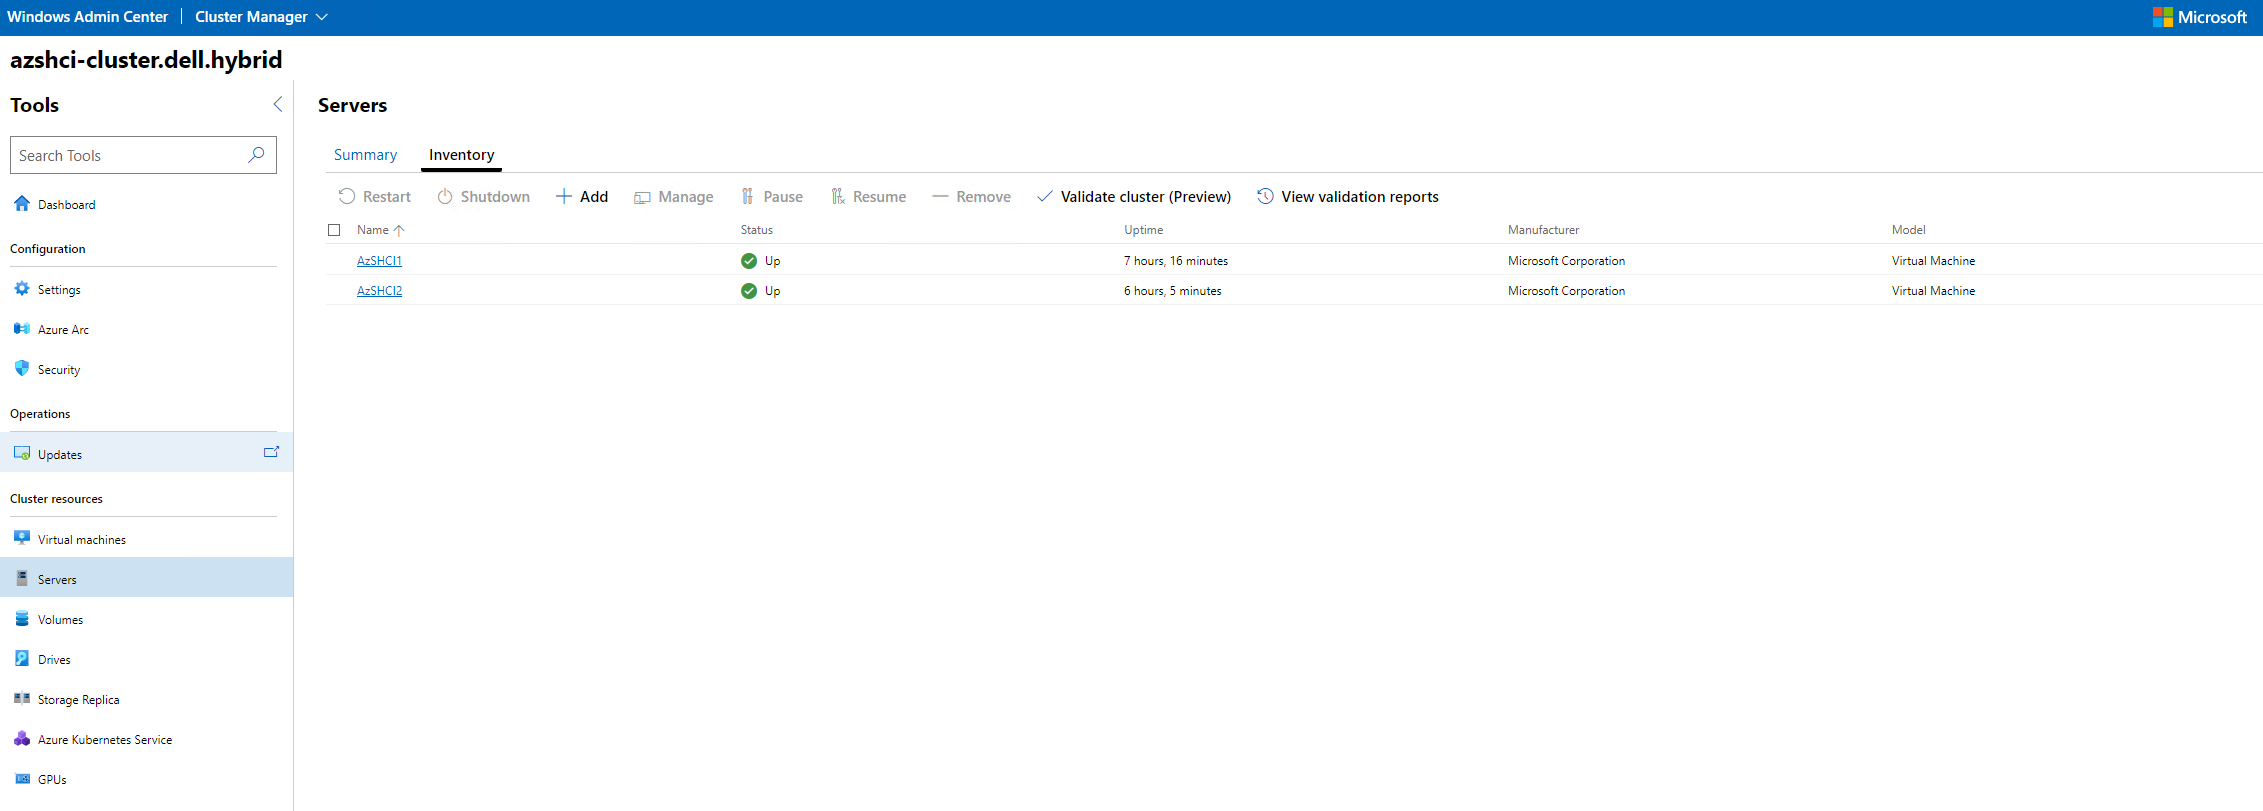
We will start in the our cluster dashboard, then go to servers in teh Cluster Resources menu. Then click on inventory.
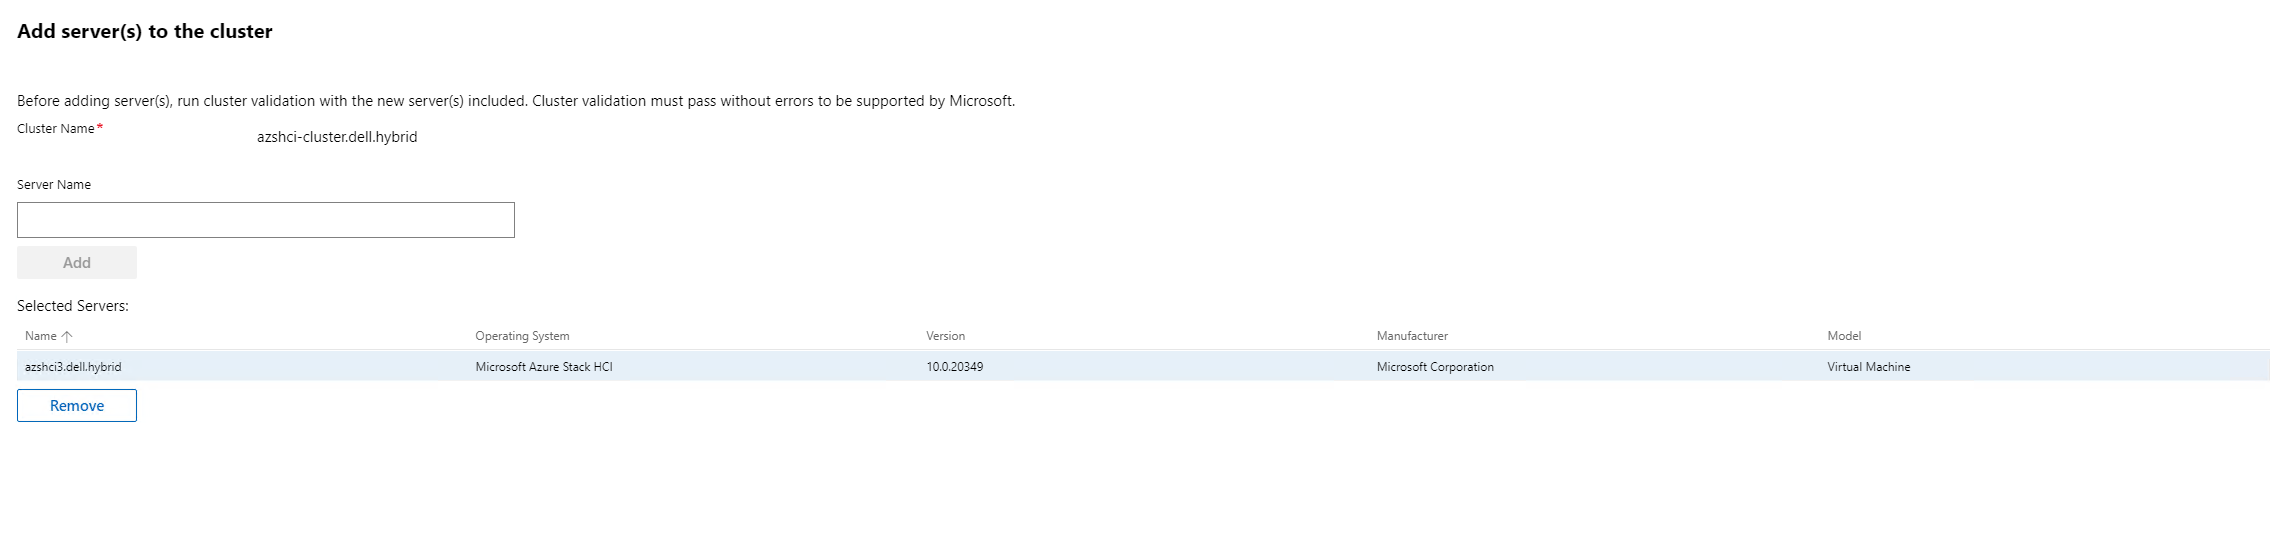
After we click on Add on the inventory screen we can then start typing the name of our server. Once it is found, click add.
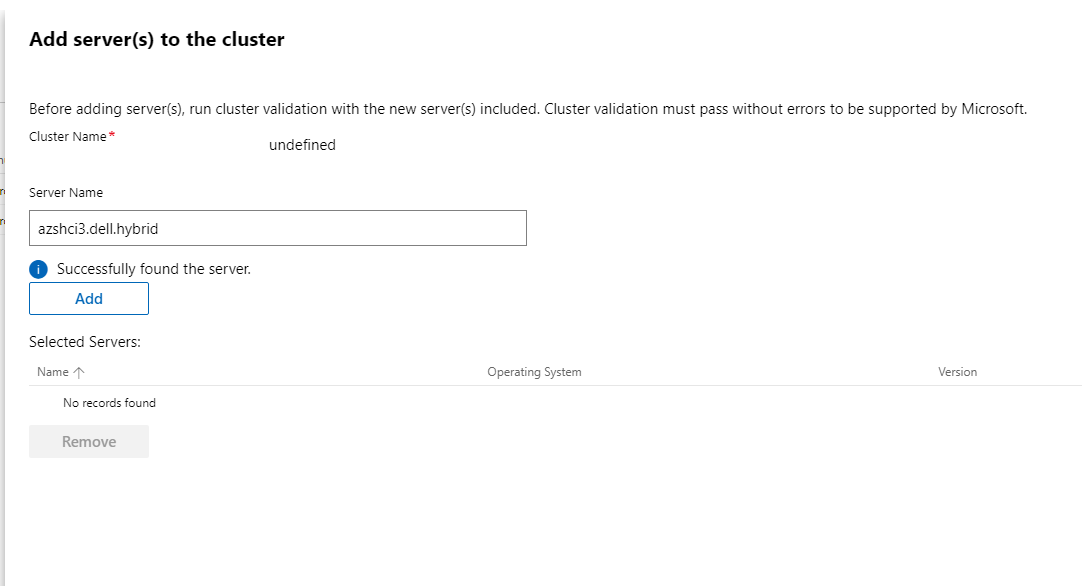
Once the server is found, we can then click Add at the bottom.
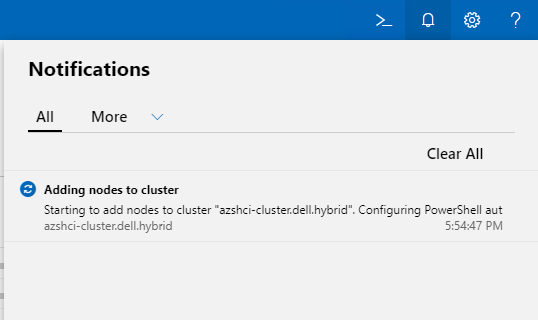
We will than see a few notification alerts that the node is being added.
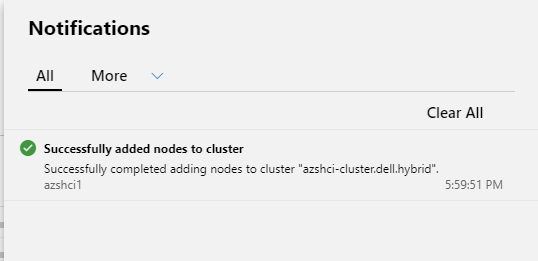
Once the server has been added we will see that it was successful. (Hopefully!)
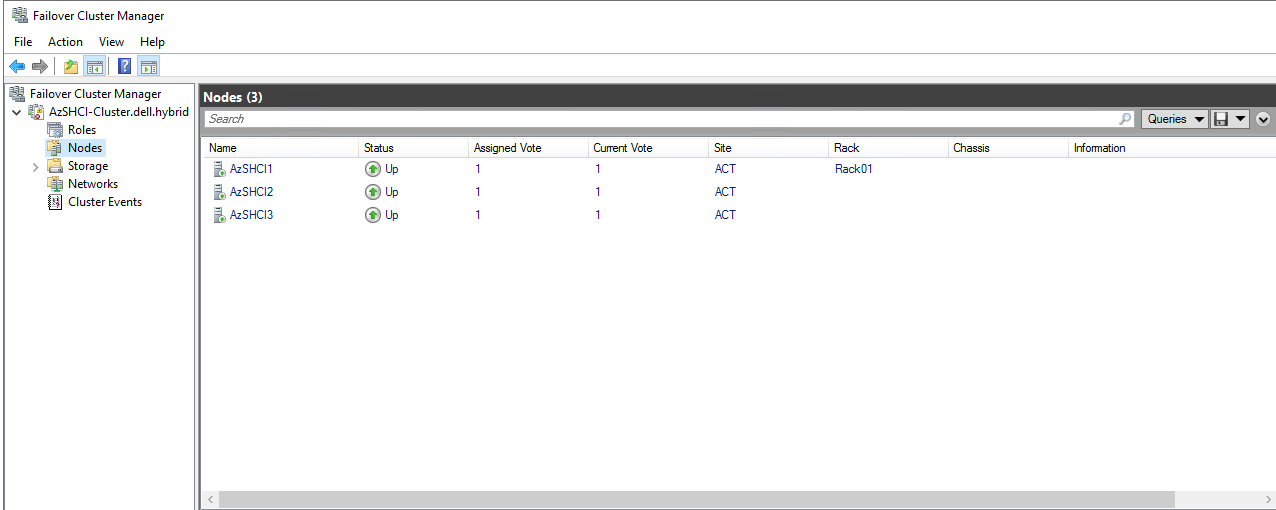
So now we can verify. First with the Failover Cluster Manager.
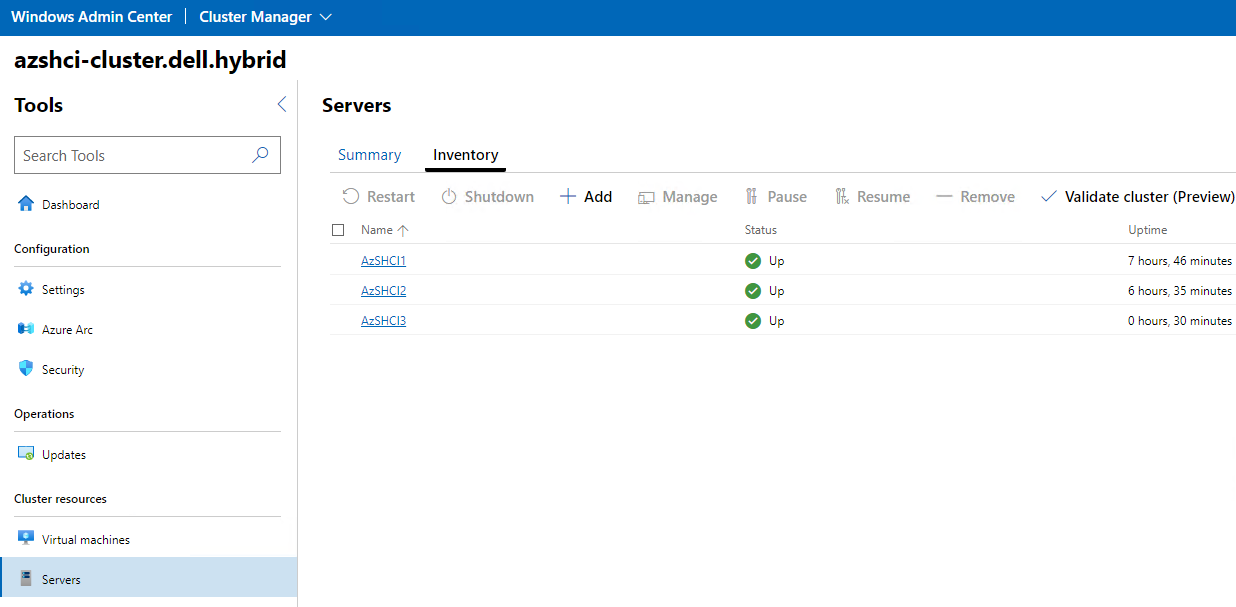
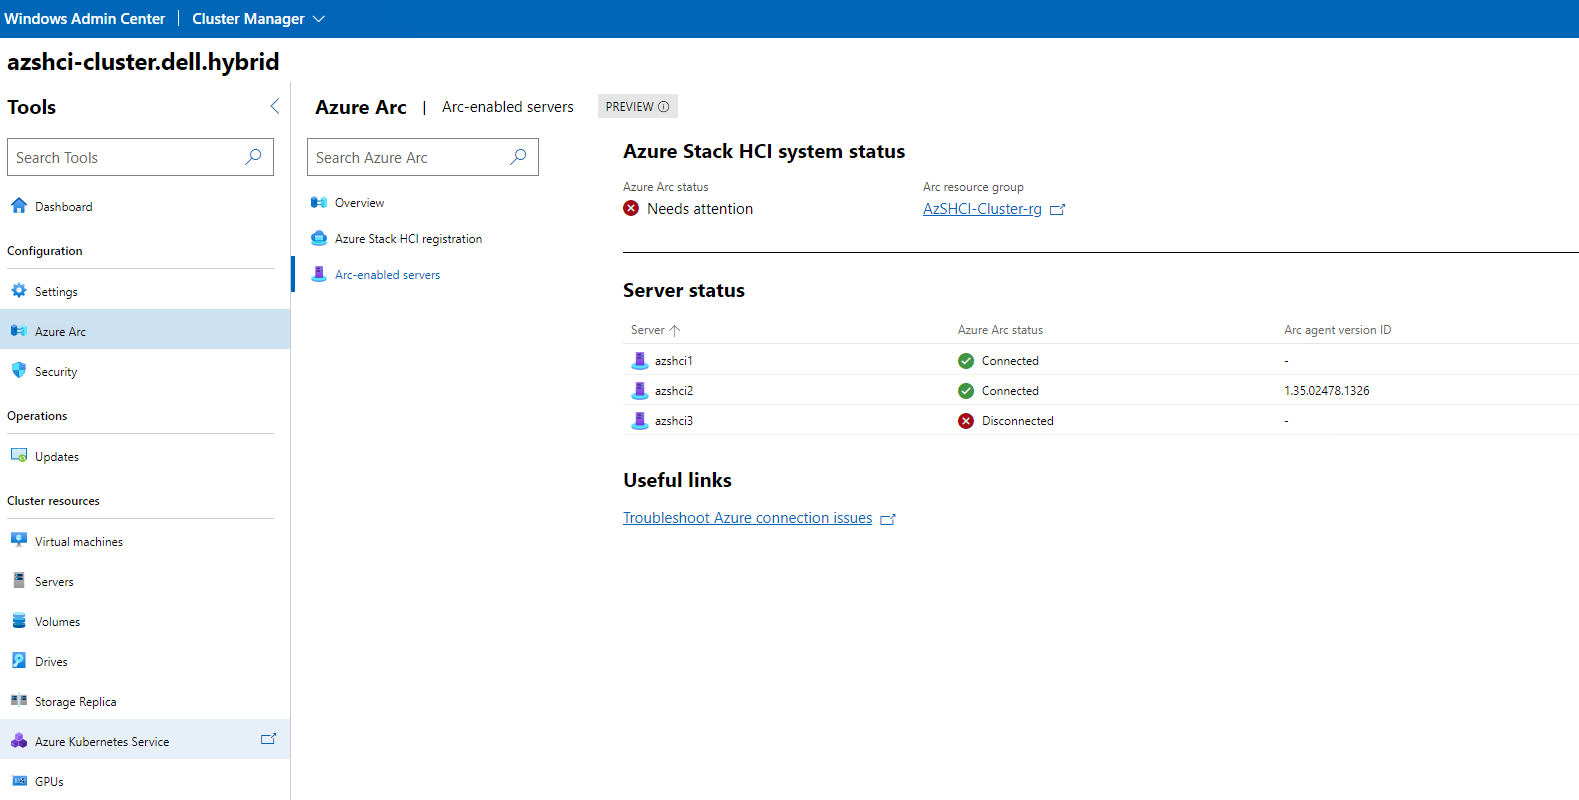
Then we can pop back over to the Servers section of our cluster.
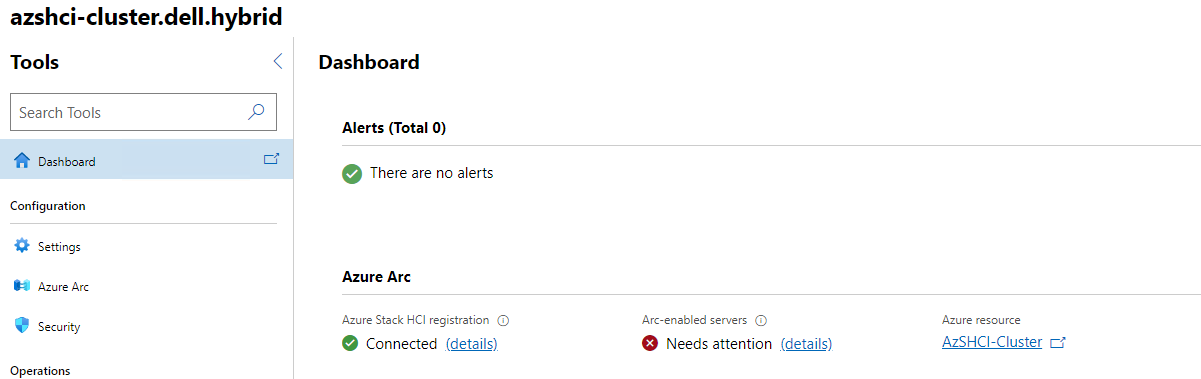
Don’t worry about the error for Azure Arc. The server will take some time before it is added.
Another view of all three servers in our cluster and their Arc status.
Final Thoughts
So, I do want to stress. This deployment I just walked through is not production ready. It will be good for getting your feet wet with Azure Stack HCI. For most of use we don’t have a lot of hardware that would be supported for HCI sitting around. We may have a few older servers that we can use, even deploy this same solution on that single physical server to have a multi-node solution, or use an AzureVM which can be very expensive. This blog I hope helped someone get an idea of that they would need to do to get started.
Moving forward, I will blog more on the Azure Services that can be run on the Azure Stack HCI platform. How to manage the cluster and more. However, I think I will do one more Azure Stack HCI deployment blog. This time using the Windows Admin Center to deploy a four-node Azure Stack HCI Cluster.
Also, this blog just touches on the deployment of an Azure Stack HCI cluster. There is so much more and we can really go into depth of what Azure Stack HCI can do along with Azure Arc. I will be blogging a lot on these subjects moving forward.
