Azure Stack HCI - Part IV - Scale-out Azure Stack HCI Single Node Cluster
This is a series of blogs about my experiences with Azure Stack HCI

In this blog series I plan to blog about everything I know about Azure Stack HCI. So, it should be a very short blog series. Just kidding. Again, I tend to blog about subjects that I am currently working on or will be currently working on. So, Azure Stack HCI is fresh on my mind again these days.
This blog will be about scaling out a single-node Azure Stack HCI cluster up to a two-node cluster. My previous blog, Azure Stack HCI - Part III - Advance Deployment of A Single Node Cluster discussed my experiences deploying a single-node cluster. There is a lot of information about my environment, how I setup my lab, and more that would be good to know before continuing with this blog. However, I will try and include as much as I can within this blog to make sense of everything.
So this blog will cover the following:
- Review Of Previous Blog
- The Variables
- Configuring the second node
- Configure Networking with Network ATC
- Configure Cluster
- Install Network HUD (NetATC)
- Complete NetATC Configurations
- Configure Cluster Storage
- Verify and Testify?
- Final Thoughts
Remember, I am building this solution on a Single Node cluster and I will try to explain how to do it not only on an AzureVM but try to explain how it would be done on physical hardware if that process is different. Since I do have plans to scale out this cluster, I will keep that in mind as I deploy this first node as well. Knowing that I will add a second and a third and a fourth node in the future.
Review Of Previous Blog
What did I do in my last blog? Good question. First, most of what I did I learned from a few others including Microsoft Learn documentation on Azure Stack HCI. My environment is deployed on an Azure VM using theHybrid Jump Start was created and being worked on by Matt McSpirit. The Hybrid Jump Start is built with Jaromir Kaspar MSLab project. Also, a lot of my scripts I am using comes from Jaromir’s Azure Stack HOLs Github repo. There is also a Slack Channel dedicated to Azure Stack HCI that I pull some information from as well.
I have an Azure VM running with Hyper-V. Within that AzureVM I have 6 VM’s. A domain controller, a Windows Admin Center Gateway VM, and 4 VM’s running the Azure Stack HCI OS. All the systems are joined to a demo domain. The only server, AzSHCI01 is configured and joined to my AzSHCI-Cluster that was deployed in my last blog. I am using Network ATC with only one intent configuration, which currently only uses 2 of the 4 virtual nics on that virtual machine. The intent also is only configured to use Compute and Management traffic. Since this is a single node, I didn’t need to configure the SMB nics, as well as a Witness.
So this blog will continue where we left off. We have a working single-node Azure Stack HCI cluster. However, we now want to scale that cluster from one-node to a two-node cluster.
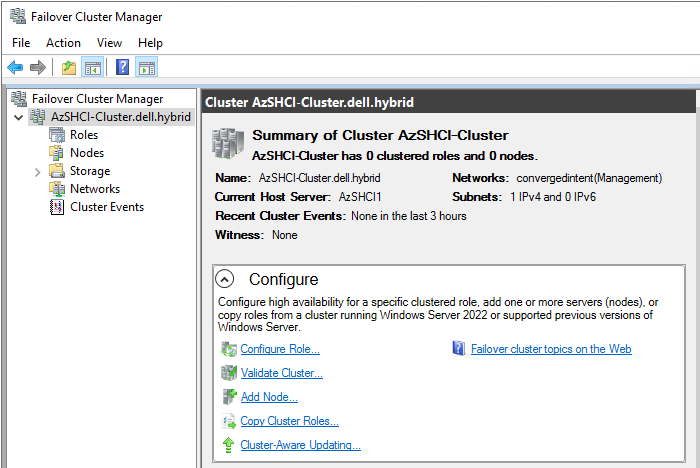
What it looks like now
The existing environment currently looks like this. From within the Failover Cluster Manager we can see that our cluster is running with our single-node, and a single cluster network for management and compute.
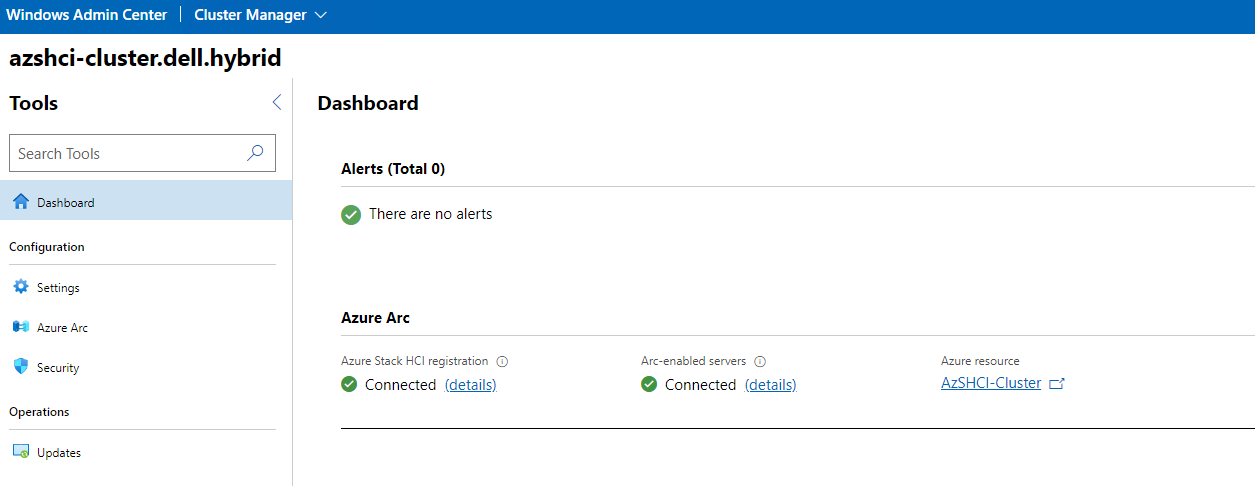
Here we can see that our cluster has been registered to Azure and is being managed by Azure Arc.
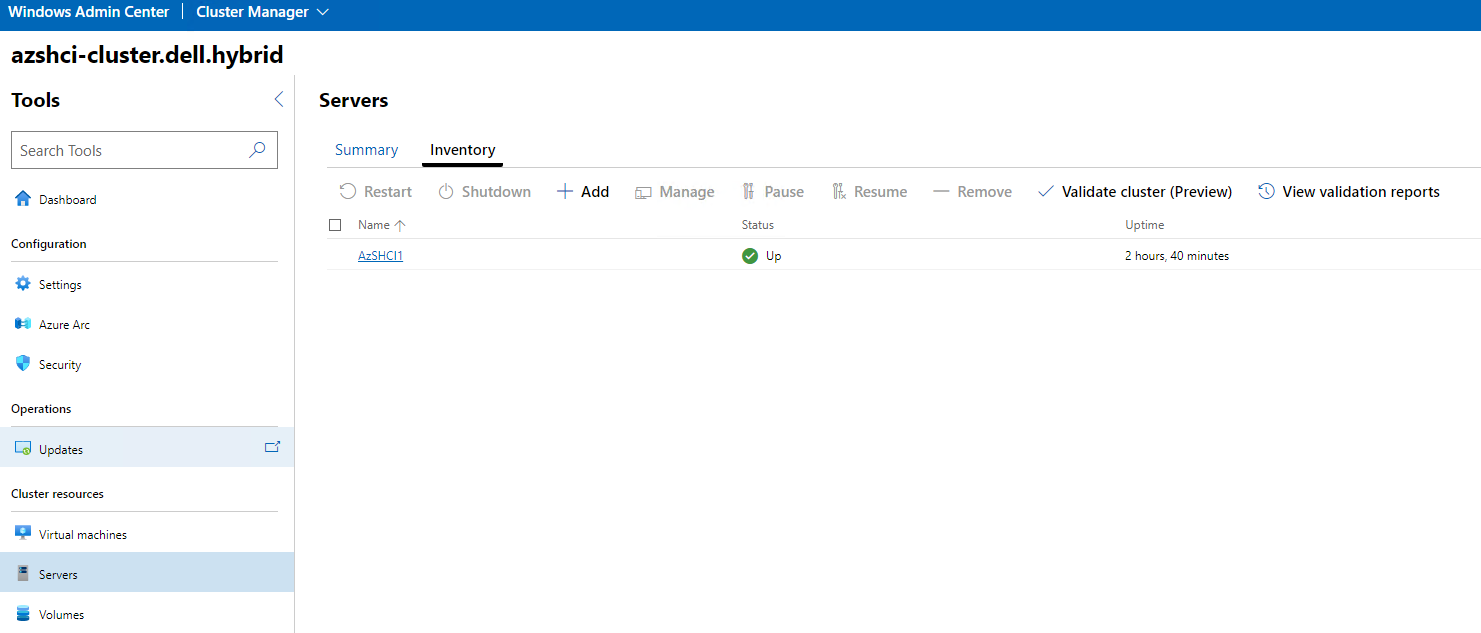
Our single node is showing up from within the Windows Admin Center.
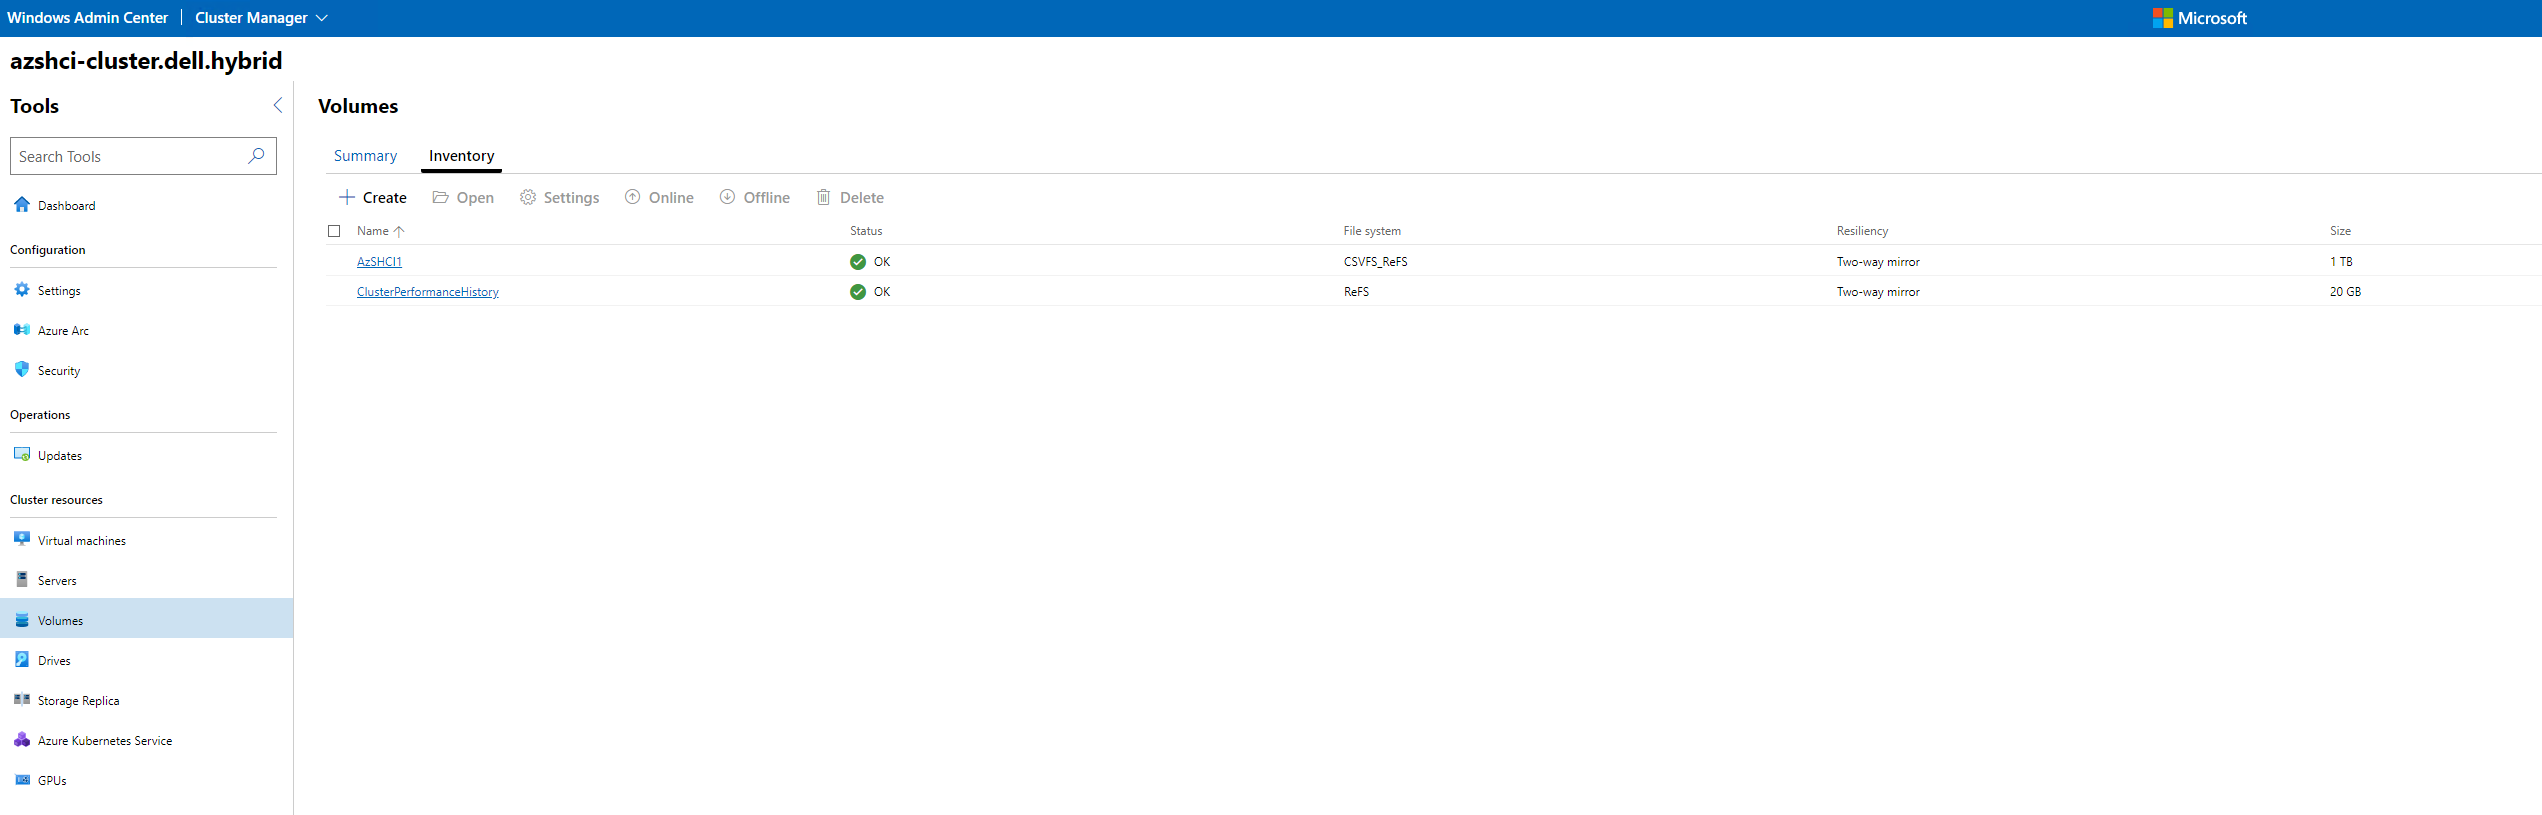
Our two volumes are up and healthy.
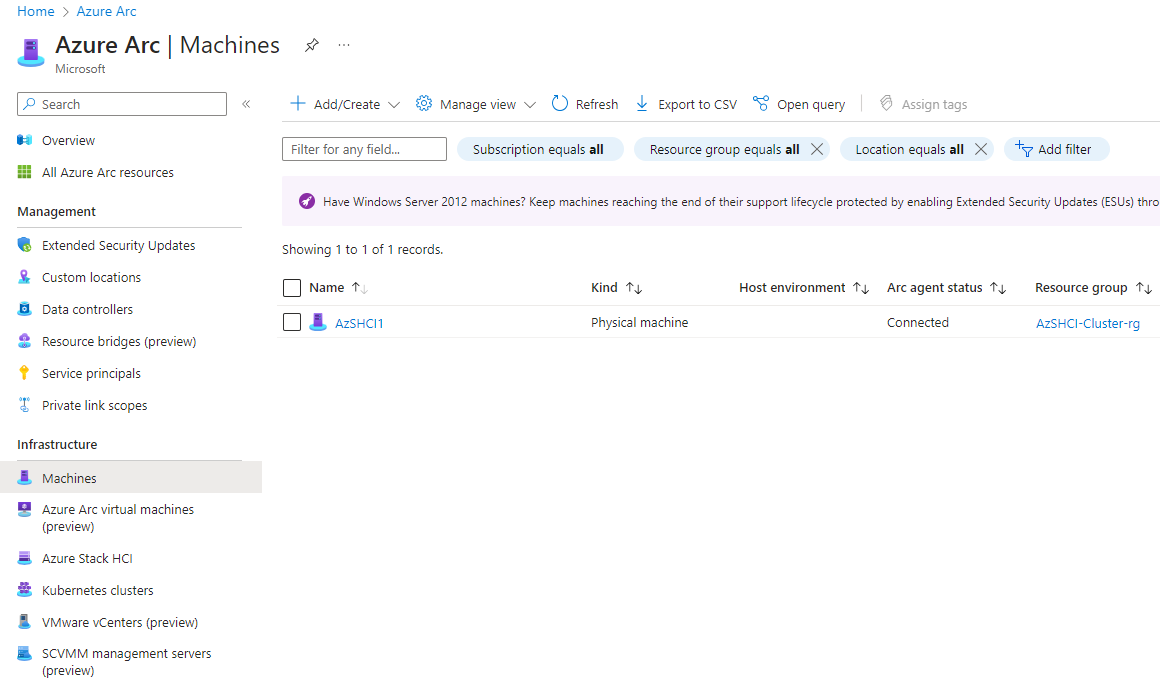
If I go into Azure Arc, I can see that my cluster is registered and connected.
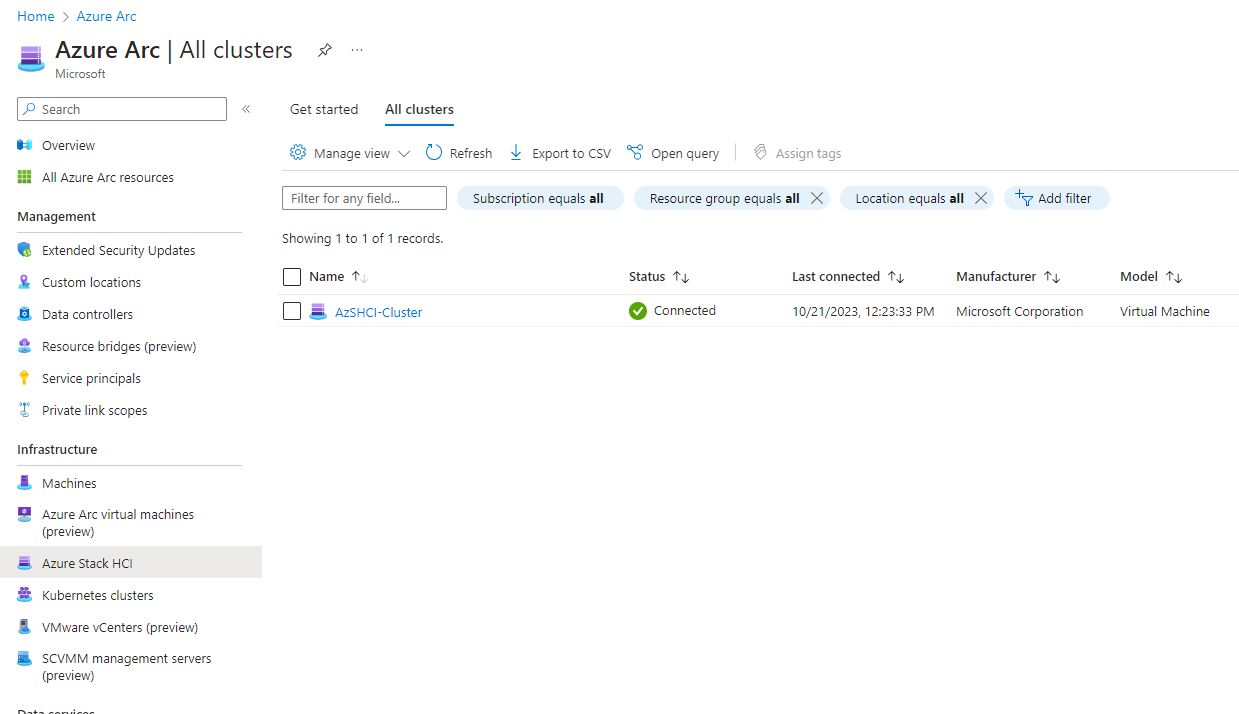
As well as my single-node, is registered and connected.
So now that we are finished with my environment. It is time to scale our this single-node Azure Stack HCI cluster and add a second node.
The Variables
As I mentioned above, a good chunk of my scripts come from others. Mostly from Jaromir’s Azure Stack Hands On Lab Github repo. I have taken them re-configured them a little to work in my environment both on a virtual machine and moving forward something I can use for automation on bare metal deployments.
Since this is going to be focused on getting my 2nd node configured and then joined to my cluster I have focused these variables knowing this.
#Please fill in variable with node name: example: $ClusterNode = "AzSHCI1"
$ClusterNode = "AzSHCI2"

#Existing Cluster Name
$ClusterName = "AzSHCI-Cluster"

#Cluster-Aware-Updating role name
$CAURoleName = "AzSHCI-Cl-CAU"

#Deploy network using Network ATC? https://learn.microsoft.com/en-us/azure-stack/hci/manage/manage-network-atc?tabs=22H2
$NetATC = $True

#Perform Windows update? (for more info visit WU Scenario https://github.com/microsoft/WSLab/tree/dev/Scenarios/Windows%20Update)
$WindowsUpdate = "Recommended" #Can be "All","Recommended" or "None"

#Dell updates
#If running on physical Dell servers change this to $True
$DellUpdates = $False

#Witness type
$WitnessType = "FileShare" #or Cloud
$WitnessServer = "DC" #name of server where witness will be configured

#For Cloud  witness
    $CloudWitnessStorageAccountName="MyStorageAccountName"
    $CloudWitnessStorageKey="qi8QB/VSHHiA9lSvz1kEIEt0JxIucPL3l99nRHhkp+n1Lpabu4Ydi7Ih192A4VW42vccIgUnrXxxxxxxxxxxxx=="
    $CloudWitnessEndpoint="core.windows.net"
    #>

#Delete Storage Pool (like after reinstall there might be data left from old cluster)
$DeletePool = $True
Configuring the second node
So let the fun begin! I am ready to start configuring my second node that will be added to my single-node Azure Stack HCI cluster. The following steps is what we took to get the node configured and ready to join the cluster.
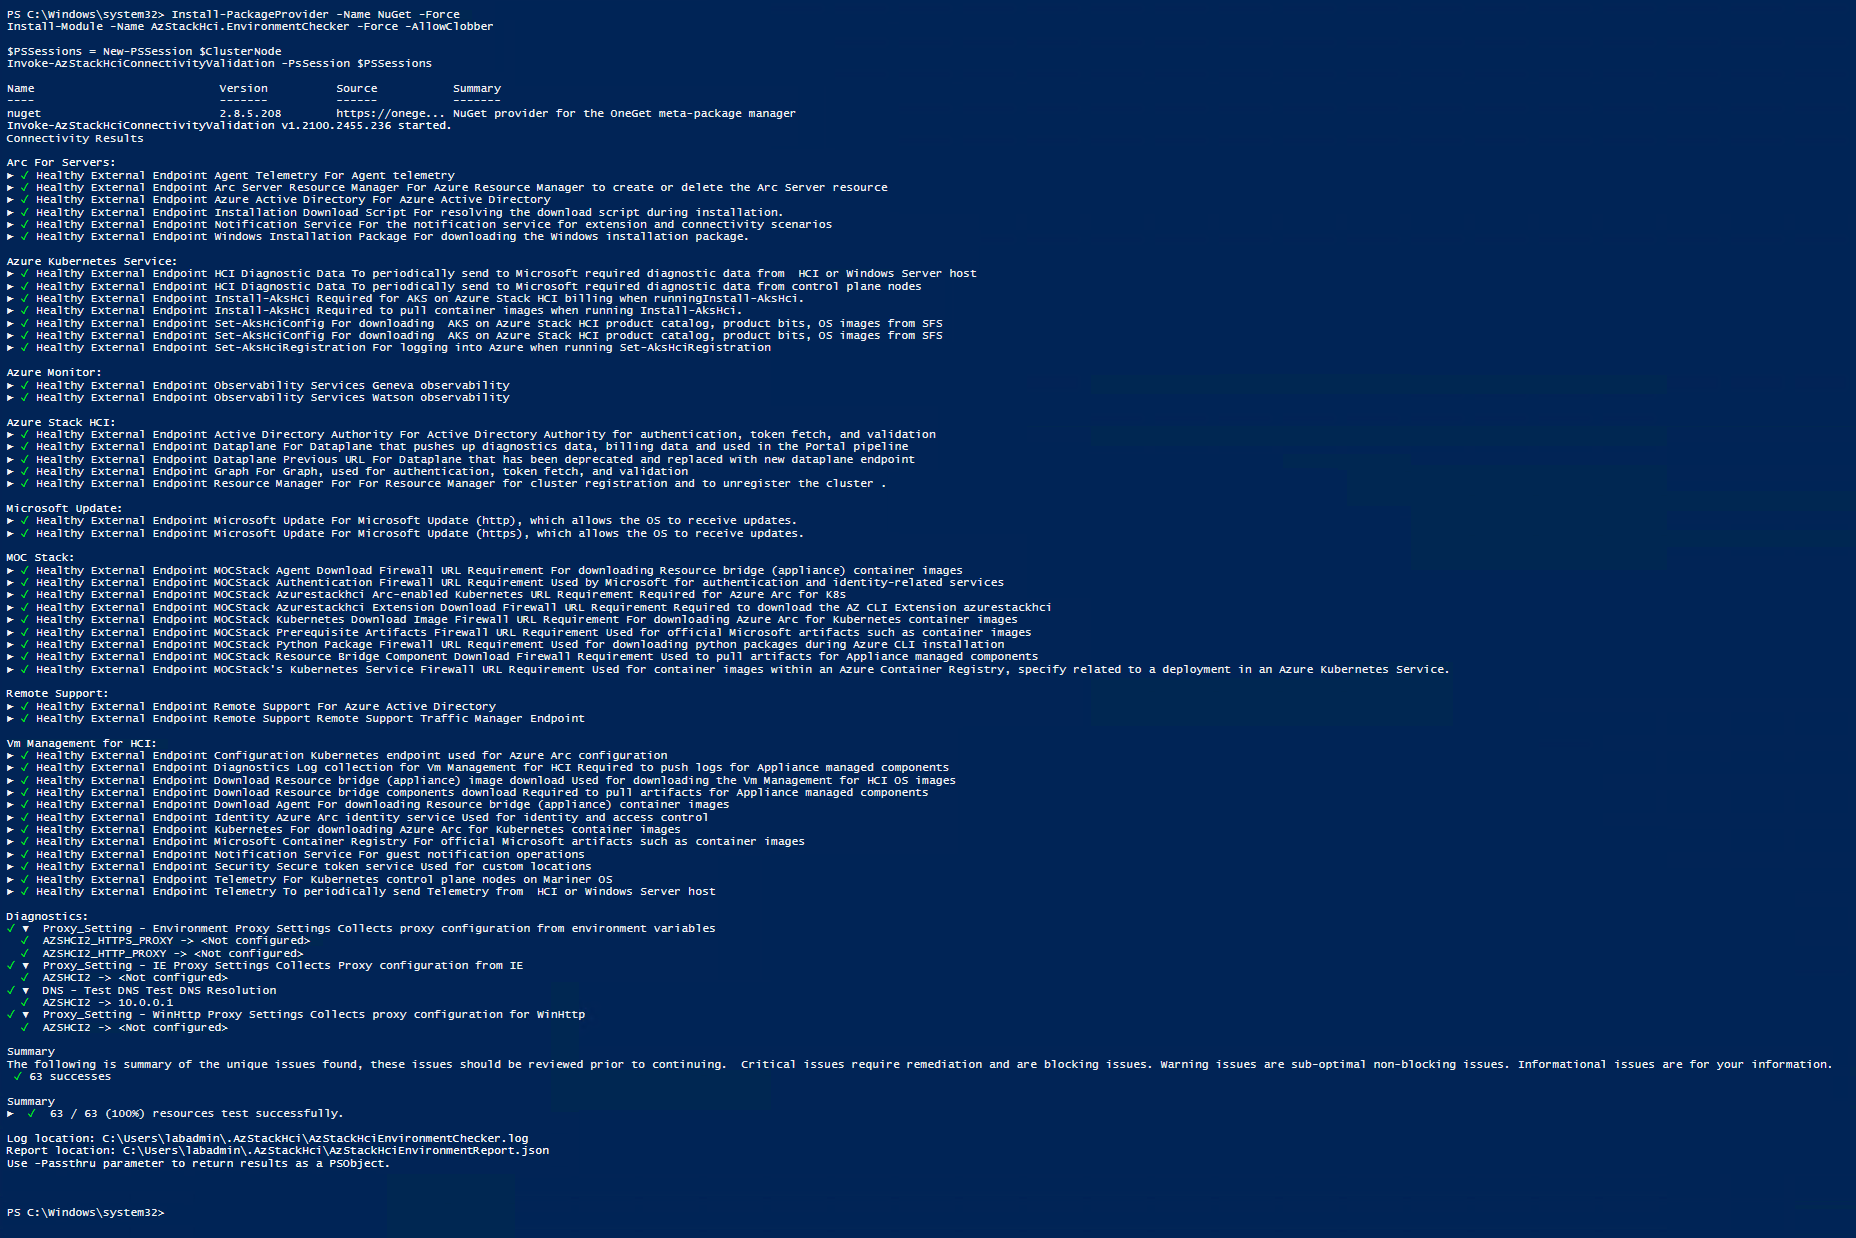
Run Azure Stack HCI Environment Checker
Here we will run the Azure Stack HCI Environment checker. I don’t think it is necessary in my virtualized environment but I will run it anyway. This tool will run some test on each of our servers that we will be joining to this Azure Stack HCI Cluster.
Install-PackageProvider -Name NuGet -Force
Install-Module -Name AzStackHci.EnvironmentChecker -Force -AllowClobber

$PSSessions = New-PSSession $ClusterNode
Invoke-AzStackHciConnectivityValidation -PsSession $PSSessions
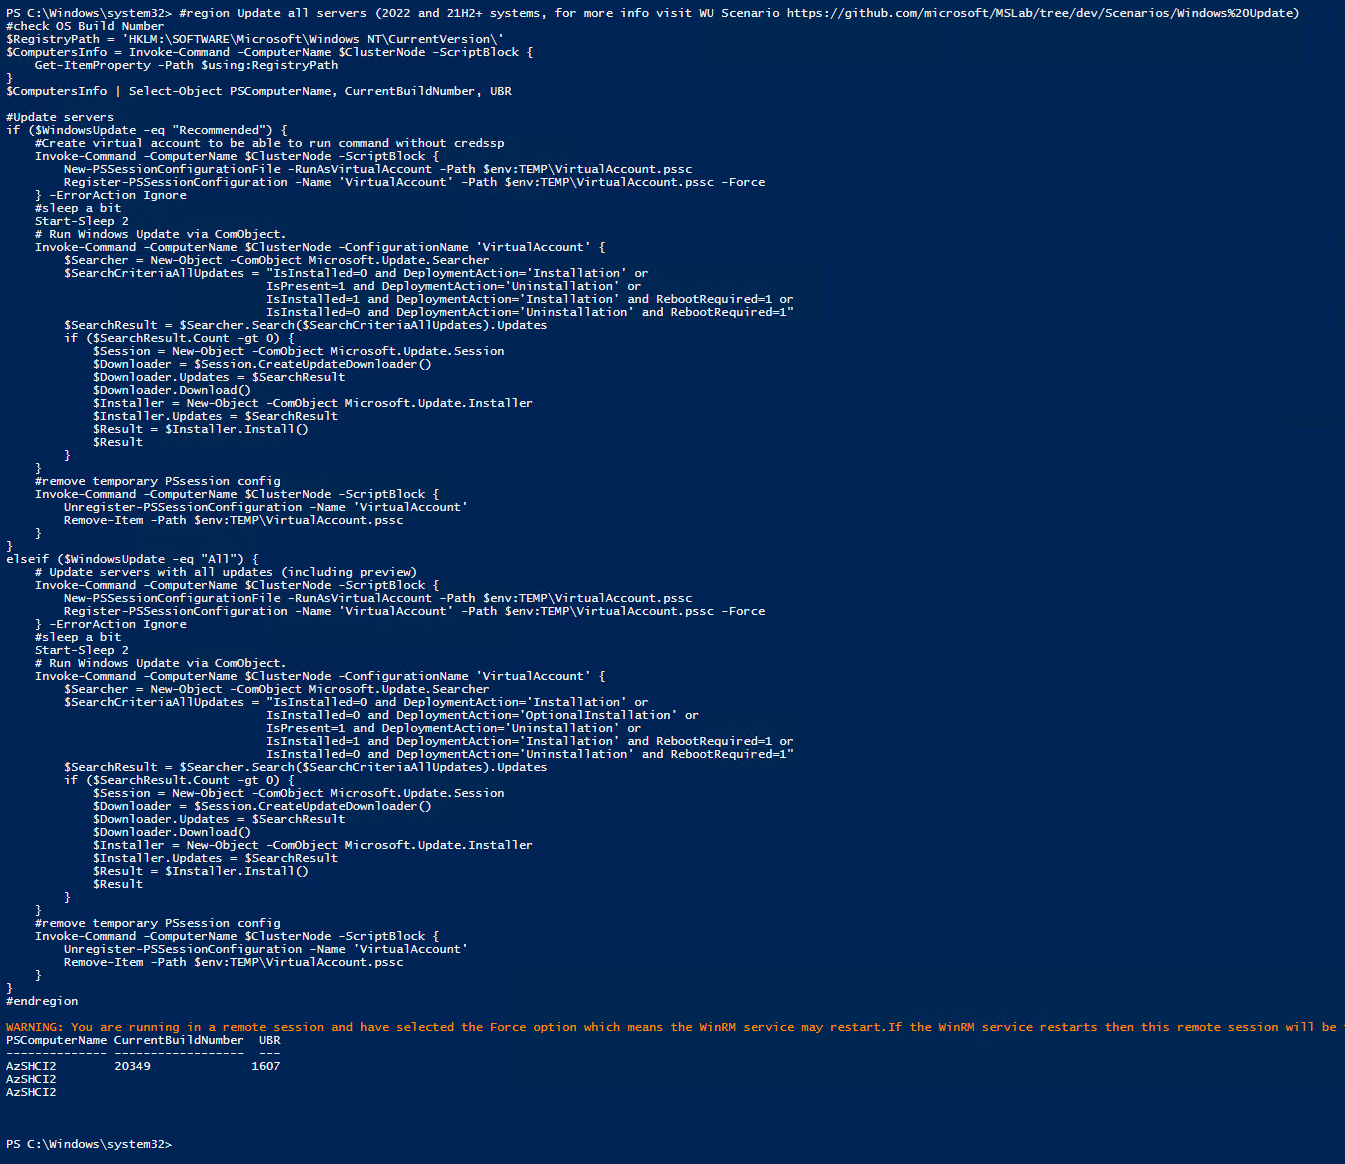
Update Server
Now we will run Windows Update to make sure we have the most recent updates installed.
$RegistryPath = 'HKLM:\SOFTWARE\Microsoft\Windows NT\CurrentVersion\'
$ComputersInfo = Invoke-Command -ComputerName $ClusterNode -ScriptBlock {
    Get-ItemProperty -Path $using:RegistryPath
}
$ComputersInfo | Select-Object PSComputerName, CurrentBuildNumber, UBR

#Update servers
if ($WindowsUpdate -eq "Recommended") {
    #Create virtual account to be able to run command without credssp
    Invoke-Command -ComputerName $ClusterNode -ScriptBlock {
        New-PSSessionConfigurationFile -RunAsVirtualAccount -Path $env:TEMP\VirtualAccount.pssc
        Register-PSSessionConfiguration -Name 'VirtualAccount' -Path $env:TEMP\VirtualAccount.pssc -Force
    } -ErrorAction Ignore
    #sleep a bit
    Start-Sleep 2
    # Run Windows Update via ComObject.
    Invoke-Command -ComputerName $ClusterNode -ConfigurationName 'VirtualAccount' {
        $Searcher = New-Object -ComObject Microsoft.Update.Searcher
        $SearchCriteriaAllUpdates = "IsInstalled=0 and DeploymentAction='Installation' or
                                    IsPresent=1 and DeploymentAction='Uninstallation' or
                                    IsInstalled=1 and DeploymentAction='Installation' and RebootRequired=1 or
                                    IsInstalled=0 and DeploymentAction='Uninstallation' and RebootRequired=1"
        $SearchResult = $Searcher.Search($SearchCriteriaAllUpdates).Updates
        if ($SearchResult.Count -gt 0) {
            $Session = New-Object -ComObject Microsoft.Update.Session
            $Downloader = $Session.CreateUpdateDownloader()
            $Downloader.Updates = $SearchResult
            $Downloader.Download()
            $Installer = New-Object -ComObject Microsoft.Update.Installer
            $Installer.Updates = $SearchResult
            $Result = $Installer.Install()
            $Result
        }
    }
    #remove temporary PSsession config
    Invoke-Command -ComputerName $ClusterNode -ScriptBlock {
        Unregister-PSSessionConfiguration -Name 'VirtualAccount'
        Remove-Item -Path $env:TEMP\VirtualAccount.pssc
    }
}
elseif ($WindowsUpdate -eq "All") {
    # Update servers with all updates (including preview)
    Invoke-Command -ComputerName $ClusterNode -ScriptBlock {
        New-PSSessionConfigurationFile -RunAsVirtualAccount -Path $env:TEMP\VirtualAccount.pssc
        Register-PSSessionConfiguration -Name 'VirtualAccount' -Path $env:TEMP\VirtualAccount.pssc -Force
    } -ErrorAction Ignore
    #sleep a bit
    Start-Sleep 2
    # Run Windows Update via ComObject.
    Invoke-Command -ComputerName $ClusterNode -ConfigurationName 'VirtualAccount' {
        $Searcher = New-Object -ComObject Microsoft.Update.Searcher
        $SearchCriteriaAllUpdates = "IsInstalled=0 and DeploymentAction='Installation' or
                                    IsInstalled=0 and DeploymentAction='OptionalInstallation' or
                                    IsPresent=1 and DeploymentAction='Uninstallation' or
                                    IsInstalled=1 and DeploymentAction='Installation' and RebootRequired=1 or
                                    IsInstalled=0 and DeploymentAction='Uninstallation' and RebootRequired=1"
        $SearchResult = $Searcher.Search($SearchCriteriaAllUpdates).Updates
        if ($SearchResult.Count -gt 0) {
            $Session = New-Object -ComObject Microsoft.Update.Session
            $Downloader = $Session.CreateUpdateDownloader()
            $Downloader.Updates = $SearchResult
            $Downloader.Download()
            $Installer = New-Object -ComObject Microsoft.Update.Installer
            $Installer.Updates = $SearchResult
            $Result = $Installer.Install()
            $Result
        }
    }
    #remove temporary PSsession config
    Invoke-Command -ComputerName $ClusterNode -ScriptBlock {
        Unregister-PSSessionConfiguration -Name 'VirtualAccount'
        Remove-Item -Path $env:TEMP\VirtualAccount.pssc
    }
}
Install Windows Features
Here we will install the Windows Features needed on our second node getting it ready to join the cluster. We will also run a script to make sure our management server has all the tools installed as well.
The first step is to make sure our management server is ready. I will install the needed Windows Features that will come into play during our deployment and management of Azure Stack HCI.
Install-WindowsFeature -Name RSAT-Clustering, RSAT-Clustering-Mgmt, RSAT-Clustering-PowerShell, RSAT-Hyper-V-Tools, RSAT-Feature-Tools-BitLocker-BdeAducExt, RSAT-Storage-Replica

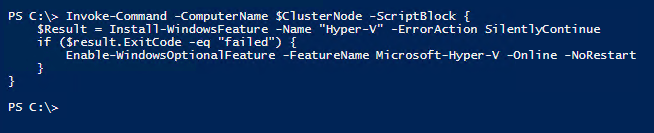
Next we will install the Hyper-V role on our future nodes. Since I am using a virtual machine, I needed to enabled nested virtulization on my VM. The good thing is, the Hybird Jump Start solution does that for me.
#install roles and features on servers
#install Hyper-V using DISM if Install-WindowsFeature fails (if nested virtualization is not enabled install-windowsfeature fails)
Invoke-Command -ComputerName $ClusterNode -ScriptBlock {
    $Result = Install-WindowsFeature -Name "Hyper-V" -ErrorAction SilentlyContinue
    if ($result.ExitCode -eq "failed") {
        Enable-WindowsOptionalFeature -FeatureName Microsoft-Hyper-V -Online -NoRestart
    }
}
Now we need to install all the required Windows features on the node that I will be using.
#define and install other features
$features = "Failover-Clustering", "RSAT-Clustering-PowerShell", "Hyper-V-PowerShell", "NetworkATC", "NetworkHUD", "Data-Center-Bridging", "RSAT-DataCenterBridging-LLDP-Tools", "FS-SMBBW", "System-Insights", "RSAT-System-Insights"
#optional - affects perf even if not enabled on volumes as filter driver is attached (SR,Dedup) and also Bitlocker, that affects a little bit
#$features+="Storage-Replica","RSAT-Storage-Replica","FS-Data-Deduplication","BitLocker","RSAT-Feature-Tools-BitLocker"
Invoke-Command -ComputerName $ClusterNode -ScriptBlock { Install-WindowsFeature -Name $using:features }

Restart Servers
I added a restart here. We will be restarting the servers again shortly but since this is a VM it boots fast. If this was a physical box I would wait to reboot until after the Security configurations are done.
Restart-Computer $ClusterNode -Protocol WSMan -Wait -For PowerShell -Force
Start-Sleep 20 # Allow time for reboots to complete fully
Foreach ($Server in $ClusterNode) {
    do { $Test = Test-NetConnection -ComputerName $Server -CommonTCPPort WINRM }while ($test.TcpTestSucceeded -eq $False)
}

Configure OS Settings
There are a few configurations that I will do along the way for the OS.
Configure Active Memory
Here I will configure Active Memory.
Invoke-Command -ComputerName $ClusterNode -ScriptBlock {
    Set-ItemProperty -Path HKLM:\System\CurrentControlSet\Control\CrashControl -Name CrashDumpEnabled -value 1
    Set-ItemProperty -Path HKLM:\System\CurrentControlSet\Control\CrashControl -Name FilterPages -value 1
}
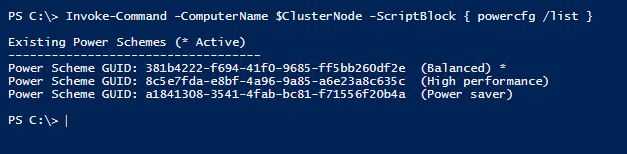
Configure High Performance Plan
If this was a physical machine we would set the high performance plan. This is not needed on a VM.
Invoke-Command -ComputerName $ClusterNode -ScriptBlock {
    if ((Get-ComputerInfo).CsSystemFamily -ne "Virtual Machine") {
        powercfg /SetActive 8c5e7fda-e8bf-4a96-9a85-a6e23a8c635c
    }
}
Let’s check the settings now:
Invoke-Command -ComputerName $ClusterNode -ScriptBlock { powercfg /list }
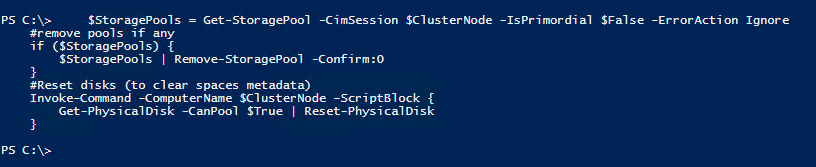
Delete Storage Pool
So in my previous blog I discussed a little about how dangerous a script like this can be. So be careful.
if ($DeletePool) {
    #Grab pools
    $StoragePools = Get-StoragePool -CimSession $ClusterNode -IsPrimordial $False -ErrorAction Ignore
    #remove pools if any
    if ($StoragePools) {
        $StoragePools | Remove-StoragePool -Confirm:0
    }
    #Reset disks (to clear spaces metadata)
    Invoke-Command -ComputerName $ClusterNode -ScriptBlock {
        Get-PhysicalDisk -CanPool $True | Reset-PhysicalDisk
    }
}
Configure Max Envelope Size
Now we will configure our Max Envelope size. This changes the max envelope size to be 8KB in order to copy files using PSSession.
Invoke-Command -ComputerName $ClusterNode -ScriptBlock { Set-Item -Path WSMan:\localhost\MaxEnvelopeSizekb -Value 8192 }

Configure MaxTimeOut
if ((Get-CimInstance -ClassName win32_computersystem -CimSession $ClusterNode).Manufacturer -like "*Dell Inc.") {
    Invoke-Command -ComputerName $ClusterNode -ScriptBlock { Set-ItemProperty -Path HKLM:\SYSTEM\CurrentControlSet\Services\spaceport\Parameters -Name HwTimeout -Value 0x00002710 }
}
if ((Get-CimInstance -ClassName win32_computersystem -CimSession $ClusterNode).Model -eq "Virtual Machine") {
    Invoke-Command -ComputerName $ClusterNode -ScriptBlock { Set-ItemProperty -Path HKLM:\SYSTEM\CurrentControlSet\Services\spaceport\Parameters -Name HwTimeout -Value 0x00007530 }
}

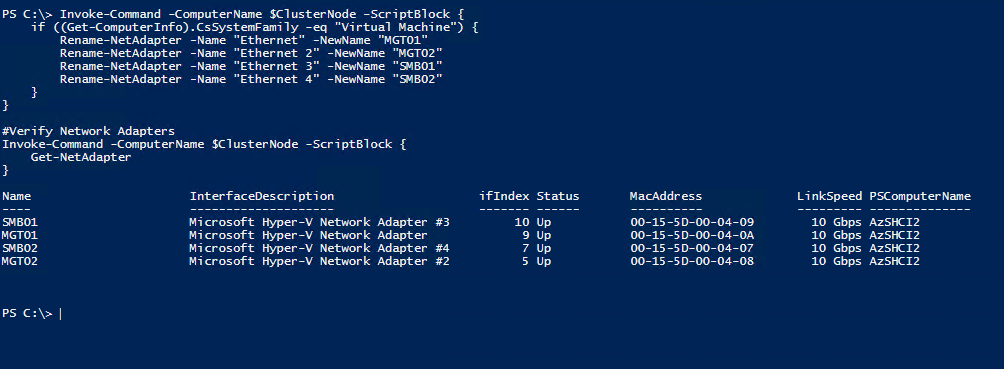
Rename Network Adapters
I did this for my systems. It isn’t necessary but I do it.
Invoke-Command -ComputerName $ClusterNode -ScriptBlock {
    if ((Get-ComputerInfo).CsSystemFamily -eq "Virtual Machine") {
        Rename-NetAdapter -Name "Ethernet" -NewName "MGT01"
        Rename-NetAdapter -Name "Ethernet 2" -NewName "MGMT02"
        Rename-NetAdapter -Name "Ethernet 3" -NewName "SMB01"
        Rename-NetAdapter -Name "Ethernet 4" -NewName "SMB02"
    }
}

#Verify Network Adapters
Invoke-Command -ComputerName $ClusterNode -ScriptBlock {
    Get-NetAdapter
}
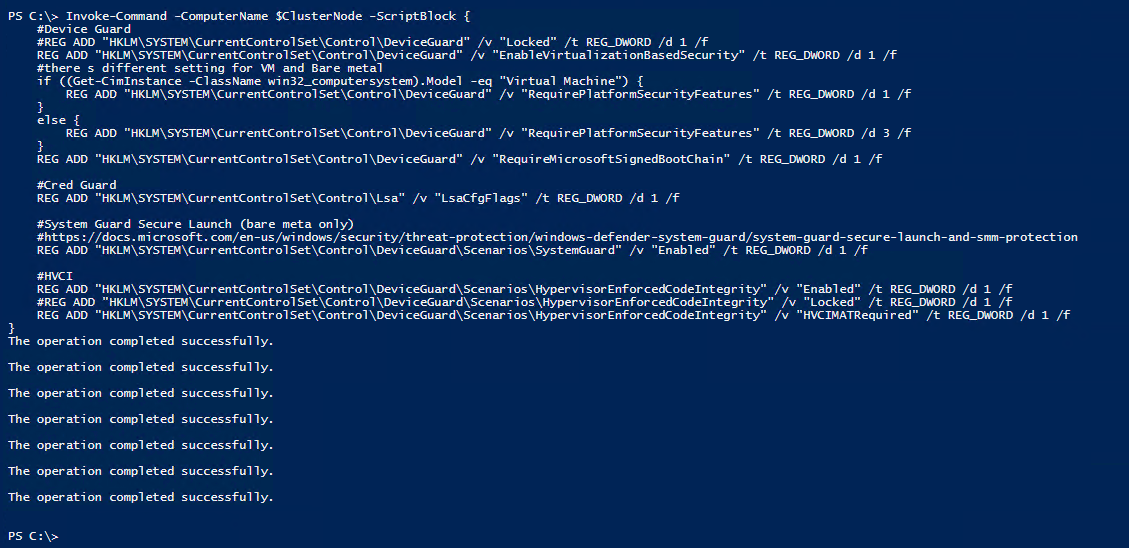
Configure OS Security
Time to do some security configurations. In my lab environment running on a VM I wouldn’t need to run these. Some of them I would if I knew I was keeping this environment up for training or other reasons.
 Invoke-Command -ComputerName $ClusterNode -ScriptBlock {
    #Device Guard
    #REG ADD "HKLM\SYSTEM\CurrentControlSet\Control\DeviceGuard" /v "Locked" /t REG_DWORD /d 1 /f
    REG ADD "HKLM\SYSTEM\CurrentControlSet\Control\DeviceGuard" /v "EnableVirtualizationBasedSecurity" /t REG_DWORD /d 1 /f
    #there s different setting for VM and Bare metal
    if ((Get-CimInstance -ClassName win32_computersystem).Model -eq "Virtual Machine") {
        REG ADD "HKLM\SYSTEM\CurrentControlSet\Control\DeviceGuard" /v "RequirePlatformSecurityFeatures" /t REG_DWORD /d 1 /f
    }
    else {
        REG ADD "HKLM\SYSTEM\CurrentControlSet\Control\DeviceGuard" /v "RequirePlatformSecurityFeatures" /t REG_DWORD /d 3 /f
    }
    REG ADD "HKLM\SYSTEM\CurrentControlSet\Control\DeviceGuard" /v "RequireMicrosoftSignedBootChain" /t REG_DWORD /d 1 /f

    #Cred Guard
    REG ADD "HKLM\SYSTEM\CurrentControlSet\Control\Lsa" /v "LsaCfgFlags" /t REG_DWORD /d 1 /f

    #System Guard Secure Launch (bare meta only)
    #https://docs.microsoft.com/en-us/windows/security/threat-protection/windows-defender-system-guard/system-guard-secure-launch-and-smm-protection
    REG ADD "HKLM\SYSTEM\CurrentControlSet\Control\DeviceGuard\Scenarios\SystemGuard" /v "Enabled" /t REG_DWORD /d 1 /f

    #HVCI
    REG ADD "HKLM\SYSTEM\CurrentControlSet\Control\DeviceGuard\Scenarios\HypervisorEnforcedCodeIntegrity" /v "Enabled" /t REG_DWORD /d 1 /f
    #REG ADD "HKLM\SYSTEM\CurrentControlSet\Control\DeviceGuard\Scenarios\HypervisorEnforcedCodeIntegrity" /v "Locked" /t REG_DWORD /d 1 /f
    REG ADD "HKLM\SYSTEM\CurrentControlSet\Control\DeviceGuard\Scenarios\HypervisorEnforcedCodeIntegrity" /v "HVCIMATRequired" /t REG_DWORD /d 1 /f
}
Restart Computer
Let us reboot to make sure all these changes will take and get our node ready to configure the cluster.
Restart-Computer $ClusterNode -Protocol WSMan -Wait -For PowerShell -Force
Start-Sleep 20 #Failsafe as Hyper-V needs 2 reboots and sometimes it happens, that during the first reboot the restart-computer evaluates the machine is up
#make sure computers are restarted
Foreach ($Server in $ClusterNode) {
    do { $Test = Test-NetConnection -ComputerName $Server -CommonTCPPort WINRM }while ($test.TcpTestSucceeded -eq $False)
}
Configure Networking with Network ATC
Network ATC is a tool to assist with the configuration of our Azure Stack HCI networking. Dealing with networking in the past could be complex and like me, would always be an error-prone process. Network ATC will help us with:
- Reduce host networking deployment time, complexity, and errors
- Deploy the latest Microsoft validated and supported best practices
- Ensure configuration consistency across the cluster
- Eliminate configuration drift
Install Features (If Needed)
Since I have used my management machine in the past and most likely have already had the features installed I wouldn’t necessarily need to install them again. Just in case I ran the following PowerShell script.
    Invoke-Command -ComputerName $ClusterNode -ScriptBlock {
        Install-WindowsFeature -Name NetworkATC, Data-Center-Bridging, RSAT-Clustering-PowerShell, RSAT-Hyper-V-Tools, FS-SMBBW
    }

Configure Management Server for ATC Management
Next we will copy over the NetworkATC modules to our management machine in order to be able to manage Network ATC from our management server.
    $session = New-PSSession -ComputerName $ClusterNode
    $items = "C:\Windows\System32\WindowsPowerShell\v1.0\Modules\NetworkATC", "C:\Windows\System32\NetworkAtc.Driver.dll", "C:\Windows\System32\Newtonsoft.Json.dll", "C:\Windows\System32\NetworkAtcFeatureStaging.dll"
    foreach ($item in $items) {
        Copy-Item -FromSession $session -Path $item -Destination $item -Recurse -Force
    }

Deploy new Intent Configurations
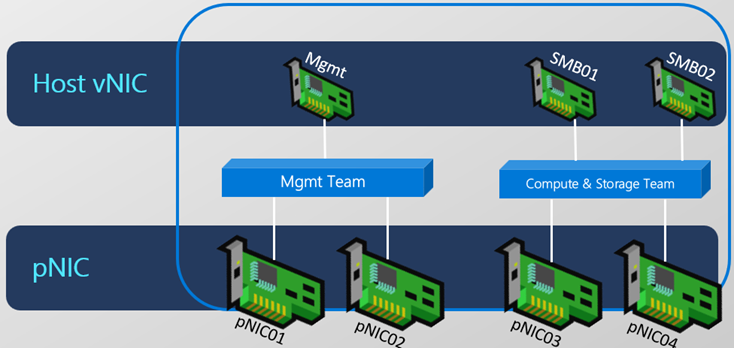
This section I will deploy my Storage Intent configuration. This will target the ClusterName so it will actually be running on AzsHCI01, my first node. This will get our cluster ready to have two network configurations. One for Compute/Management and then a separate switch for Storage traffic only.
So here is an example of the configuration that was deployed in my first blog. We have 4 virtual nics. We are using nic01 and nic02 for our Mgmt & Compute Team that was configured with our ConvergedIntent configuration.
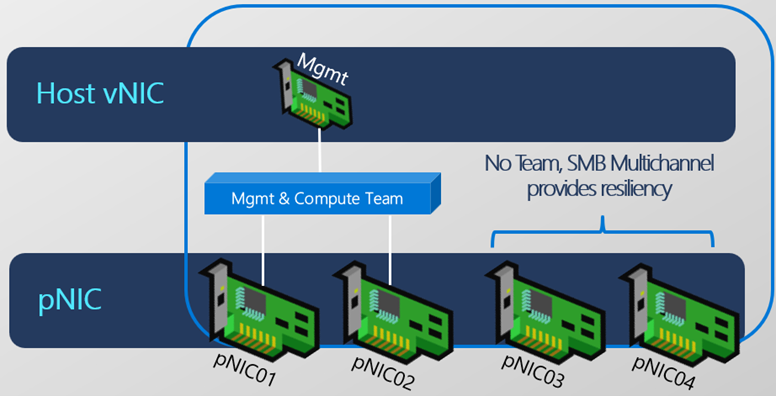
What we are about to do is deploy another Intent configuration that will add a Storage Intent. The only thing that is different between my deployment and the image below is my compute and management are on one Intent configuration, which in turn is a separate virtual switch from my storage intent and virtual switch.
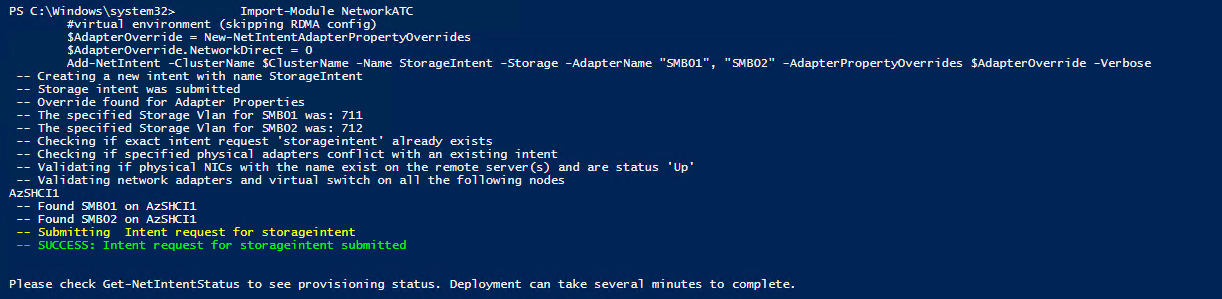
Here is the PowerShell that will allow me to deploy our configurations.
#if virtual environment, then skip RDMA config
    if ((Get-CimInstance -ClassName win32_computersystem -CimSession $ClusterNode).Model -eq "Virtual Machine") {
        Import-Module NetworkATC
        #virtual environment (skipping RDMA config)
        $AdapterOverride = New-NetIntentAdapterPropertyOverrides
        $AdapterOverride.NetworkDirect = 0
        Add-NetIntent -ClusterName $ClusterName -Name StorageIntent -Storage -AdapterName "SMB01", "SMB02" -AdapterPropertyOverrides $AdapterOverride -Verbose
    }
    else {
        #on real hardware you can configure RDMA
        #grab fastest adapters names (assuming that we are deploying converged intent with just Mellanox or Intel E810)
        $FastestLinkSpeed = (get-netadapter -CimSession $ClusterNode | Where-Object { $_.Status -eq "up" -and $_.HardwareInterface -eq $True }).Speed | Sort-Object -Descending | Select-Object -First 1
        #grab adapters
        $AdapterNames = (Get-NetAdapter -CimSession $ClusterNode | Where-Object { $_.Status -eq "up" -and $_.HardwareInterface -eq $True } | where-object Speed -eq $FastestLinkSpeed | Sort-Object Name).Name
        #$AdapterNames="SLOT 3 Port 1","SLOT 3 Port 2"
        Import-Module NetworkATC
        Add-NetIntent -ClusterName $ClusterName -Name StorageIntent -Storage -AdapterName "SMB01", "SMB02" -AdapterPropertyOverrides $AdapterOverride -Verbose
    }
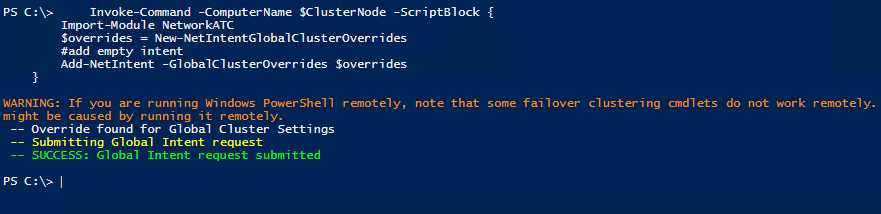
We will add the default global intent manually since we are running this from the management server. I will be honest, I ony do this because I have seen it done with others.
    Invoke-Command -ComputerName $ClusterNode -ScriptBlock {
        Import-Module NetworkATC
        $overrides = New-NetIntentGlobalClusterOverrides
        #add empty intent
        Add-NetIntent -GlobalClusterOverrides $overrides
    }

    #check
    Start-Sleep 20 #let intent propagate a bit
    Write-Output "applying intent"
    do {
        $status = Invoke-Command -ComputerName $ClusterName -ScriptBlock { Get-NetIntentStatus }
        Write-Host "." -NoNewline
        Start-Sleep 5
    } while ($status.ConfigurationStatus -contains "Provisioning" -or $status.ConfigurationStatus -contains "Retrying")
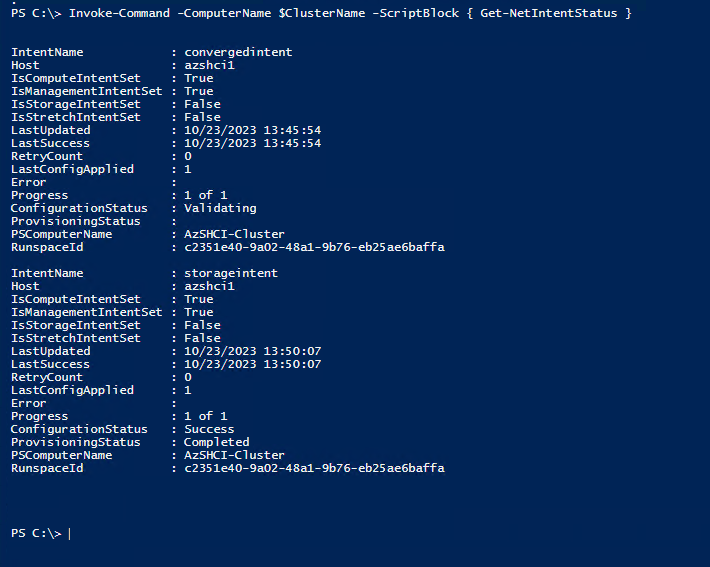
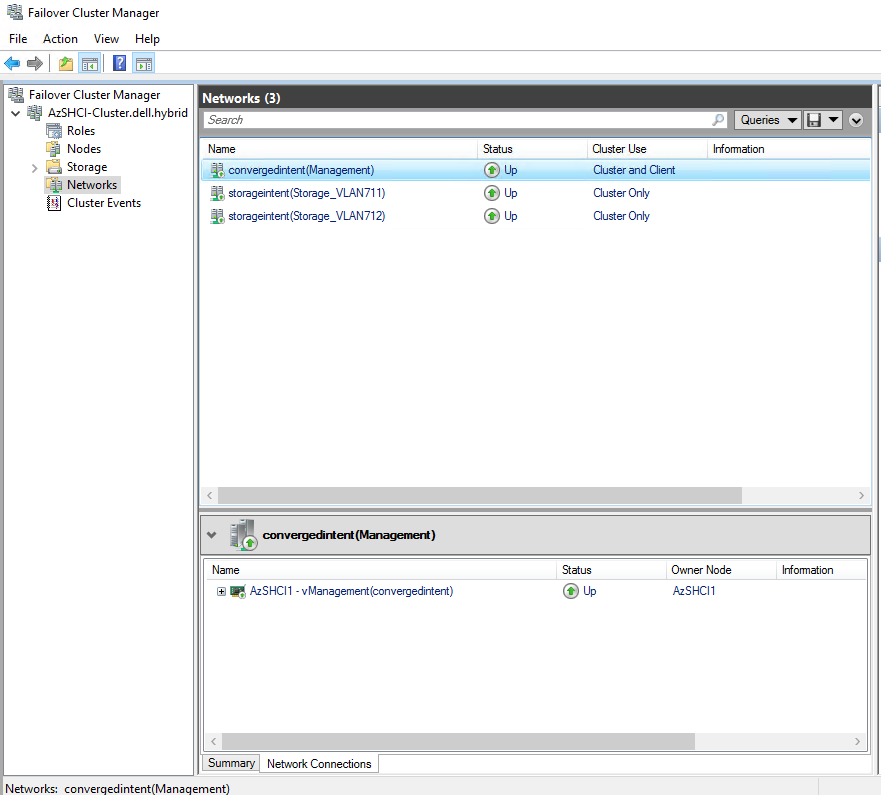
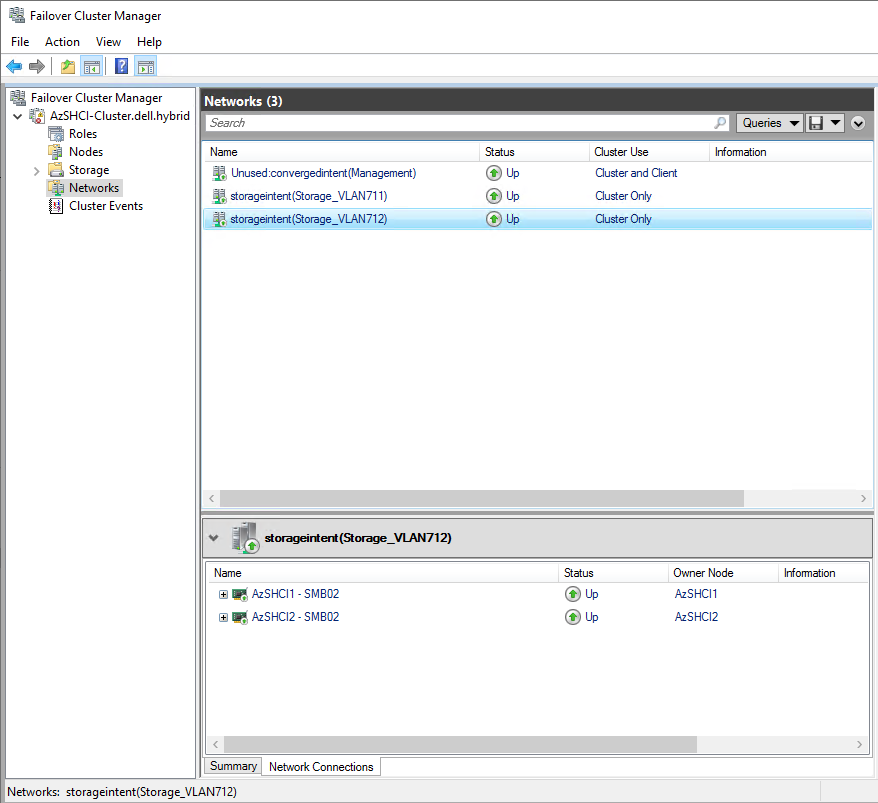
Now if we go to our Failover Cluster Manager we should be able to see the three switches now. The first is our converged management network for compute and management traffic The other two are our SMB traffic on two different vlans. This may take some time. Once this is complete then I will move forward with adding this node to the cluster.
Configure Cluster
Nice, we are almost ready to join our second node to the cluster. Networking is done and all the needed OS configurations are done. The next step can be completed after the cluster is joined but I do it right before.
Configure Witness
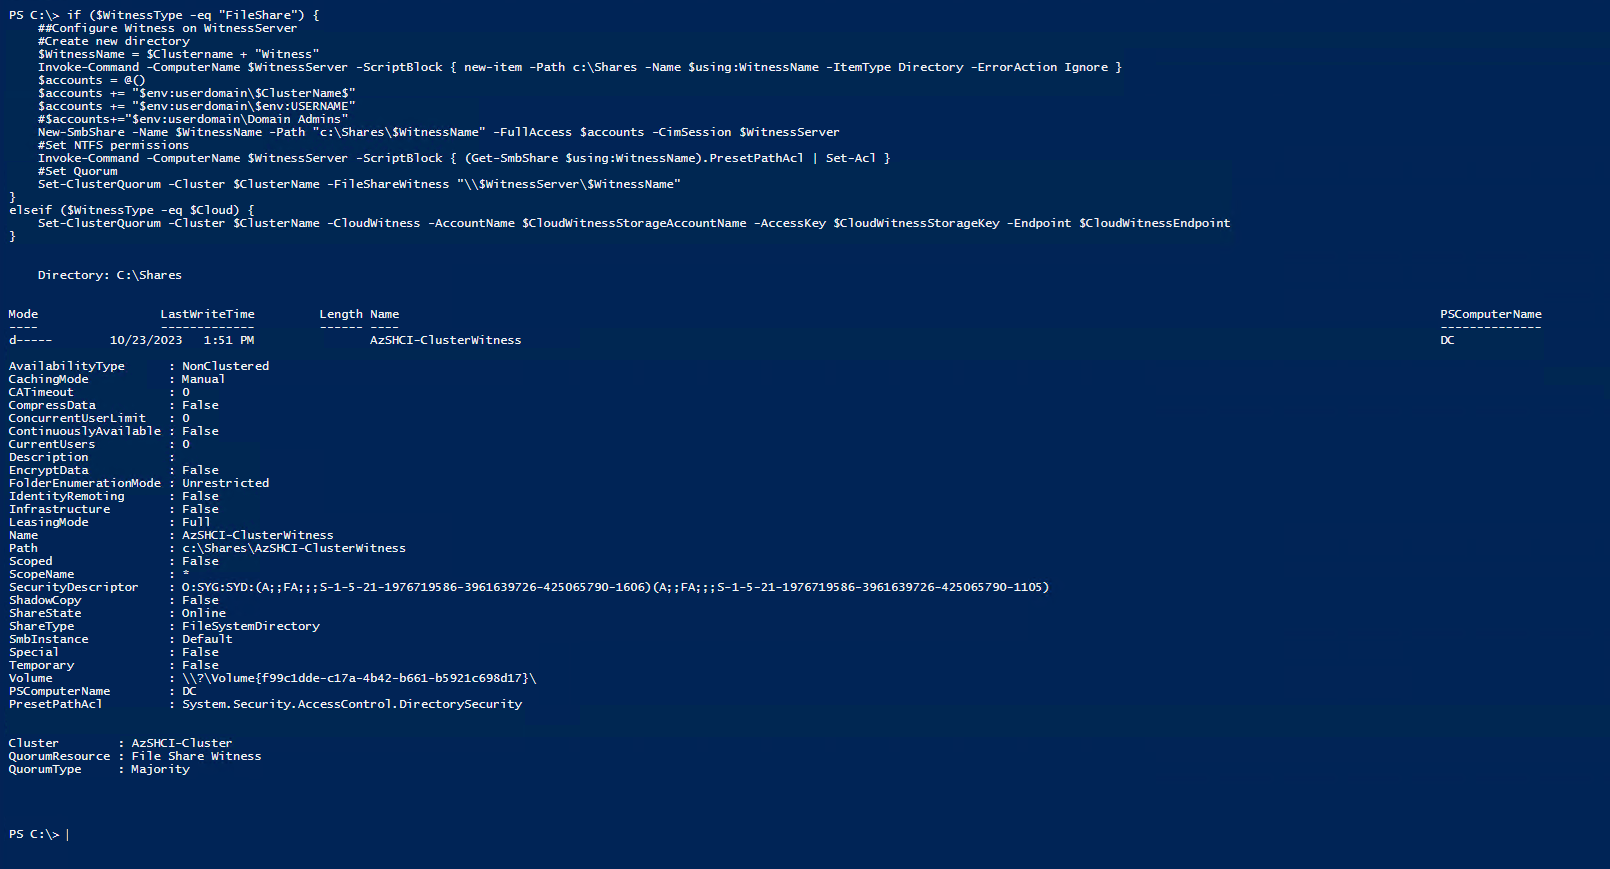
This is where we will create our Witness for our cluster. Since before it was only a single-node cluster we did not need a witness… (Can I get a Witness!) Anyway, for this lab I will create Fileshare witness on my domain controller. This is just a lab built to write this blog so please don’t do this in any solution other than that. Either have a real file server that can be used or go with a Cloud Witness.
if ($WitnessType -eq "FileShare") {
    ##Configure Witness on WitnessServer
    #Create new directory
    $WitnessName = $Clustername + "Witness"
    Invoke-Command -ComputerName $WitnessServer -ScriptBlock { new-item -Path c:\Shares -Name $using:WitnessName -ItemType Directory -ErrorAction Ignore }
    $accounts = @()
    $accounts += "$env:userdomain\$ClusterName$"
    $accounts += "$env:userdomain\$env:USERNAME"
    #$accounts+="$env:userdomain\Domain Admins"
    New-SmbShare -Name $WitnessName -Path "c:\Shares\$WitnessName" -FullAccess $accounts -CimSession $WitnessServer
    #Set NTFS permissions
    Invoke-Command -ComputerName $WitnessServer -ScriptBlock { (Get-SmbShare $using:WitnessName).PresetPathAcl | Set-Acl }
    #Set Quorum
    Set-ClusterQuorum -Cluster $ClusterName -FileShareWitness "\\$WitnessServer\$WitnessName"
}
elseif ($WitnessType -eq $Cloud) {
    Set-ClusterQuorum -Cluster $ClusterName -CloudWitness -AccountName $CloudWitnessStorageAccountName -AccessKey $CloudWitnessStorageKey -Endpoint $CloudWitnessEndpoint
}
Add Node To Cluster
Now we can add the second node to the cluster. Very simple, the following PowerShell command is below. We could also do this from the Windows Admin Center as well.
Add-ClusterNode -Name $ClusterNode -Cluster $ClusterName

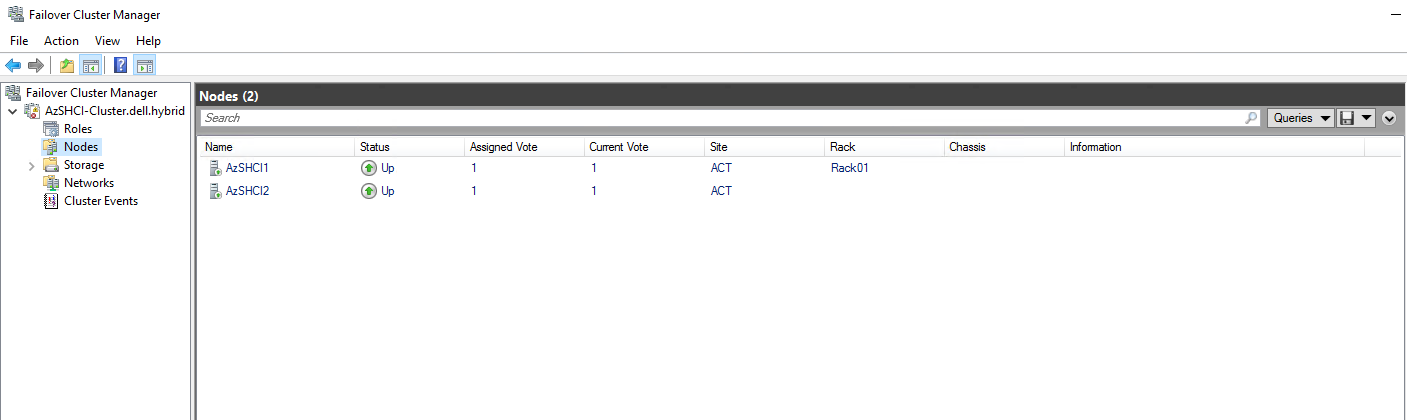
And after about 5 minutes we can start verifying that the cluster was added successfully. I am going to check first in the failover cluster manager. Here I can see my 2nd node is up and running.
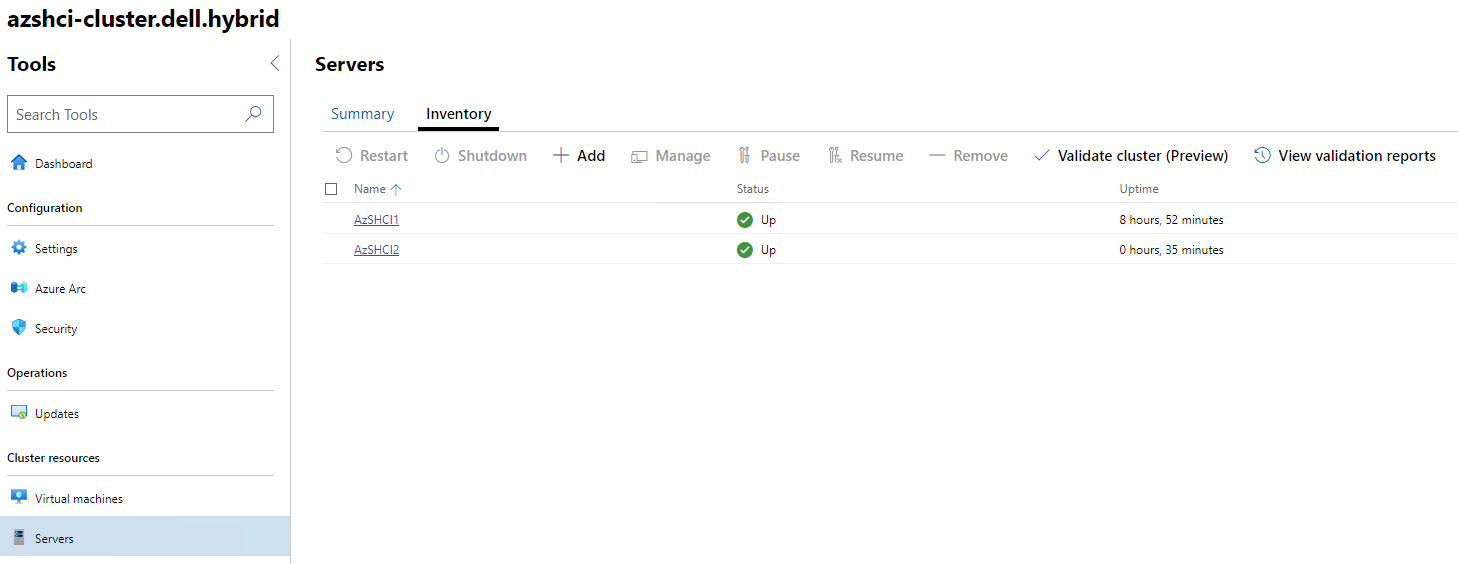
Next I will go into the Windows Admin Center to check on my cluster settings and see that the node has joined successfully. As you can see below, I do have an issue but it is expected. It will take a few minutes for my newly added node to get registered with Azure Arc-enabled servers. This will go green within the next 15 minutes or so.

Then from within the Cluster I can click on Servers and see that both servers are up and running.
Here we can check that our Network intent configurations have been provisioned successfully across all our nodes.
Check Network ATC settings

We can also check Failover Cluster manager to make sure that all our cluster networks are correctly configured. This make take some time so be patient.
One of the last configurations for our cluster would be to disabled CSV cache if using SCM storage or if this is running on a virtual machine.
if (Get-PhysicalDisk -cimsession $ClusterNode | Where-Object bustype -eq SCM) {
    #disable CSV cache if SCM storage is used
        (Get-Cluster $ClusterName).BlockCacheSize = 0
}
elseif ((Invoke-Command -ComputerName $ClusterNode -ScriptBlock { (get-wmiobject win32_computersystem).Model }) -eq "Virtual Machine") {
    #disable CSV cache for virtual environments
        (Get-Cluster $ClusterName).BlockCacheSize = 0
}

We are not done yet. There are some more network settings that have to be configured, storage settings, and we also need to enabled cluster aware updating and a few other things.
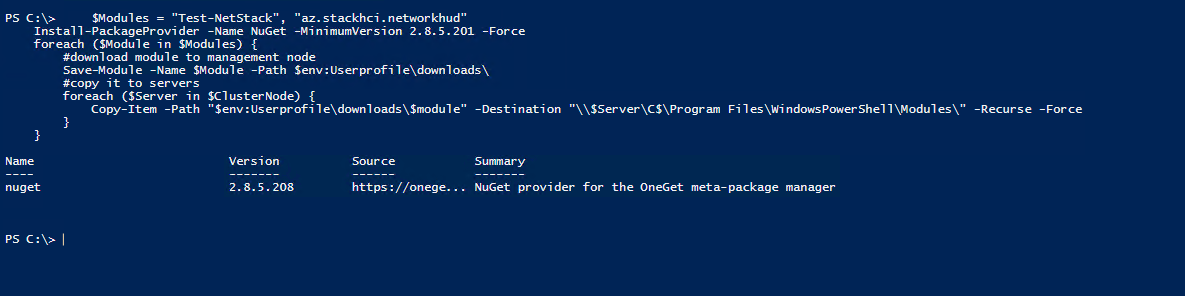
Install Network HUD (NetATC)
Here we will install Network HUd on the second node. This was already installed on the first node previously.
Invoke-Command -ComputerName $ClusterNode -ScriptBlock {
        Install-WindowsFeature -Name "NetworkHUD", "Hyper-V", "Hyper-V-PowerShell", "Data-Center-Bridging", "RSAT-DataCenterBridging-LLDP-Tools", "NetworkATC", "Failover-Clustering"

$Modules = "Test-NetStack", "az.stackhci.networkhud"
    Install-PackageProvider -Name NuGet -MinimumVersion 2.8.5.201 -Force
    foreach ($Module in $Modules) {
        #download module to management node
        Save-Module -Name $Module -Path $env:Userprofile\downloads\
        #copy it to servers
        foreach ($Server in $ClusterNode) {
            Copy-Item -Path "$env:Userprofile\downloads\$module" -Destination "\\$Server\C$\Program Files\WindowsPowerShell\Modules\" -Recurse -Force
        }
    }
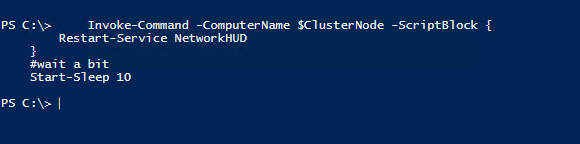
    Invoke-Command -ComputerName $ClusterNode -ScriptBlock {
        Restart-Service NetworkHUD
    }
    #wait a bit
    Start-Sleep 10
    #check event logs
    $events = Invoke-Command -ComputerName $ClusterNode -ScriptBlock {
        Get-WinEvent -FilterHashtable @{"ProviderName" = "Microsoft-Windows-Networking-NetworkHUD"; Id = 105 }
    }
    $events | Format-Table -AutoSize
Complete NetATC Configurations
The finally steps to finish our network configuration using Network ATC. Here we will install and configure Data Center Bridging if needed. Then go through all the settings to see if they are configured correctly.
This step we will disable network adapters that we will not be using. Since this was a virtual environment and not physical I didn’t have any network adapters that needed to be disabled.
Get-Netadapter -CimSession $ClusterNode | Where-Object Status -ne "Up" | Disable-NetAdapter -Confirm:0

Here is where I will configure Data center bridging.
    if ((Get-CimInstance -ClassName win32_computersystem -CimSession $ClusterNode).Manufacturer -like "*Dell Inc.") {
        if (Get-NetAdapter -CimSession $ClusterNode -InterfaceDescription Mellanox*) {
            Set-NetAdapterAdvancedProperty -CimSession $ClusterNode -InterfaceDescription Mellanox* -DisplayName 'Dcbxmode' -DisplayValue 'Host in charge'
        }
    }
    #configure larger receive buffers on Mellanox adapters
    if ((Get-CimInstance -ClassName win32_computersystem -CimSession $ClusterNode).Manufacturer -like "*Dell Inc.") {
        if (Get-NetAdapter -CimSession $ClusterNode -InterfaceDescription Mellanox*) {
            Set-NetAdapterAdvancedProperty -CimSession $ClusterNode -InterfaceDescription Mellanox* -DisplayName 'Receive buffers' -DisplayValue '4096'
        }
    }

Check NetATC Configurations
Live Migration settings. This is where we would see what networks were exuded from Live Migration.
    $Networks = (Get-ClusterResourceType -Cluster $clustername -Name "Virtual Machine" | Get-ClusterParameter -Name MigrationExcludeNetworks).Value -split ";"
    foreach ($Network in $Networks) { Get-ClusterNetwork -Cluster $ClusterName | Where-Object ID -Match $Network }
I do want to call out something here that I noticed is happening. For some reason my Cluster Network is being renamed during the process I am following. I am going to find out why or how or what is doing this.

Check Live Migration options. Make sure it is configured to SMB.
Get-VMHost -CimSession $ClusterNode | Select-Object *Migration*
Check SMB Bandwidth settings limit.
Get-Cluster -Name $ClusterName | Select-Object *SMB*
Get-SmbBandwidthLimit -CimSession $ClusterNode
Check VLAN settings
Get-VMNetworkAdapterIsolation -CimSession $ClusterNode -ManagementOS
CHeck number of live migrations
get-vmhost -CimSession $ClusterNode | Select-Object Name, MaximumVirtualMachineMigrations
Check Cluster Overrides in Global Overrides
    Invoke-Command -ComputerName $ClusterName -ScriptBlock {
        Import-Module NetworkATC
        $GlobalOverrides = Get-Netintent -GlobalOverrides
        $GlobalOverrides.ClusterOverride
    }
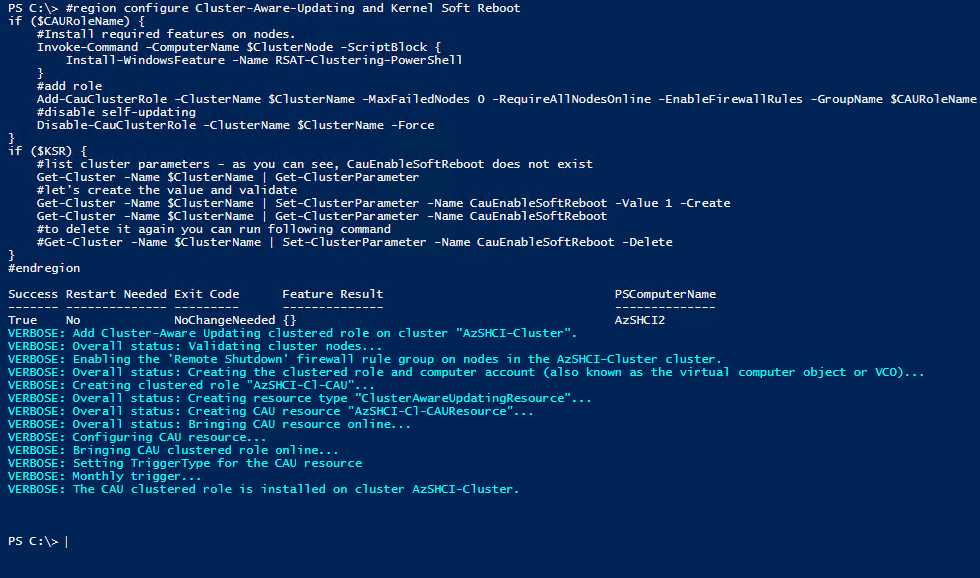
Enable Cluster-Aware-Updating
Now we can enable cluster-aware-updating. This can be done again in the Windows Admin Center but I will do it via PowerShell.
if ($CAURoleName) {
    #Install required features on nodes.
    Invoke-Command -ComputerName $ClusterNode -ScriptBlock {
        Install-WindowsFeature -Name RSAT-Clustering-PowerShell
    }
    #add role
    Add-CauClusterRole -ClusterName $ClusterName -MaxFailedNodes 0 -RequireAllNodesOnline -EnableFirewallRules -GroupName $CAURoleName -VirtualComputerObjectName $CAURoleName -Force -CauPluginName Microsoft.WindowsUpdatePlugin -MaxRetriesPerNode 3 -CauPluginArguments @{ 'IncludeRecommendedUpdates' = 'False' } -StartDate "3/2/2017 3:00:00 AM" -DaysOfWeek 4 -WeeksOfMonth @(3) -verbose
    #disable self-updating
    Disable-CauClusterRole -ClusterName $ClusterName -Force
}
if ($KSR) {
    #list cluster parameters - as you can see, CauEnableSoftReboot does not exist
    Get-Cluster -Name $ClusterName | Get-ClusterParameter
    #let's create the value and validate
    Get-Cluster -Name $ClusterName | Set-ClusterParameter -Name CauEnableSoftReboot -Value 1 -Create
    Get-Cluster -Name $ClusterName | Get-ClusterParameter -Name CauEnableSoftReboot
    #to delete it again you can run following command
    #Get-Cluster -Name $ClusterName | Set-ClusterParameter -Name CauEnableSoftReboot -Delete
}
Configure Cluster Storage
Storage Fault Domain Changes
#configure storage pool
Set-StoragePool -CimSession $ClusterName -FriendlyName "S2D on $ClusterName" -FaultDomainAwarenessDefault StorageScaleUnit
Get-VirtualDisk -CimSession $ClusterName | Select-Object FriendlyName, FaultDomainAwareness
Invoke-Command -ComputerName $clusterName -ScriptBlock { Stop-ClusterPerformanceHistory -DeleteHistory }
#recreate performance history
Start-ClusterPerformanceHistory -CimSession $ClusterName
Get-VirtualDisk -CimSession $ClusterName | Select-Object FriendlyName, FaultDomainAwareness
Create Volumes
Get-StoragePool -FriendlyName "S2D on $ClusterName" -CimSession $ClusterName | Set-StoragePool -ProvisioningTypeDefault Thin
#create 1TB volume on each node
foreach ($Server in $ClusterNode) {
    New-Volume -StoragePoolFriendlyName  "S2D on $ClusterName" -FriendlyName $Server -Size 1TB -CimSession $ClusterName
}
Align Volumes
#align volumes ownership to with servers
foreach ($Server in $ClusterNode) {
    Move-ClusterSharedVolume -Name "Cluster Virtual Disk ($Server)" -Node $Server -Cluster $ClusterName
}
Verify and Testify?
So, at this time I have a fully functional two-node Azure Stack HCI cluster ready to have workloads deployed to it. At this point we can go through and verify everything is running. That both nodes are connected, that our networks are up and running, and that all our small configurations have been applied. We can verify that our nodes show up in Azure as Arc-enabled servers, and that our Azure Stack HCI cluster is also being managed and is registered with Azure. We should verify our storage is working and that all our volumes are good for workload placements. I will even try to do an update via the Update manager from within the Windows Admin Center to make sure everything there is working as well.
There are handful of other settings that can be configured. For instance, configuring fault domains for the new node, configuring the default location for VM’s on our volumes, etc. But for now, this is where the blog shall end.
Final Thoughts
So, I do want to stress. This deployment I just walked through is not production ready. It will be good for getting your feet wet with Azure Stack HCI. For most of use we don’t have a lot of hardware that would be supported for HCI sitting around. We may have a few older servers that we can use, even deploy this same solution on that single physical server to have a multi-node solution, or use an AzureVM which can be very expensive. This blog I hope helped someone get an idea of that they would need to do to get started. Moving forward, I will blog about scaling out this single node cluster to a two node cluster and then to a three and four node cluster after that.
I also didn’t cover how you would cable a two node cluster. THere are a few different ways that it can be done. We could go switchless for compute and storage or introduce a top of the rack switch.
Also, this blog just touches on the deployment of an Azure Stack HCI cluster. There is so much more and we can really go into depth of what Azure Stack HCI can do along with Azure Arc. I will be blogging a lot on these subjects moving forward.
