Azure Stack HCI - Part III - Advanced Deployment of A Single Node Cluster
This is a series of blogs about my experiences with Azure Stack HCI
In this blog series I plan to blog about everything I know about Azure Stack HCI. So, it should be a very short blog series. Just kidding. Again, I tend to blog about subjects that I am currently working on or will be currently working on. So, Azure Stack HCI is fresh on my mind again these days.
I had planned to have a Part III that would have focused on scaling out a single node cluster. However, as I was writing that blog and going back to Part II, Azure Stack HCI - Part II - Deploying A Single Node Cluster I found myself wanting to add to that blog. There where things that I didn’t cover I felt would be important. So instead of deleting that blog, because it did do a decent job at a high level overview, I am going to keep that blog and write another one that goes more in-depth. Which is the birth of this blog, Part III - Advance Deployment of A Single Node Cluster.
In this blog I want to add some areas I left out of the last blog and go slightly deeper in some of the other areas of that last blog. Hopefully this blog will be useful to those that are interested in Azure Stack HCI and want to get your toes wet enough to learn more.
So this blog will cover the following:
- Shout Out!!!
- Overview - Single Node Cluster
- Hardware Deployment & Configuration
- Pre-Requisites and Configurations
- Cluster Networking
- Create the Cluster
- Storage Spaces Direct
- Register The Cluster
- Register the Windows Admin Center (WAC)
- Add Cluster To WAC
- Creating Volumes
- More Settings
- Final Thoughts
Remember, I am building this solution on a Single Node cluster and I will try to explain how to do it not only on an AzureVM but try to explain how it would be done on physical hardware if that process is different. Since I do have plans to scale out this cluster, I will keep that in mind as I deploy this first node as well. Knowing that I will add a second and a third and a fourth node in the future.
Note: So once again I learned something after this blog was created. Instead of re-writing a third blog on this subject I just edited this blog. I was unaware that you could still use Network ATC with virtual machines. Even thought the Microsoft Learn documentation calls out that it is only supported on Physical machines. The changes I made in this blog are in that area. From manually configuring the network to using Network ATC.
Shout Out!!!
The first thing I would like to do before I start is give credit to Dell’s own Matt McSpirit and Jaromir Kaspar. Jaromir is the creator of MSLab. MSLab is the base for the Hybrid Jump Start I used to deploy my Azure environment. Hybrid Jump Start was created and being worked on by Matt McSpirit. A lot of my knowledge comes from there two gentlemen. Then of course, a lot of my references will come from Microsoft Learn documentation on Azure Stack HCI. There is also a Slack Channel dedicated to Azure Stack HCI that I pull some information from as well.
Overview - Single Node Cluster
So why a single node Azure Stack HCI Cluster? There are some get advantages of running a single node cluster and of course with that there are things you should take into account when running a single node cluster.
Let’s look at why you wouldn’t first? Better get the bad stuff out of the way before we talk about why a single node cluster has some advantages.
First thing that we should note in a single-node cluster is the resiliency to some failures such as a hard disk failure. Single node devices are also limited a single drive type (either NVMe or SSD). Along with storage, there is no High Availability for the workloads that run on a single-node cluster. This means if the device fails, your workloads fail. Something to think about as well, when you do updates, this will require a reboot of the OS, which in turn will bring down your workloads. So moral to the story, critical applications shouldn’t run on a single-node cluster unless you can afford some down time.
Now let’s take a look at some of the advantages of a single-node cluster.
- Smaller Solutions: It’s suitable for environments with physical space constraints or that don’t require built-in resiliency, such as retail stores and branch offices.
- Reduced Costs: A smaller footprint reduces hardware and operational costs1. Using a single server minimizes hardware and software costs in locations that can tolerate lower resiliency.
- Scalability: Solutions can be built to scale, ranging from single-node up to 16 nodes if needed1. You can add servers to scale out the cluster.
- Azure Integration: It brings native Azure Arc integration3, allowing you to gain the capabilities afforded by being enabled by Azure, such as running Azure Kubernetes Service (AKS).
- Supports Same Workloads: It supports the same workloads as a multi-node cluster, such as Azure Virtual Desktop (AVD) and Azure Kubernetes Service (AKS) on Azure Stack HCI.
- Proof of Concept (PoC) and Testing: Organizations considering a transition to Azure Stack HCI might deploy a single node initially to test functionalities, performance, and integration with existing systems before committing to a full-scale deployment.
- Specific Workloads: Some workloads or applications might not require the high availability offered by multi-node clusters but can benefit from the other features of HCI, such as integrated storage and compute capabilities.
- Training and Development: For training purposes or for development and testing environments, a single-node deployment can provide a controlled environment without the need for more extensive infrastructure.
Thanks to Karl Wester-Ebbinghaus for some more suggestions:
- Edge AVD for stores/running cash terminals etc.
- Dev/Test VM’s even with Dev/Test Licensing regarding teh OS Workloads
- Outsourcing old/legacy workloads that require ESU savings on hardware and ESU cost.
It’s essential to understand that while a single-node Azure Stack HCI deployment offers specific benefits, it does come with the trade-off of not having the high availability and failover capabilities inherent in multi-node clusters. Thus, it’s crucial to assess the importance of these features based on the intended use case.
Hardware Deployment & Configuration
There are plenty of options when it comes to hardware for a single node solution. I have had most of my experiences with Dell so I tend to lean towards Dell solutions. For transparency, I did work for Dell EMC for about 3 months back in 2016 as a contractor, then again for about a month as a full time employee for Dell Services before Dell Services became NTT Data Services. However, that has just a little pull when it comes to talking about hardware vendors. I don’t have any experience with Lenovo at the server level. I have some experience with HPE and their Edgeline EL8000 Converged Edge Systems. I worked a few projects with that solution when I was on an Edge Team working with Microsoft Federal. At the time their were not certified to run Azure Stack HCI but we did have it running on that system and it was a good sturdy system to run on the edge. I am not sure if it now certified or not.
So I will say, over all I favor Dell solutions and they have a very nice solution for Azure Stack HCI that was just announced Dell’s APEX Cloud Platform for Microsoft Azure is currently the First and only Azure Stack HCI offering in the Premier Solution Category. The things I have seen this new product can do for lifecycle management and more look amazing. Plus, these are Dell Servers, which in my experience have many nice features including the iDrac. Now Dell also makes a very nice single node system for Azure Stack HCI, the AX series.
However, if you are like me and have a budget of zero dollars than hardware is pretty much off the table. So for this blog and most my learning and training experience I will deploy a solution in Azure for a few days or so. As mentioned above, I have been using Matt McSpirit’s Hybrid Jump Start to deploy my virtual environment.
My Virtual Environment
the Hybrid Jump Start deploys a single Host in Azure. Within the host, it will configure Hyper-V and nested VM support for Hyper-V. It will then deploying the following:
- An Active Directory Domain Controller
- A Windows Admin Center Gateway Server
- Depending on your choice, between 2 to 4 HCI Host.
This will configure all HCI nodes with 3 NICS that are assigned to a vSwitch created called HybridJumpStart-xyz-vSwitch. The domain controller will have two NICS installed one assigned to the same vSwitch as the nodes and the 2nd is assigned to an InternalNat switch.
Last it configures an Active Directory domain Dell.Hybrid, joins all the servers to that domain for you and then deploys the Windows Admin Center for you.
The good thing about this jump start is you don’t have to rack servers, rack switches, run power, and cables. A click and a few variables later you have a fully functional lab ready to move forward with Azure Stack HCI.
Deploying my virtual environment
From the Hybrid Jump Start the Github repo I just clicked Deploy To Azure and filled in the necessary fields. I did keep some of the default settings but the following I did change:
- Virtual Machine Size: I changed to Standard_E32s_v4
- Azure Stack HCI Nodes: I changed from 2 to 4
- Azure Stack HCI Node Memory: I changed to 48.
- Data Disk Size: I changed to 128 GB
- Data Disk Type: I changed to Premium_LRS
I also changed the time the machine will shutdown each night from 22:00 to 20:00. (That is 8PM for my fellow Texans.) I also changed the time zone to the only time zone that matters, Central Time (Texas Time!)

Deployment kicked off and took about an hour overall for everything to deploy.


While I waited, I did go into the VM resource to configure an alert to be emailed to me before my VM auto shutsdown. This comes in handy a lot. In order to do this, we just go back to the Virtual Machine resource in the resource group created, click on that resource, and on the left blade under Operations, there is a option called Auto-shutdown. We click on that and to the right, add an email address to the Email Address field.
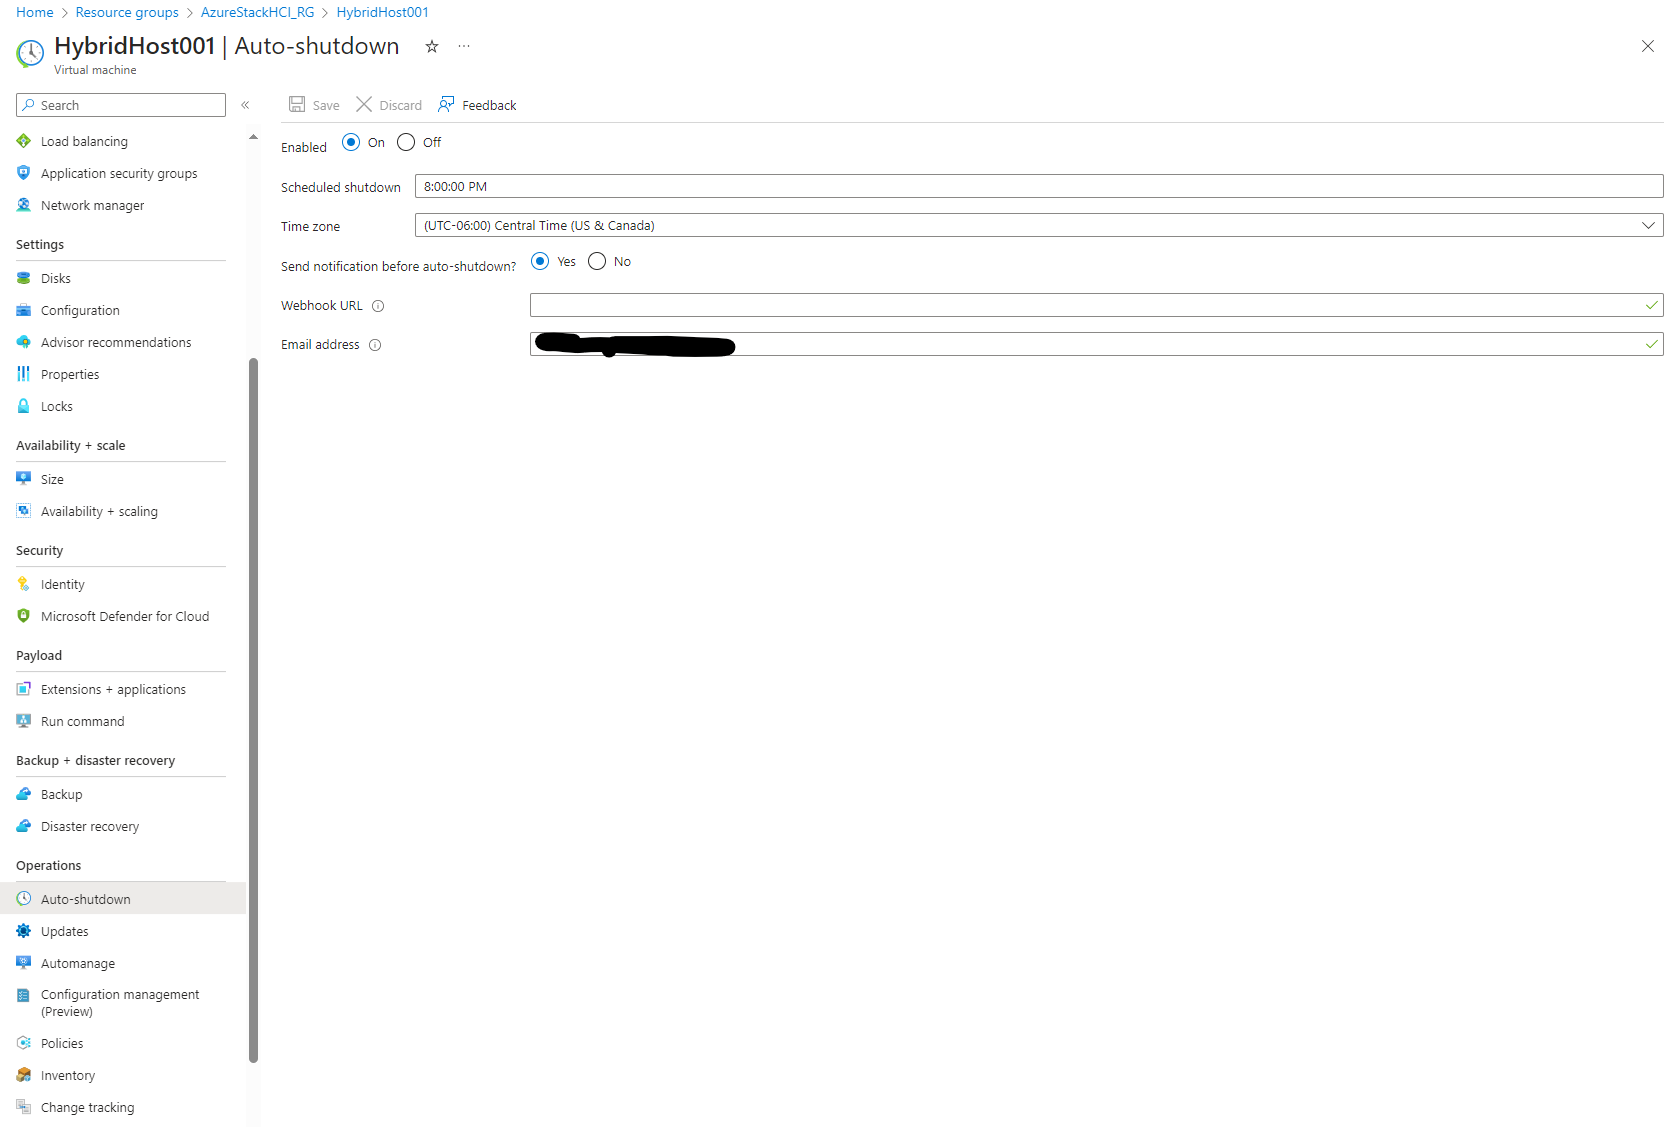
Click save and now, while we are working hard late at night, we will be reminded that our machine will shut down soon. I always forget adn in the middle of working it always shuts down.
Physical Hardware Deployment
With Physical hardware there are some areas we need to discuss. If you are going to just use a single node than it is pretty straight forward. Rack the server, run your ethernet cables for network connection, and of course power. For a two node cluster, you could get by without having top of the rack switches. For management you just need to have one NIC connected to switches, for the storage and compute networks you can cross connect the two servers without a top of the rack switch. Now, once we get into three nodes and above, this is where the hardware configuration, networking, etc get more important. When the servers are rack, the power is run, then we need to talk about networking. At a high level, you shouldn’t have less than 4 physical NICS for anything larger than a three node cluster. In most cases, you would create a SET team across two physical NICS for management, and another SET team for both Compute and Storage.
Once the servers have been racked we will need to deploy the OS, the Azure Stack HCI OS on those servers. Either by Network Deployment, via some lifecycle management solution, or something like SCCM or WDS, or old fashion sneaker net to the box with a bootable USB drive.
Pre-Requisites and Configurations
So at this point, if you have physical hardware or if you are using a virtualized environment like I am using the following steps will closely be related. There are some other settings around networking and OS configuration that would need to be done for physical host but for the most part, everything I will cover at this point will get your single node cluster up and running on physical hardware or an AzureVM or some other virtualized platform.
Pre-requisites
So one of the biggest pre-requisites at this point is having an Active Directory Domain. The nodes will all have to be joined to the domain after the OS has been installed.
Management Tools
In most environments, we would have a management server that we can install all our tools. For my environment, I only have the DC so I will use that as my management server for this lab.
Install-WindowsFeature -Name RSAT-Clustering, RSAT-Clustering-Mgmt, `
    RSAT-Clustering-PowerShell, RSAT-Hyper-V-Tools, `
    RSAT-Feature-Tools-BitLocker-BdeAducExt, RSAT-Storage-Replica
OS Configuration
There are three things that we should configure on all our host. I like to enable remote desktop on my host in a lab environment, we also need to configure Active memory dump and if these where physical hardware we would need to configure high performance power plan on all our nodes.
# Define servers as variable
$Servers = "AzSHCI1", "AzSHCI2", "AzSHCI3", "AzSHCI4"

# Configure Active memory dump
Invoke-Command -ComputerName $servers -ScriptBlock {
    Set-ItemProperty -Path HKLM:\System\CurrentControlSet\Control\CrashControl -Name CrashDumpEnabled -value 1
    Set-ItemProperty -Path HKLM:\System\CurrentControlSet\Control\CrashControl -Name FilterPages -value 1
}

# Configure high performance power plan
# Set high performance if not VM
Invoke-Command -ComputerName $servers -ScriptBlock {
    if ((Get-ComputerInfo).CsSystemFamily -ne "Virtual Machine") {
        powercfg /SetActive 8c5e7fda-e8bf-4a96-9a85-a6e23a8c635c
    }
}
# Check settings
Invoke-Command -ComputerName $servers -ScriptBlock { powercfg /list }

# Enable Remote Desktop
Invoke-Command -ComputerName $Servers -ScriptBlock { Set-ItemProperty -Path 'HKLM:\System\CurrentControlSet\Control\Terminal Server'-name "fDenyTSConnections" -Value 0 }

Invoke-Command -ComputerName $Servers -ScriptBlock { Enable-NetFirewallRule -DisplayGroup "Remote Desktop" }
I also will rename my machines network adapters at this point which will help me better identify them later.
$Servers = "AzSHCI1"
## Rename Network Adapters
Invoke-Command ($Servers) {
    Rename-NetAdapter -Name "Ethernet" -NewName "vmNic01"
    Rename-NetAdapter -Name "Ethernet 2" -NewName "vmNic02"
    Rename-NetAdapter -Name "Ethernet 3" -NewName "vmNic03"
    Rename-NetAdapter -Name "Ethernet 4" -NewName "vmNic04"
    }
    Invoke-Command -ComputerName $Servers -ScriptBlock {
    Get-NetAdapter
    }
Install Features
Next I will install all the features needed for my node AZSHCI1. Since this blog is about a single node sever with continuation into how to join the other nodes, I will just need to do the following on a single node:
$Servers = "AzSHCI1"
## Install Roles & Features
$FeatureList = "BitLocker", "Data-Center-Bridging", "Failover-Clustering", "FS-FileServer", "FS-Data-Deduplication", "Hyper-V", "Hyper-V-PowerShell", "RSAT-AD-Powershell", "RSAT-Clustering-PowerShell", "NetworkATC", "NetworkHUD", "FS-SMBBW", "Storage-Replica"

# This part runs the Install-WindowsFeature cmdlet on all servers in $ServerList, passing the list of features in $FeatureList.
Invoke-Command ($Servers) {
    Install-WindowsFeature -Name $Using:Featurelist -IncludeAllSubFeature -IncludeManagementTools
}


# Restart and wait for computers
Restart-Computer $servers -Protocol WSMan -Wait -For PowerShell -Force
Start-Sleep 20 # Allow time for reboots to complete fully
Foreach ($Server in $Servers) {
    do { $Test = Test-NetConnection -ComputerName $Server -CommonTCPPort WINRM }while ($test.TcpTestSucceeded -eq $False)
}
Cluster Networking
Now, this is the section that changed drastically since I wrote the blog. I am leaving the old way or what we would call the manual way just for reference but I am adding how to do this using Network ATC as well.
The Manual Way
If we were deploying this solution on Physical nodes we would be able to take advantage of Network ATC. However, Network ATC is not supported on a virtual environments so we will configure our networks manually and using PowerShell. I guess in theory you could do a lot of this in the Windows Admin Center but PowerShell is a lot easier, when it comes to multi-node systems you are trying to configure for a cluster.
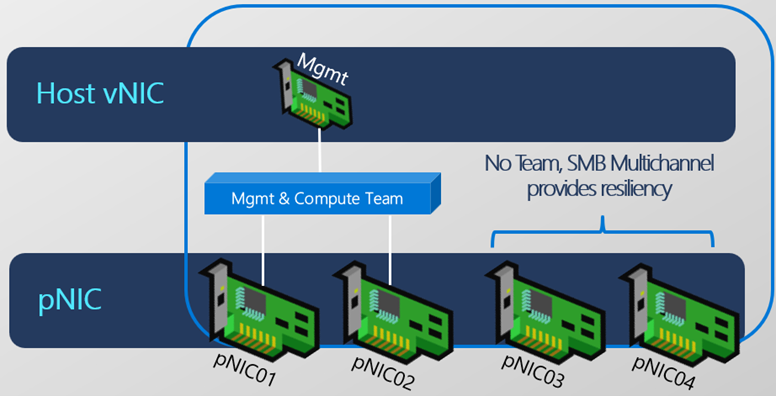
The following image shows how I am going to configure my host today. Each of my nodes have 4 virtual nics that represent 4 physical nics in this case. I will be creating two Switch Embedded Teams (SET), one for a Management Team and another for my Compute and Storage Team or what we will call ConvergedSwitch. During the process we will create a vNIC for the Management interface, and then two more vNICS for our SMB traffic.
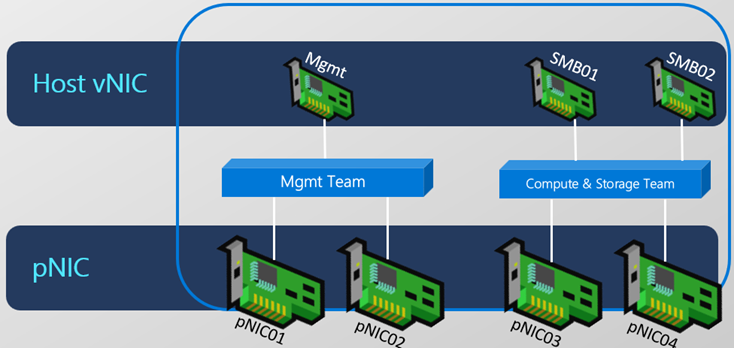
For this virtual environment the PowerShell command I am going to use will just grab the first available physical nics and add them to the SET Team. Then the next two available will be added to the Compute and Storage Team. In a physical configuration you will want to make sure you have identified which physical nic maps to what interface, etc in each Node. Since in a physical deployment you will have network cables running from each to different switch ports with different subnets assigned to each network.
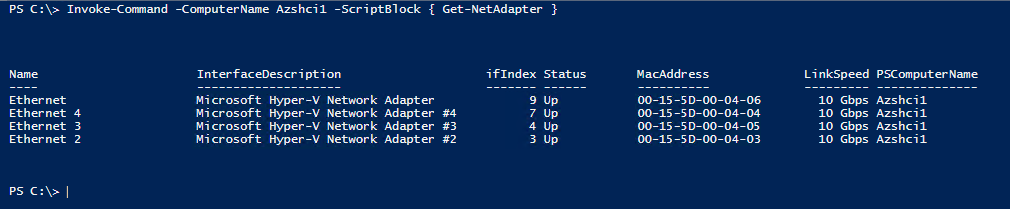
For an example, you can run the following PowerShell command on your host to see these mappings.
Invoke-Command -ComputerName Azshci1 -ScriptBlock { Get-NetAdapter }
For my environment I don’t need to worry about this since all the vnics on each node are connected to the same vSwitch on my hyper-v server. Moving forward I will continue as they are physical nics.
We are going to create the Management Team at this point. The script below will run on my first node, it will create the Management Team SET switch and it will add the first two physical NICs located on my node.
# Define servers as variable
$Servers="AzSHCI1"

# Define the vSwitch Name
$vSwitchName = "Management Team"
Invoke-Command -ComputerName $servers -ScriptBlock {
    # Get the first 2 pNIC adapters on the system
    $NetAdapters = Get-NetAdapter | Where-Object Status -eq Up | Sort-Object Name | Select-Object -First 2
    # Create the VM Switch from those 2 adapters
    New-VMSwitch -Name $using:vSwitchName -EnableEmbeddedTeaming $TRUE -NetAdapterName $NetAdapters.Name
}
Next I will create the ConvergedSwitch running the following command. In this command we have included -AllowManagementOS = $False so it will not create our vNics. These we will create later for our SMB traffic.
# Define servers as variable
$Servers = "AzSHCI1"

# Define the vSwitch Name
$vSwitchName = "ConvergedSwitch"
Invoke-Command -ComputerName $servers -ScriptBlock {
    # Get the first 2 pNIC adapters on the system
    $NetAdapters = Get-NetAdapter | Where-Object Status -eq Up | `
        Where-Object { $_.Name -like "*3*" -or $_.Name -like "*4*" } | Sort-Object Name
    # Create the VM Switch from those 2 adapters
    New-VMSwitch -Name $using:vSwitchName -EnableEmbeddedTeaming $TRUE -NetAdapterName `
    $NetAdapters.Name -AllowManagementOS $FALSE
}
Not necessary but very useful we will rename our management virtual adapter that was created previously to Management Team.
$vSwitchName = "Management Team"
Rename-VMNetworkAdapter -ManagementOS -Name $vSwitchName `
    -NewName Management -CimSession $Servers
Now we will create our host virtual nics for storage. These will be called SMB01 and SMB02. These will be assigned to the ConvergedSwitch SET Team created earlier.
$vSwitchName = "ConvergedSwitch"
foreach ($Server in $Servers) {
    # Add SMB vNICs (number depends on how many pNICs are connected to vSwitch)
    $SMBvNICsCount = (Get-VMSwitch -CimSession $Server `
            -Name $vSwitchName).NetAdapterInterfaceDescriptions.Count
    foreach ($number in (1..$SMBvNICsCount)) {
        $TwoDigitNumber = "{0:D2}" -f $Number
        Add-VMNetworkAdapter -ManagementOS -Name "SMB$TwoDigitNumber" `
            -SwitchName $vSwitchName -CimSession $Server
    }
}
Now let’s look at the virtual network adapters I just created. This can be done by running the following PowerShell script:
Get-VMNetworkAdapter -CimSession $Servers -ManagementOS
The next step is to configure IP addresses for our storage networks. I want to replicate my environment as much as I can like a physical network so I will be using two separate storage subnets.
| Node | Name | IP Address | Subnet Mask | VLAN |
|---|---|---|---|---|
| AZSHCI1 | SMB01 | 172.16.1.1 | 24 | 1 |
| AZSHCI1 | SMB02 | 172.16.2.1 | 24 | 1 |
The following PowerShell script was used:
$StorNet1 = "172.16.1."
$StorNet2 = "172.16.2."
$IP = 1 # Starting IP
foreach ($Server in $Servers) {
    $SMBvNICsCount = (Get-VMSwitch -CimSession $Server -Name $vSwitchName).NetAdapterInterfaceDescriptions.Count
    foreach ($number in (1..$SMBvNICsCount)) {
        $TwoDigitNumber = "{0:D2}" -f $Number
        if ($number % 2 -eq 1) {
            New-NetIPAddress -IPAddress ($StorNet1 + $IP.ToString()) `
                -InterfaceAlias "vEthernet (SMB$TwoDigitNumber)" `
                -CimSession $Server -PrefixLength 24
        }
        else {
            New-NetIPAddress -IPAddress ($StorNet2 + $IP.ToString()) `
                -InterfaceAlias "vEthernet (SMB$TwoDigitNumber)" `
                -CimSession $Server -PrefixLength 24
            $IP++
        }
    }
}
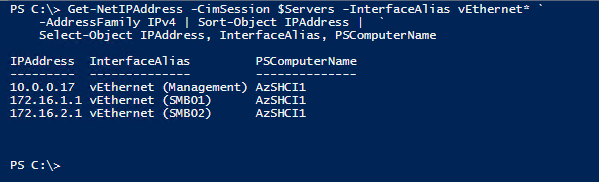
Now let’s validate these network configurations. I did so by running the following PowerShell command:
Get-NetIPAddress -CimSession $Servers -InterfaceAlias vEthernet* `
    -AddressFamily IPv4 | Sort-Object IPAddress |  `
    Select-Object IPAddress, InterfaceAlias, PSComputerName
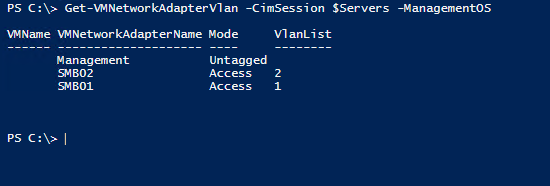
I went ahead and assigned VLANS to my storage network adapters. In my environment it isn’t necessary but it wouldn’t hurt. This is something that QoS will require if you are using QoS on physical host. This was don’t using the following code:
$StorVLAN1 = 1
$StorVLAN2 = 2

# Configure Odds and Evens for VLAN1 and VLAN2
foreach ($Server in $Servers) {
    $NetAdapters = Get-VMNetworkAdapter -CimSession $server -ManagementOS -Name *SMB* | Sort-Object Name
    $i = 1
    foreach ($NetAdapter in $NetAdapters) {
        if (($i % 2) -eq 1) {
            Set-VMNetworkAdapterVlan -VMNetworkAdapterName $NetAdapter.Name `
                -VlanId $StorVLAN1 -Access -ManagementOS -CimSession $Server
            $i++
        }
        else {
            Set-VMNetworkAdapterVlan -VMNetworkAdapterName $NetAdapter.Name `
                -VlanId $StorVLAN2 -Access -ManagementOS -CimSession $Server
            $i++
        }
    }
}
# Restart each host vNIC adapter so that the Vlan is active.
Get-NetAdapter -CimSession $Servers -Name "vEthernet (SMB*)" | Restart-NetAdapter
Let’s check out what we just did. I will run the following code:
Get-VMNetworkAdapterVlan -CimSession $Servers -ManagementOS
Now we need to map our storage vnics to use our physical nics within or ConvergedSwitch SET team. This was done running the following command:
Invoke-Command -ComputerName $servers -ScriptBlock {
    # Retrieve adapter names
    $physicaladapternames = (get-vmswitch $using:vSwitchName).NetAdapterInterfaceDescriptions
    # Map pNIC and vNICs
    $vmNetAdapters = Get-VMNetworkAdapter -Name "SMB*" -ManagementOS
    $i = 0
    foreach ($vmNetAdapter in $vmNetAdapters) {
        $TwoDigitNumber = "{0:D2}" -f ($i + 1)
        Set-VMNetworkAdapterTeamMapping -VMNetworkAdapterName "SMB$TwoDigitNumber" `
            -ManagementOS -PhysicalNetAdapterName (get-netadapter -InterfaceDescription $physicaladapternames[$i]).name
        $i++
    }
}
We can now confirm that this was completed by running the following command:
# Confirm it's completed
Get-VMNetworkAdapterTeamMapping -CimSession $servers -ManagementOS | `
    Format-Table ComputerName, NetAdapterName, ParentAdapter
The “Micheal Godfrey Why The Heck Didn’t You Use Network ATC” Way.
Just as I did above in the manual way, I am going to build out my solution using two intents. What is an intent you ask? Well, the Microsoft Learn Docs has that answer for you under the Definitions section of their Network ATC overview page. However, I am nice and will copy and paste that definition here:
Intent: An intent is a definition of how you intend to use the physical adapters in your system. An intent has a friendly name, identifies one or more physical adapters, and includes one or more intent types.
Intent: An intent is a definition of how you intend to use the physical adapters in your system. An intent has a friendly name, identifies one or more physical adapters, and includes one or more intent types.
There are a few different types of intents. There are many different ways to configure these intents as well. The configuration I will be using today will include will include a single intent for now.
Here I will create a single intent that will use my vmNic01 and vmNic02 for Compute and Management. Since this is a single node, we do not need to worry about storage. However, we do have plans to scale out this cluster at one point, which is why we will one day create a second intent for storage using vmnic03 and vmnic04. This would look a lot like what I created above in the manual steps.
So, unlike the manual configuration of our network, Network ATC is fast and very easy to configure. If I where deploying this on physical nodes the only command I would run at this point would look like this:
Add-NetIntent -Name ConvergedIntent -AdapterName vmNIC01, vmNIC02 -Management -Compute
For my environment, since these run on Virtual Machines, I do need to do an adapter override and disable Network Direct. So here is what I did to configure networking on my single node cluster:
First, we want to verify the adapters:
# - Verify Adapters
Invoke-Command -ComputerName $ClusterName -ScriptBlock {
    Get-NetAdapter -Name vmnic01, vmnic02 -CimSession (Get-ClusterNode).Name | Select Name, PSComputerName
    }
We should get a confirmation that these adapters are up and ready.
Now, the simple code that will save us so much time when configuring our networks.
# Configure Intent
#  Disable Network Direct Adapter Property - For Virtual Machines Only
# Note: This is not required for physical servers and since this is a single-node cluster, we will not use the vmnics for SMB traffic at this time.
Invoke-Command -ComputerName $servers -ScriptBlock {
    if ((Get-ComputerInfo).CsSystemFamily -eq "Virtual Machine") {
        $AdapterOverride = New-NetIntentAdapterPropertyOverrides
        $AdapterOverride.NetworkDirect = 0
        Add-NetIntent -Name ConvergedIntent -AdapterName vmNIC01, vmNIC02 -Management -Compute -AdapterPropertyOverrides $AdapterOverride
    }
}
Tada!! Just like that. So now we monitor our intent to make sure if provisioned correctly.
# - Validate Intent Deployment - #
Invoke-Command -ComputerName $servers -ScriptBlock {
    Get-NetIntent
    }
Invoke-Command -ComputerName $servers -ScriptBlock {
Get-NetIntentStatus -ClusterName $ClusterName -Name ConvergedIntent
}
Other Network Settings
There are a few other things that we would want to discuss if moving forward on Physical hardware. I would highly suggest looking at the Microsoft Learn Documentation and read up on the following:
- Jumbo Frames Settings
- RDMA
- Network QoS
- Datacenter Bridging (DCBX)
Create the Cluster
Now it is time to create out cluster. Again, if this was a two node or larger clusters we could do this via the Windows Admin Center. However, if you are deploying these and need more automation, PowerShell is the way to go. Since I am only deploying a single node at this time, PowerShell is the only way to go.
Creating the cluster if actually fairly simple. The following PowerShell script will create the cluster for me.
$ClusterName = "AzSHCI-Cluster"
$Servers = "AzSHCI1"

# Test Cluster first
Test-Cluster -Node $servers -Include "Storage Spaces Direct", "Inventory", "Network", "System Configuration", "Hyper-V Configuration"

# Cluster with Distributed Domain Name
New-Cluster -Name $ClusterName -Node $servers -ManagementPointNetworkType "Distributed"
Storage Spaces Direct
Now it is time to get our storage ready. If this was a physical cluster the following script would be necessary to help get us started in a clean state. This script is similar to one that I would run when I was building out S2D clusters before Azure Stack HCI. I do have to warn you. Do not do what I did with this script!!! Let’s just say, if it is 2:30 AM and you are burning the midnight oil to meet some deadlines. Make sure, please make sure that the variable for $Servers is set correctly. It would be very easy to wipe an entire HCI cluster, as in my case an entire S2D cluster running all my management tools in less than a few minutes.
It won’t hurt to run this on our virtual environment so here is the PowerShell script:
$Servers = "AzSHCI1"

Invoke-Command ($Servers) {
    # Retrieve any existing virtual disks and storage pools and remove
    Update-StorageProviderCache
    Get-StoragePool | Where-Object IsPrimordial -eq $false | `
        Set-StoragePool -IsReadOnly:$false -ErrorAction SilentlyContinue
    Get-StoragePool | Where-Object IsPrimordial -eq $false | `
        Get-VirtualDisk | Remove-VirtualDisk -Confirm:$false -ErrorAction SilentlyContinue
    Get-StoragePool | Where-Object IsPrimordial -eq $false | `
        Remove-StoragePool -Confirm:$false -ErrorAction SilentlyContinue

    # Reset the disks
    Get-PhysicalDisk | Reset-PhysicalDisk -ErrorAction SilentlyContinue

    # Prepare the disks
    Get-Disk | Where-Object Number -ne $null | Where-Object IsBoot -ne $true | `
        Where-Object IsSystem -ne $true | Where-Object PartitionStyle -ne RAW | `
        ForEach-Object {
        $_ | Set-Disk -isoffline:$false
        $_ | Set-Disk -isreadonly:$false
        $_ | Clear-Disk -RemoveData -RemoveOEM -Confirm:$false
        $_ | Set-Disk -isreadonly:$true
        $_ | Set-Disk -isoffline:$true
    }
    Get-Disk | Where-Object Number -ne $Null | Where-Object IsBoot -ne $True | `
        Where-Object IsSystem -ne $True | Where-Object PartitionStyle -eq RAW | `
        Group-Object -NoElement -Property FriendlyName
} | Sort-Object -Property PsComputerName, Count
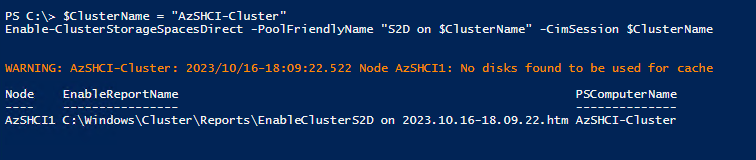
So the next step I will take is to enable Storage Spaces Direct on our cluster running the following PowerShell command:
$ClusterName = "AzSHCI-Cluster"
Enable-ClusterStorageSpacesDirect -PoolFriendlyName "S2D on $ClusterName" -CimSession $ClusterName
Register The Cluster
In my previous blog I walked through registering an HCI cluster with Azure using the Windows Admin Center. In the blog I will walk through doing the same via PowerShell.
I started by downloading and installing the required Azure Stack HCI PowerShell module and it’s dependencies. Then I logged into my Azure tenant:
$ClusterName = "AzSHCI-Cluster"
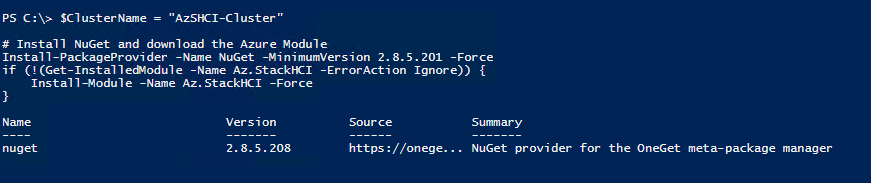
# Install NuGet and download the Azure Module
Install-PackageProvider -Name NuGet -MinimumVersion 2.8.5.201 -Force
if (!(Get-InstalledModule -Name Az.StackHCI -ErrorAction Ignore)) {
Install-Module -Name Az.StackHCI -Force
}
# Download Azure Accounts module
if (!(Get-InstalledModule -Name az.accounts -ErrorAction Ignore)) {
Install-Module -Name Az.Accounts -Force
}
# Login to Azure
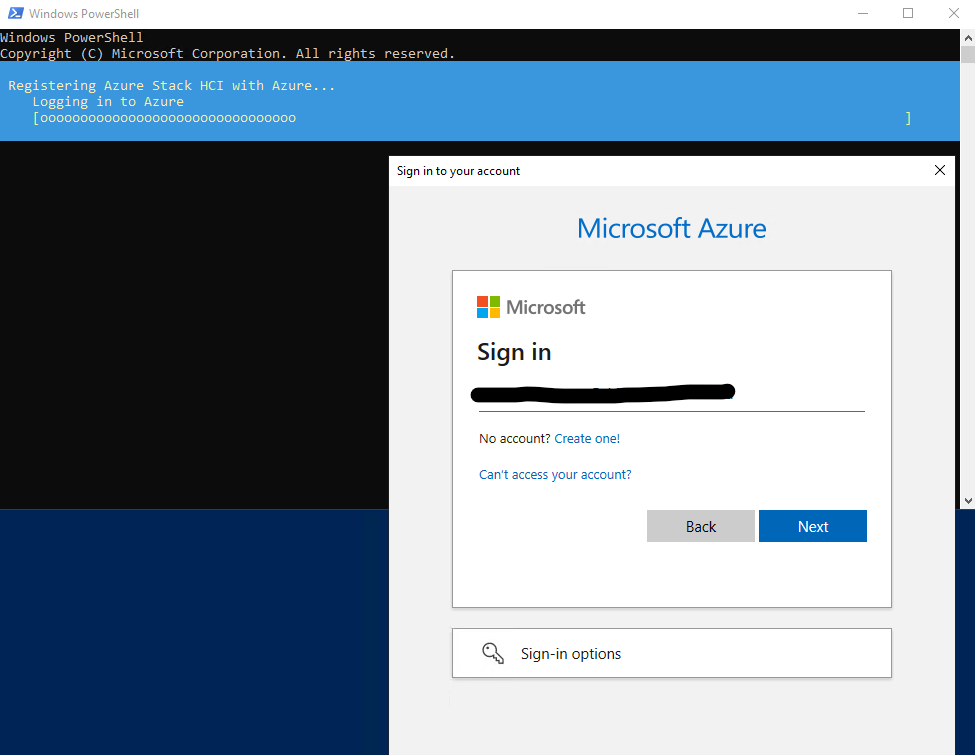
Login-AzAccount -UseDeviceAuthentication

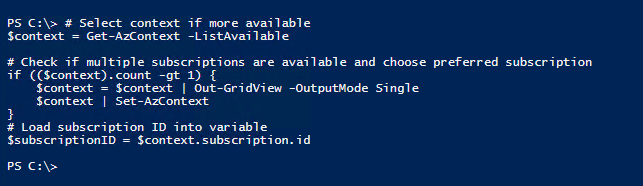
We then need to get our preferred subscription. I only have one with this account but like my work account I may have access to many subscriptions. We can do this by running the following PowerShell:
# Select context if more available
$context = Get-AzContext -ListAvailable

# Check if multiple subscriptions are available and choose preferred subscription
if (($context).count -gt 1) {
    $context = $context | Out-GridView -OutputMode Single
    $context | Set-AzContext
}
# Load subscription ID into variable
$subscriptionID = $context.subscription.id
Here we will define the resource group where our cluster resources are going to be located. We will also install the Az.Resources module in order to create the resource group in Azure.
# Define the Azure resource group name (Customizable)
$ResourceGroupName = $ClusterName + "_Rg"
# Install the Az.Resources module to create resource groups
if (!(Get-InstalledModule -Name Az.Resources -ErrorAction Ignore)) {
Install-Module -Name Az.Resources -Force
}
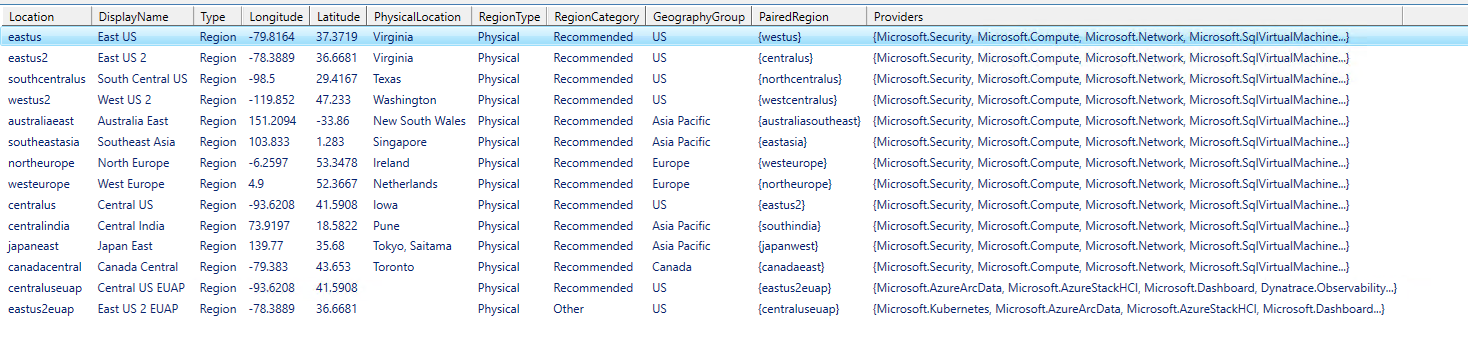
# Display and select location for registered cluster (and RG)
$region = (Get-AzLocation | Where-Object Providers -Contains "Microsoft.AzureStackHCI" `
| Out-GridView -OutputMode Single -Title "Please select Location for Azure Stack HCI metadata").Location
# Create the resource group to contain the registered Azure Stack HCI cluster
if (-not (Get-AzResourceGroup -Name $ResourceGroupName -ErrorAction Ignore)) {
New-AzResourceGroup -Name $ResourceGroupName -Location $region
}
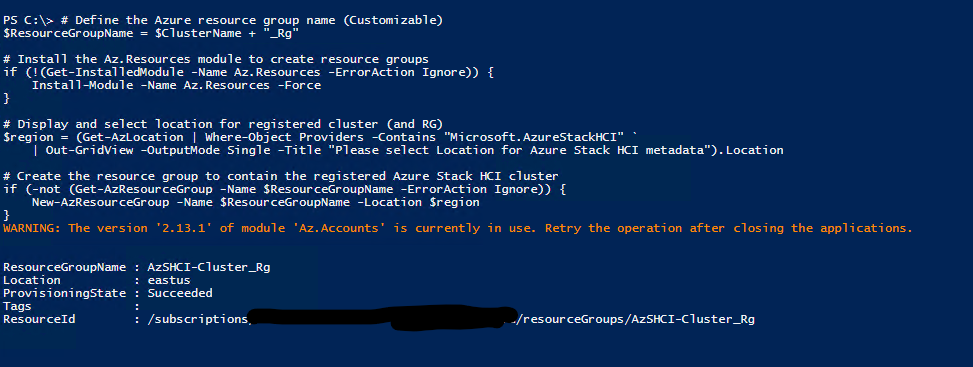
Once the script runs it will prompt us for our location. Select the location.
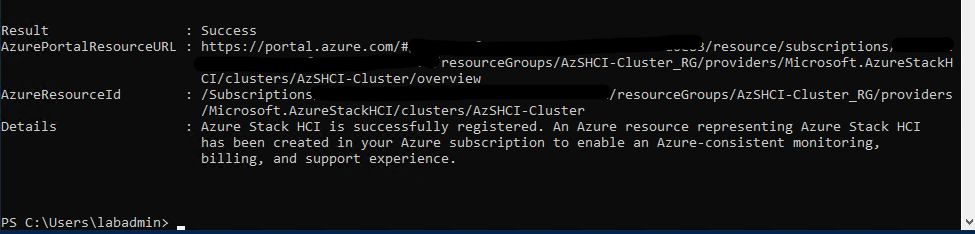
Finally we can run the command to register our cluster:
Register-AzStackHCI -SubscriptionId $subscriptionID -ComputerName $ClusterName -Region "eastus" -ResourceName $ClusterName -ResourceGroupName $ResourceGroupName
We will be prompted to give our tenant credentials.

Once the registration process has ended we should the following screen:
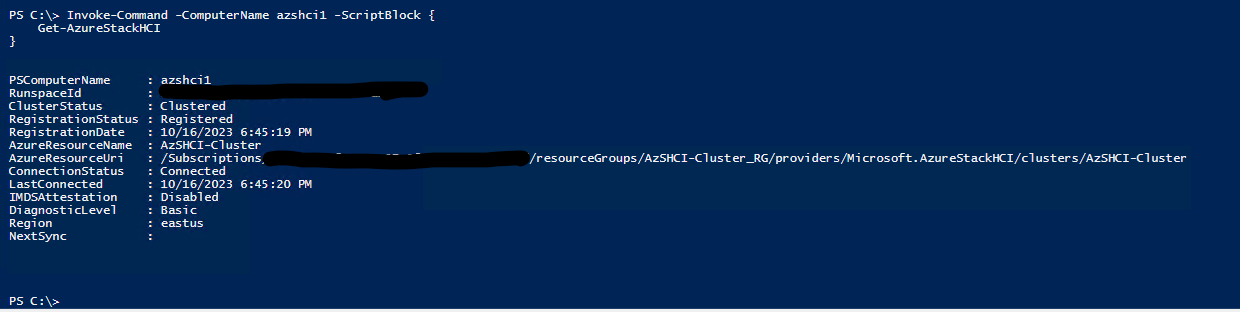
To check that the system has been registered we can also run the following command:
Invoke-Command -ComputerName azshci1 -ScriptBlock {
    Get-AzureStackHCI
}
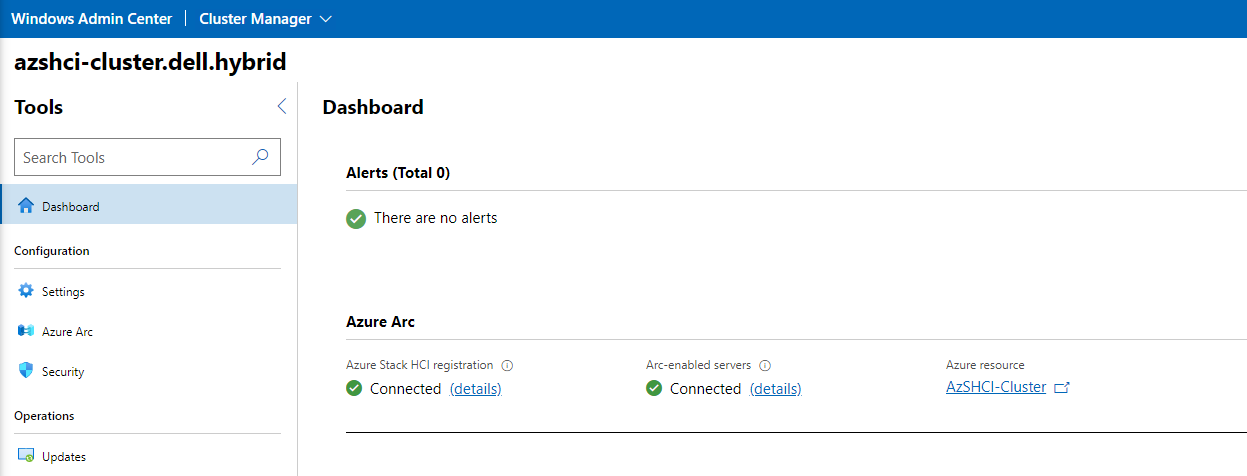
We can also go into our Windows Admin Center (Once we have the WAC registered and our Cluster added to the WAC) and see within the dashboard for the cluster that the cluster is connected as an Azure Stack HCI resource and that Arc enabled servers will be enabled. If following this blog, we will register the WAC and add the cluster to the WAC later in this blog.
Within about 15 minutes our resources should also show up in the Azure portal. The single node itself will show up as an Azure Arc-enabled managed server and our cluster should show up as an managed cluster under Azure Stack HCI section under Infrastructure.

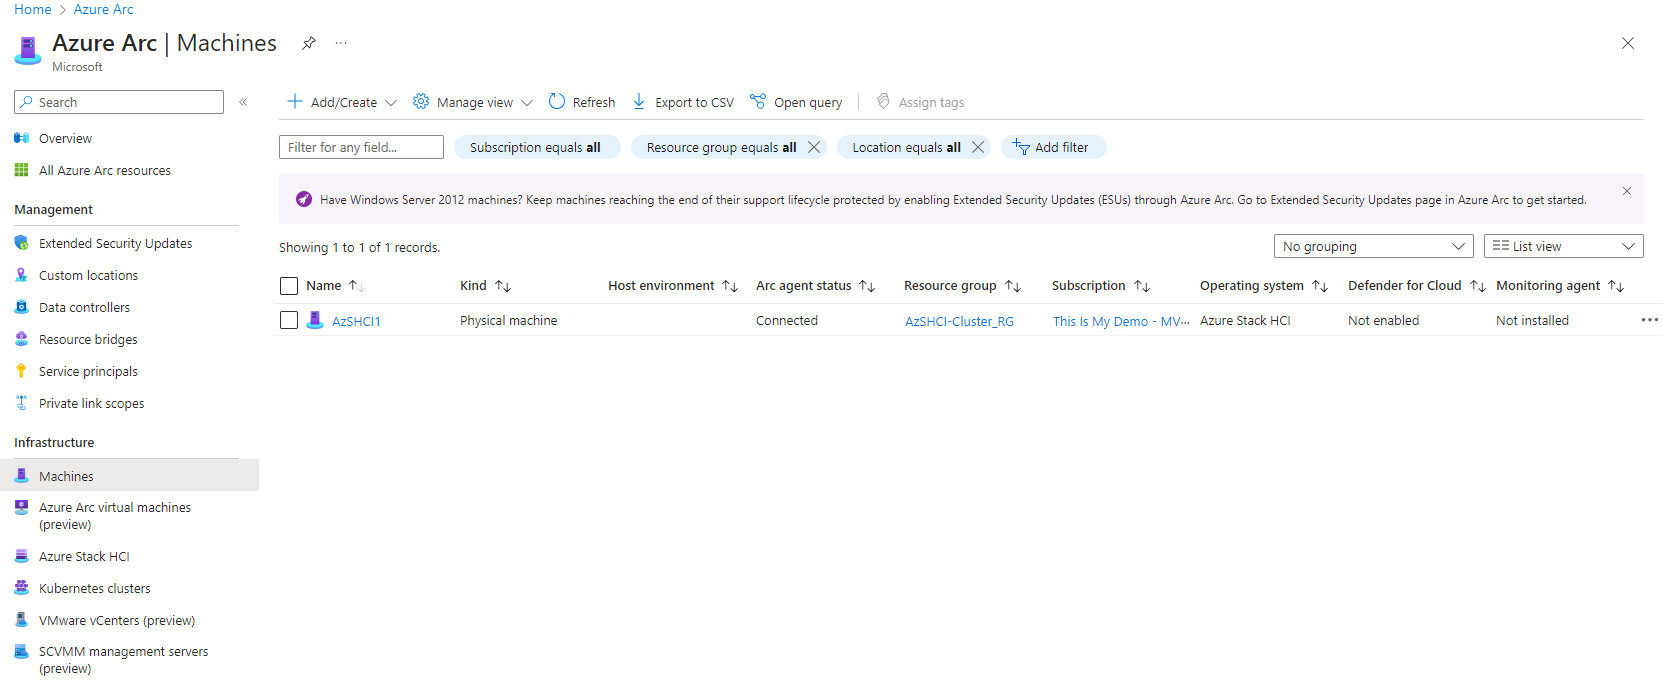
From here we can manage both our cluster and our nodes from the Azure Portal. This will be covered in a future blog.
Register the Windows Admin Center (WAC)
So we still need to register out Windows Admin Center if we haven’t done so yet. don’t get this confused with the registration of our Azure Stack HCI Cluster. These are two different processes. For this we will go into our Windows Admin Center portal and register it from there.
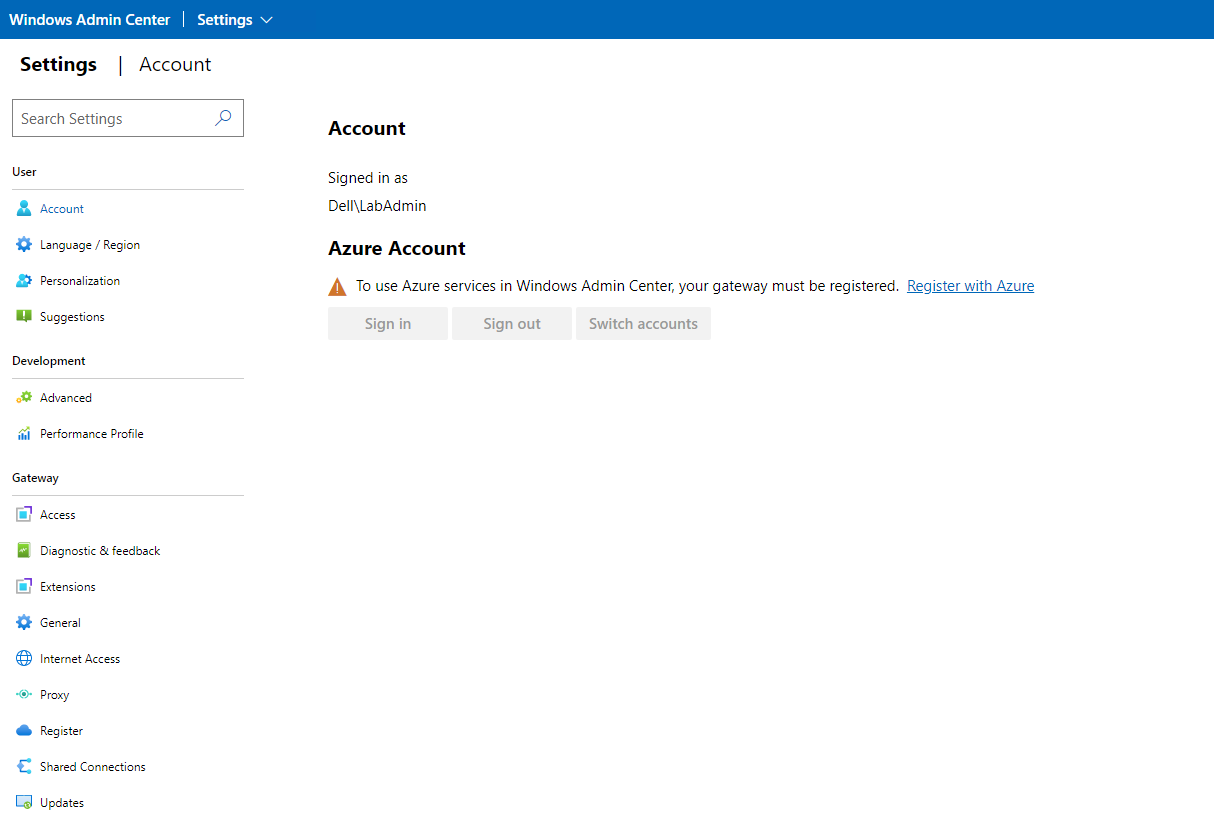
If this had been a multi-node cluster this is where I would have created my cluster witness. Since this is just a single node cluster I will not create the cluster witness. However, once I add that second node I will need to create a cluster witness. When we first log on to our WAC portal and go to settings we should see that we are signed in under our local domain account but not signed into an Azure Account.
On the settings blade, if we go down to Register under the Gateway section we will see the prompt to register this instance of the Windows Admin Center.
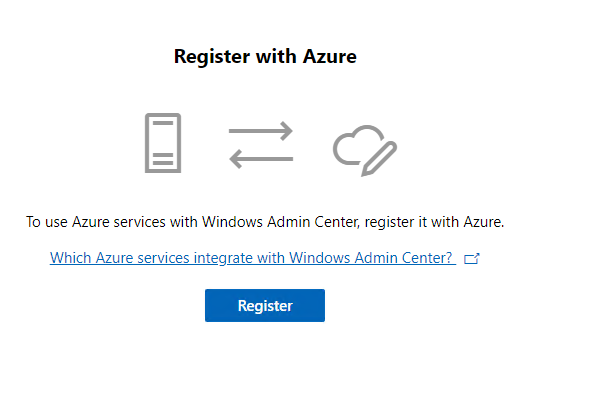
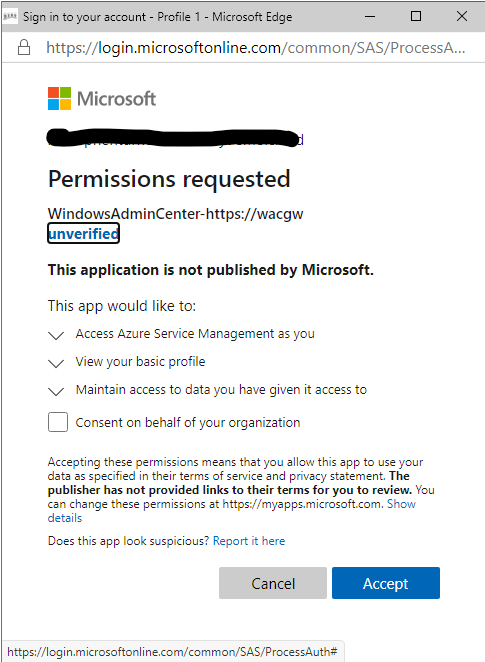
At this point, it will authenticate us and sign us into our Azure Tenant.

Once that is done, on the far right, a new blade will pop up asking for some information. Here we will select which Azure Cloud, for myself I will select Azure Global. It will provide a Code, once you click on copy, an Edge browser will start directing you to microsoft.com/devicelogin where you will enter the code provided, then sign on into your tenant. Here we have a choice, I could either use an existing Azure Active Directory Application or have one created. In this case, I just had it create a new one for me. In a production environment, we should be using a pre-created application that also has specific roles assign to it. Finally we click connect.
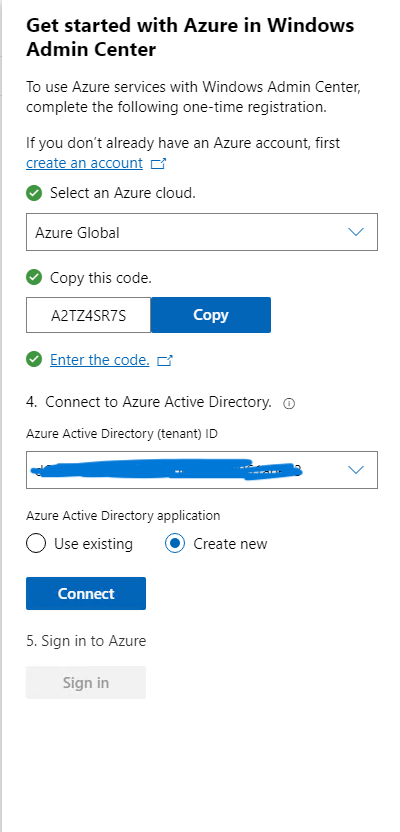
The next prompt is to allow permissions to our tenant for this application. Click on Consent and click accept.
Once we have signed on, it takes a few seconds. We can go back to our portal and we can now see that we are registered with Azure and connected.
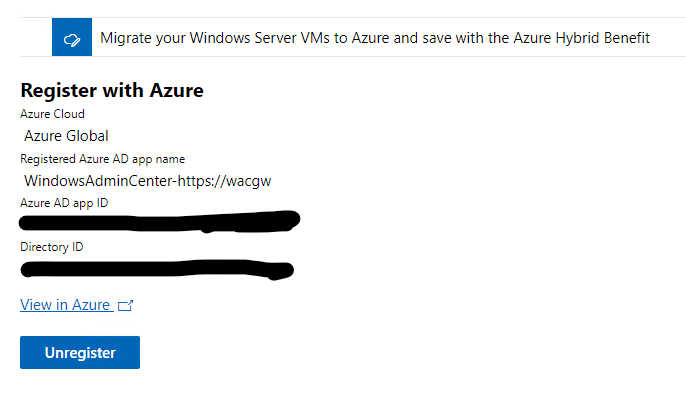
So now our WAC instance is registered and our cluster is also registered with Azure. We can move forward with some other configurations as well as creating some volumes for our VM storage.
Add Cluster To WAC
One thing I will need to do is add this cluster and the nodes to my Windows Admin Center so I can do some work that needs to be done. Like creating volumes and configuration some setting from within a GUI interface.
We need to click on the downward error next to Windows Admin Center and select All Connections.
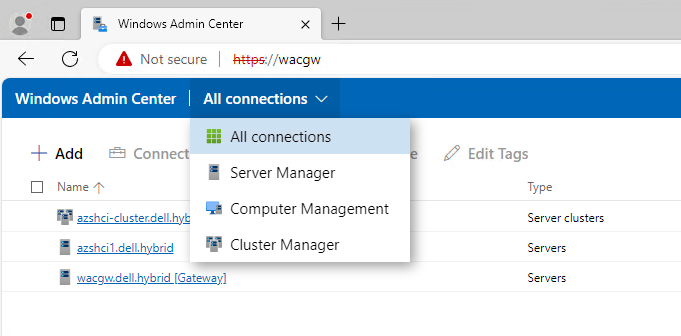
Then click Add. From here we will select Add under server clusters.
The blade to the far right will pop up. Here I will enter my newly created custer name. It should find the cluster. I will tag the connections with the cluster name and I will also add the nodes that are part of this cluster to WAC as well.
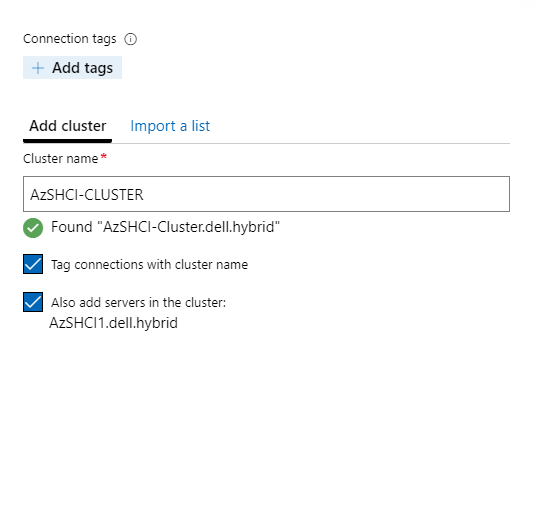
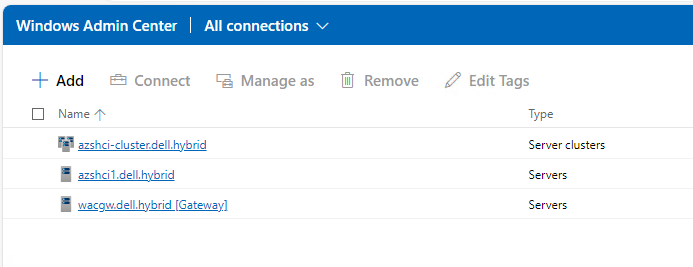
Now we should be able to see our newly added cluster and our first node in our WAC instance. We are now ready to start configuing this cluster either in PowerShell or the Windows Admin Center.
Creating Volumes
So now we have our cluster running with a single node. We can manage it via the Azure Portal, via Windows Admin Center, or PowerShell at this time. We have storage spaces direct enabled but we don’t have any volumes created. We can easily create volumes in the WAC or in Powershell. I will be creating two 1TB volumes, one from PowerShell and the other from the WAC.
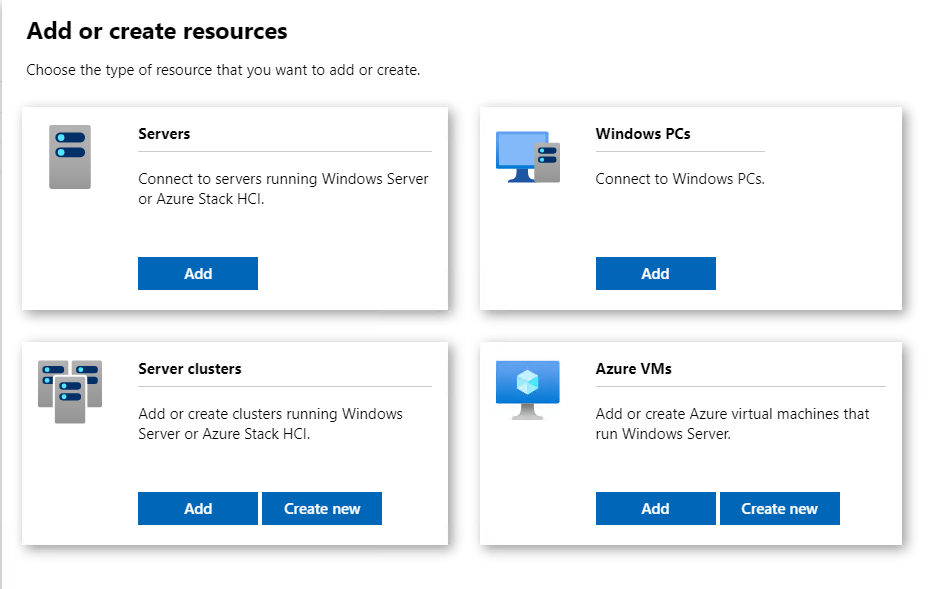
Create Volume using WAC
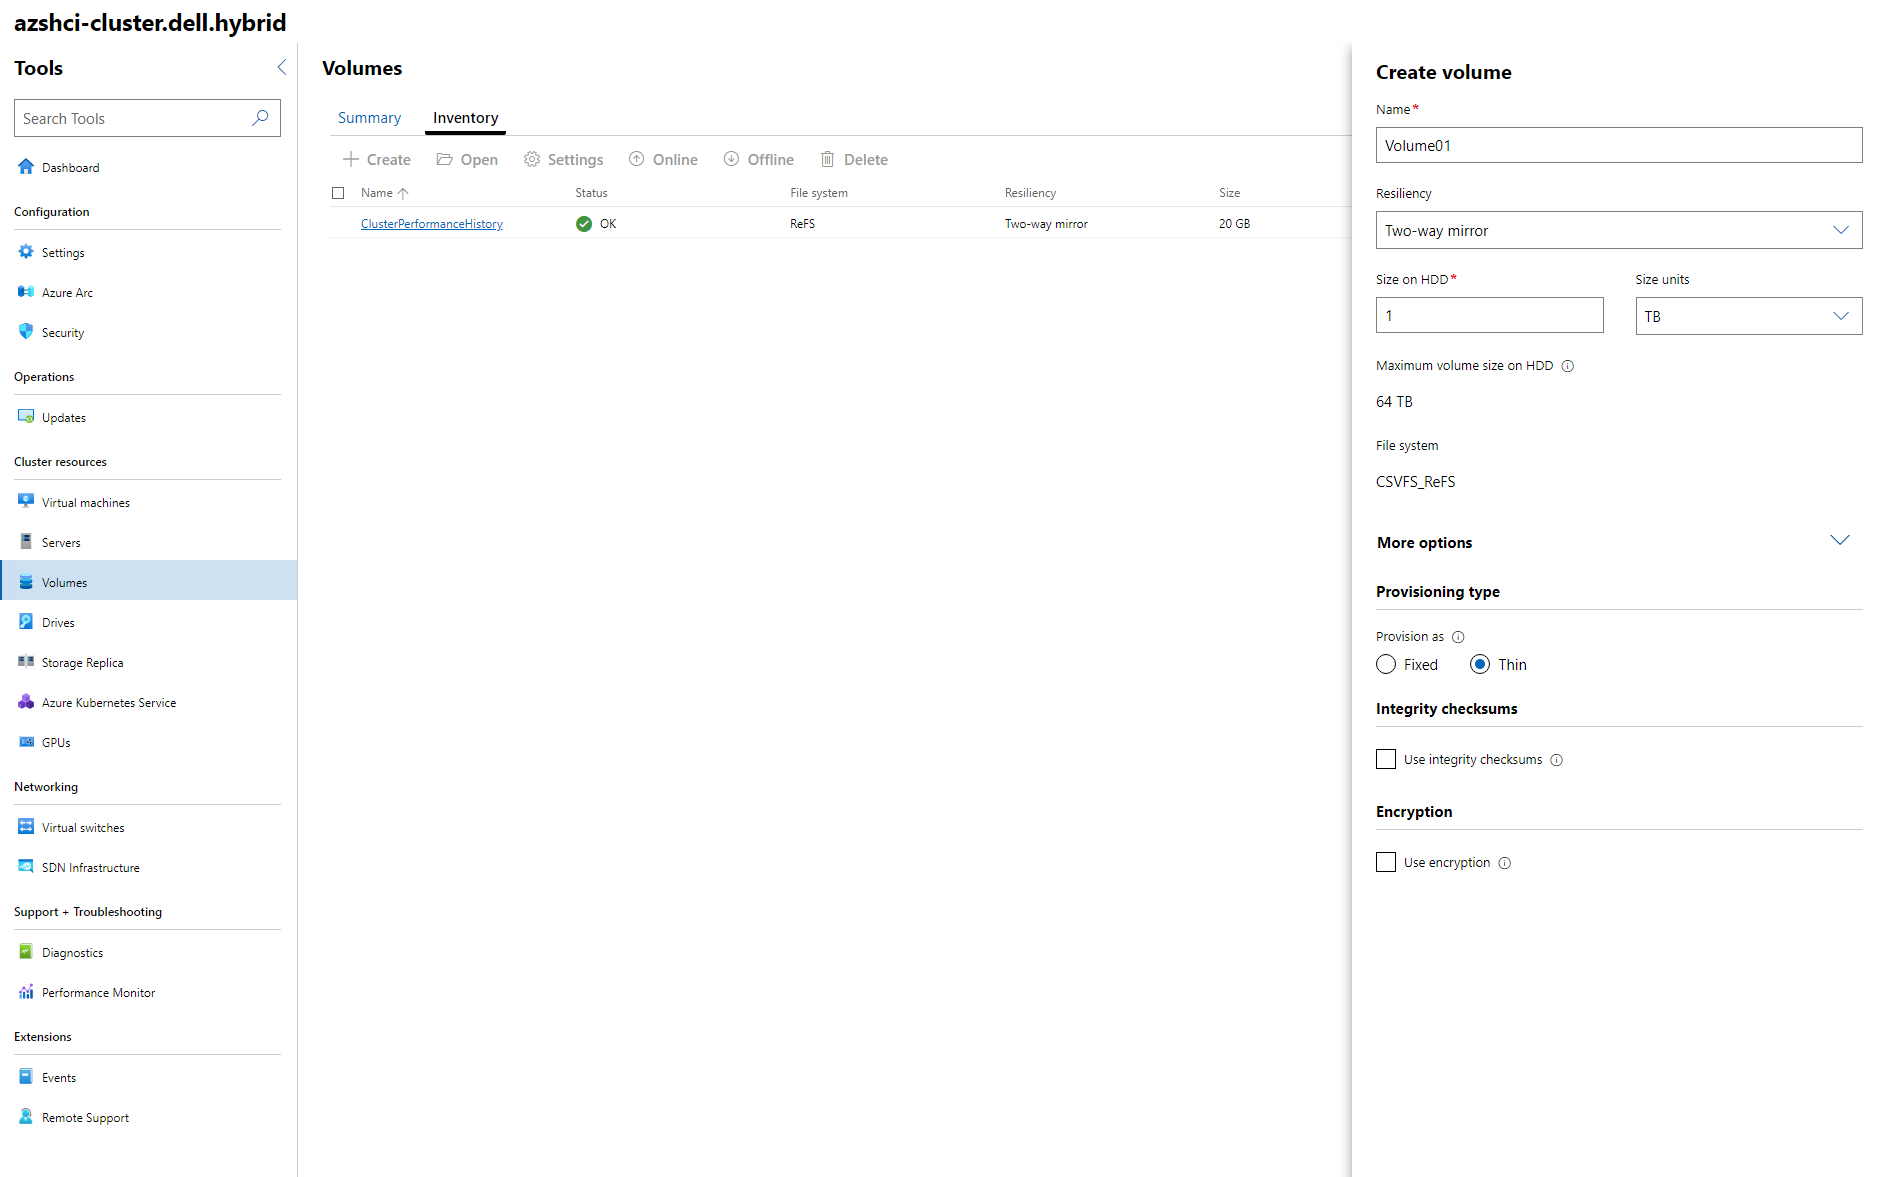
Once we have logged on to our Windows Admin Center, if we go to our cluster using the drop down at the top left, then select All connections. We will see our newly added custer AZSHCI-Cluster. Click on the cluster and it will bring up the dashboard for that cluster. On the left menu, under cluster resources, we will see a volumes. I will click on that and we will first see the summary of our volumes. Currently there should only be one volume, which we can see under the Inventory tab. From here, click on Create on the top menu.
- For Name I will name my first volume Volume01.
- Under Resiliency, since this is a single node, we will only have the availability to select two-way mirror.
- Size I added 1 TB
Under more options I made sure I selected Then provisioning.
Create Volume using PowerShell
Now while we wait for the Volume to be created from the WAC. I am going to use PowerShell to create a second volume called Volume02. The following script will produce the same type and sized volume as we created in the WAC earlier.
$ClusterName = "AzSHCI-Cluster"
New-Volume -CimSession $ClusterName -FileSystem CSVFS_ReFS `
    -StoragePoolFriendlyName S2D* -Size 1TB -FriendlyName "Volume02" `
    -ResiliencySettingName Mirror -ProvisioningType Thin

Once the script has ran we can return to our WAC instance and see the two newly created volumes.
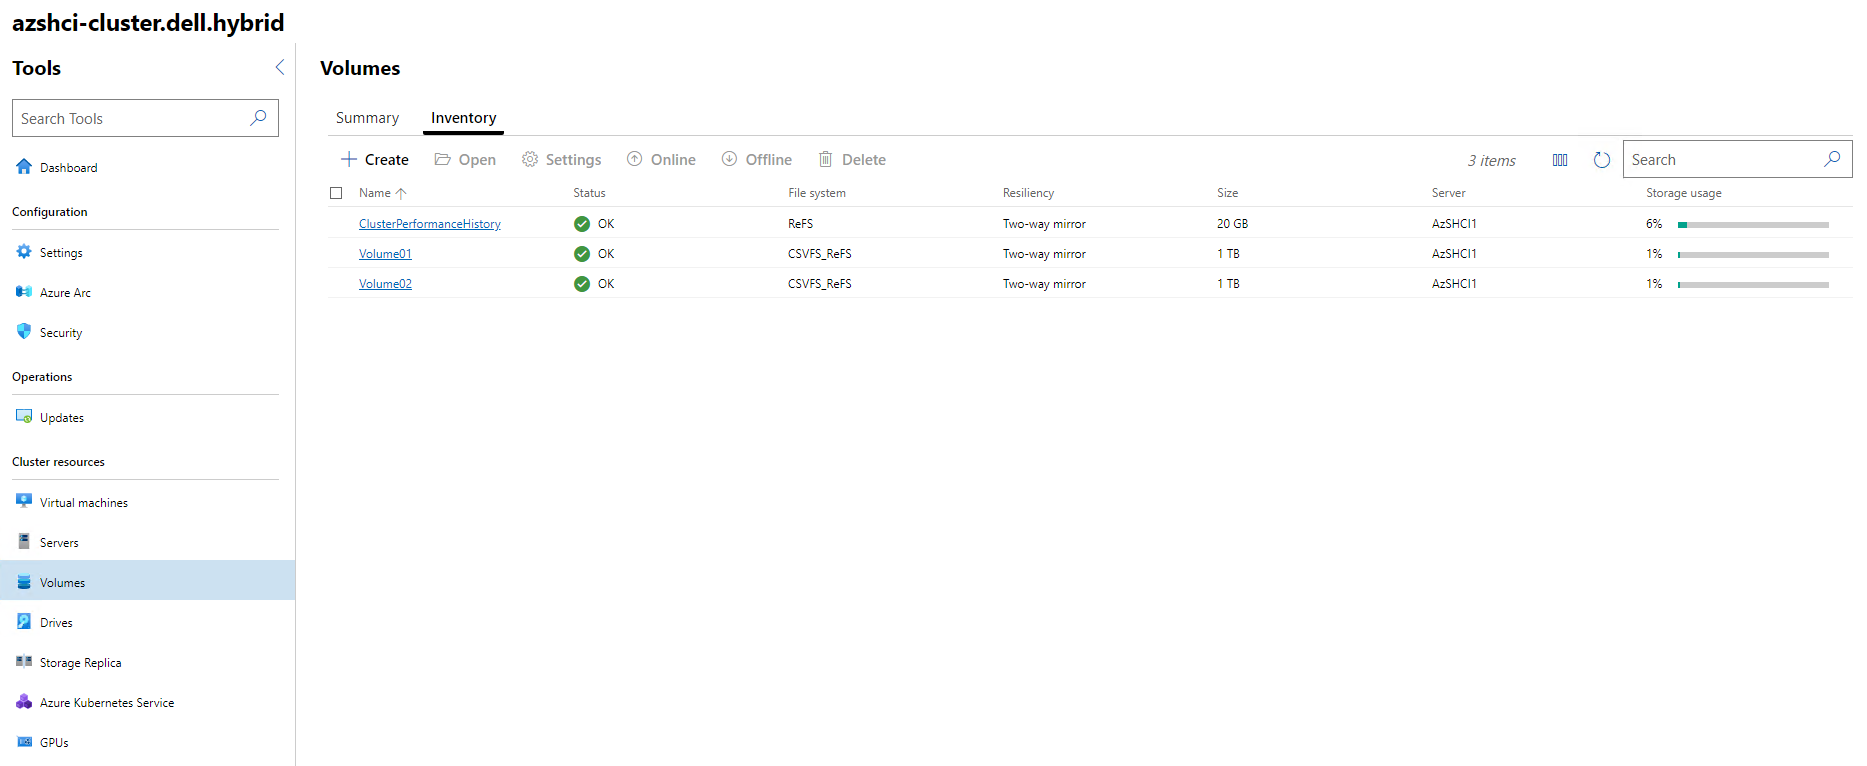
We now have our volumes created and we are ready to configure a few settings for our cluster.
More Settings
Storage Settings
So let’s look at some storage settings that we can configure. The first section that may be of interested is the In-Memory cache section. This can be found under Settings within our Cluster Dashboard.
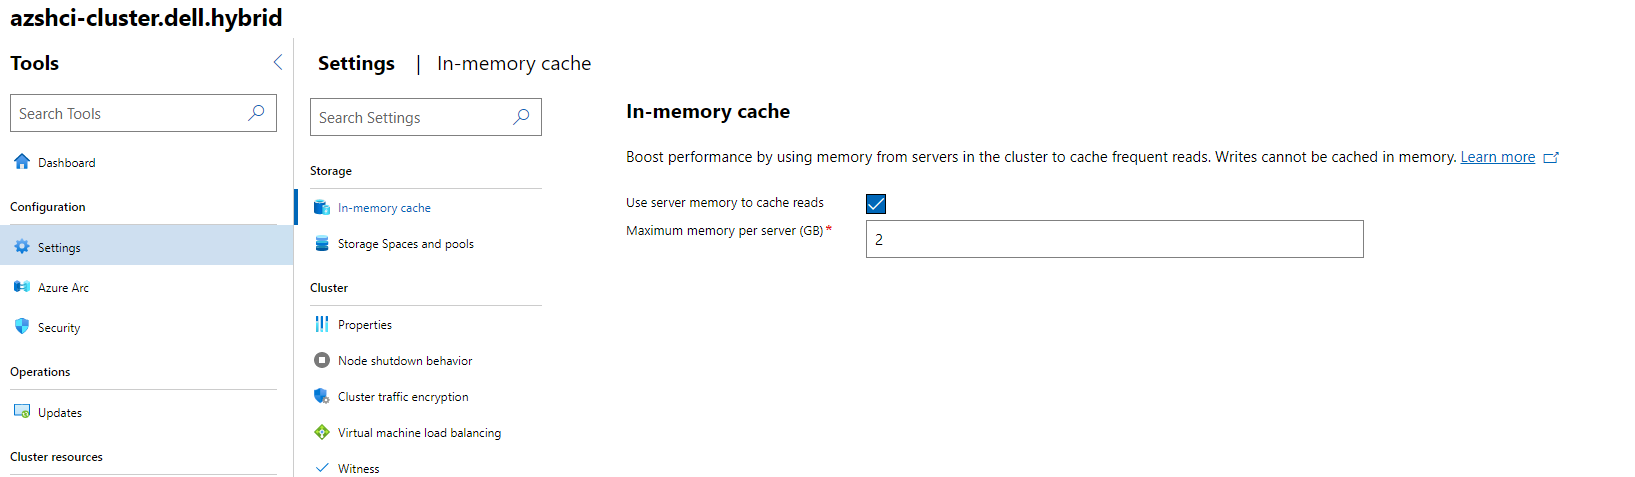
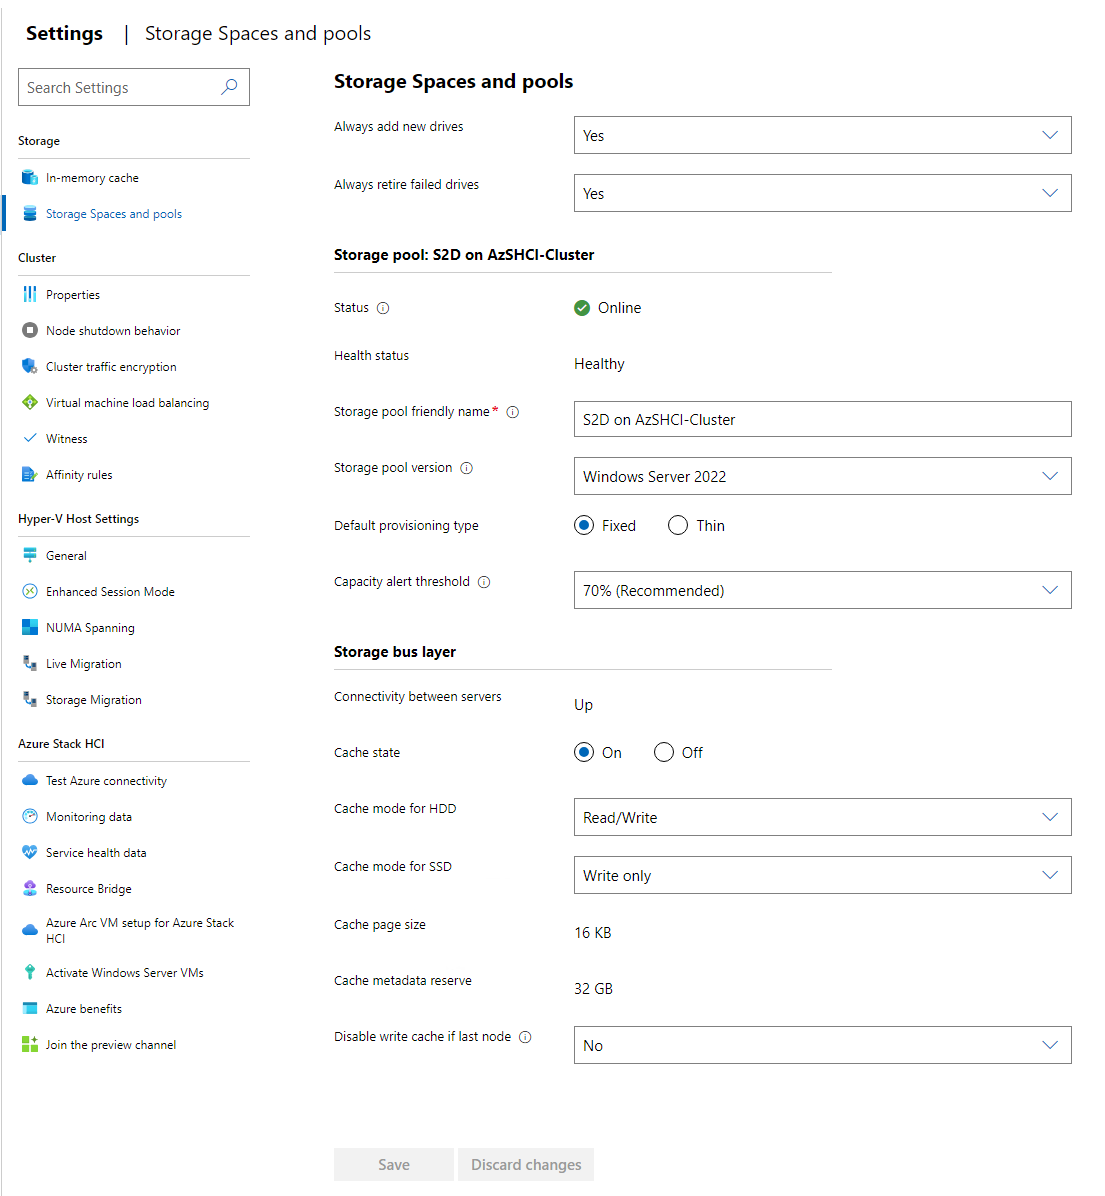
We also have settings for storage spaces and pools. Here we can configure things like the storage pool friendly name. We can change the mean name. (kidding) We can set default provisioning type for all volumes created. The version of storage pools, and configure the capacity alert threshold. For my demo environment I will not change anything here.
Settings to think about
We are pretty much done with my first deployment of my first node. There are some more settings I would call out to at least look at for your deployments.
- Deduplication and Compression
- Cluster traffic encryption
- Affinity Rules
- Live Migration settings
- Hyper-V VM and Data locations
Final Thoughts
So, I do want to stress. This deployment I just walked through is not production ready. It will be good for getting your feet wet with Azure Stack HCI. For most of use we don’t have a lot of hardware that would be supported for HCI sitting around. We may have an older server we can run as a single node, even deploy this same solution on that single physical server to have a multi-node solution, or use an AzureVM which can be very expensive. This blog I hope helped someone get an idea of that they would need to do to get started. Moving forward, I will blog about scaling out this single node cluster to a two node cluster and then to a three and four node cluster after that.
Also, this blog just touches on the deployment of an Azure Stack HCI cluster. There is so much more and we can really go into depth of what Azure Stack HCI can do along with Azure Arc. I will be blogging a lot on these subjects moving forward.
